-
Notifications
You must be signed in to change notification settings - Fork 0
Training U Net models
- Introduction
- How to set up the training environment
- Project structure
- Step-by-step tutorial for generating data and training a new model
- Description of training data output
- Configuring the model training
This document explains how to generate training data and use this data to train new instances of the U-Net model used by MoMA.
MoMA uses a U-Net (a type of convolutional neural network) to process phase contrast (PhC) images to make predictions of where cells are located within the input image. The U-Net model outputs a probability map for each frame of the input movie, which is an image with pixel values between 0 and 1 indicating the probability that the pixel is part of a cell.
By training the U-Net model with additional ground-truth data, we can adapt the U-Net model to new appearances of cell and growth lane, which result from e.g. antibiotic treatment and changes in the mother machine design.
This project is written in Python and uses the Conda package management tool for handling dependencies.
The Conda is not available on Scicore as a Lmod module. You therefore need to install it by following these steps:
-
Login to Scicore with SSH.
-
Download Miniconda (see here: https://docs.conda.io/en/latest/miniconda.html) and start the install process:
# download installer
wget https://repo.anaconda.com/miniconda/Miniconda3-latest-Linux-x86_64.sh
# make installer exectuable
chmod +x https://docs.conda.io/en/latest/miniconda.html
# start installation
./Miniconda3-latest-Linux-x86_64.sh
-
Select the default install path:
~/miniconda3 -
Select 'yes', when asked, if you want to initialize the bash.
-
Validate the installation after it finishes:
-
Start a new terminal. The prompt should now show "(base)", which indicates the Conda base environment.
-
Open
~/.bashrcand confirm that the following lines were added after the Miniconda3 installation:# >>> conda initialize >>> # !! Contents within this block are managed by 'conda init' !! __conda_setup="$('/scicore/home/nimwegen/micuby52/miniconda3/bin/conda' 'shell.bash' 'hook' 2> /dev/null)" if [ $? -eq 0 ]; then eval "$__conda_setup" else if [ -f "/scicore/home/nimwegen/micuby52/miniconda3/etc/profile.d/conda.sh" ]; then . "/scicore/home/nimwegen/micuby52/miniconda3/etc/profile.d/conda.sh" else export PATH="/scicore/home/nimwegen/micuby52/miniconda3/bin:$PATH" fi fi unset __conda_setup # <<< conda initialize <<<
-
Check that you can list the Conda environments:
conda env list
-
Note:
There exists the option to not activate the Conda 'base' environment by
default, in case you do not want this. This can be done by running
conda config --set auto_activate_base falseafter the installation (as explained at the end of the Condas installation process). However, I have not tested this.
After installing the Conda package manager, you can install the deepmoma Conda environment, which we will use for generating training data and training:
-
The project directory for doing model training is located here:
/scicore/home/nimwegen/GROUP/Moma/Unet_Training/00_deep_moma
-
Open a new terminal on Scicore and install the Conda environment
deepmoma:cd /scicore/home/nimwegen/GROUP/Moma/Unet_Training/00_deep_moma/install ./conda_setup.shThe setup process can take a long time to complete (~30mins, depending on the network performance on Scicore).
-
Check that the deepmoma environment is listed in the existing environments:
conda env list
The project directory for doing model training is located here on Scicore:
/scicore/home/nimwegen/GROUP/Moma/Unet_Training/00_deep_momaThe folder structure of the U-Net training project looks like this:
$ tree -F -L 1 00_deep_moma
00_deep_moma
├── 00_raw_data/
├── 01_training_data/
├── 02_model_training/
├── 03_model_evaluation/
├── 04_exploration_and_debugging/
├── 05_testing/
├── 06_image_analysis/
├── 07_notebooks/
├── deep_moma/
└── install/
These are the directories that are relevant for generating training data and performing training:
- 00_raw_data : This directory contains training data that is
generated from experimental data in the directory:
/scicore/home/nimwegen/GROUP/MM_DataIt contains sub-directories for different types of training data (e.g. different treatment with different antibiotics, different Mother machine design, etc.). - 01_training_data : This directory contains definitions of training
datasets that are created using the data in
00_raw_data. They are CSV files that define which GLs in00_raw_databelong to a given dataset. - 02_model_training : This directory contains the code to run the training as well as the corresponding models.
- deep_moma : Directory containing the Python modules used in the project.
- Remaining directories: These directories are for doing e.g. image analysis for generating the training data, evaluating the performance of trained models, etc. They are not immediately relevant in the context of training U-Net.
The folder 00_raw_data contains sub-directories for different types of
training data (e.g. different treatment with different antibiotics,
different Mother machine design, etc.):
$ lsdoc 00_raw_data/

00_tilted_not_overlapping/
01_straight_tight/
02_filaments/
03_empty_channels/
04_stationary_phase/
05_inhomogeneous_phase_contrast_intensity/
06_with_reservoirs/
07_with_reservoir_antibiotics/
08_exported_from_moma/
09_ladder_chip_design/
Each of the sub-directories contains a set of GLs that were copied with a Python script from experimental data located in `/scicore/home/nimwegen/GROUP/MM_Data` (see below an example of antibiotics training dataset with subfolders for Gentamicin and Ciprofloxacin):
$ tree -L 2 00_raw_data/07_with_reservoir_antibiotics
00_raw_data/07_with_reservoir_antibiotics
├── 00_gentamicin
│   ├── thomas_20200910
│   └── thomas_20200922
└── 01_ciprofloxacin
    ├── thomas_20200910
    └── thomas_20200922
Each of these sub-directories contains further sub-directories for different versions of the training dataset along with the corresponding version of the Python script that was used to generate the training data:
$ lsdoc 00_raw_data/09_ladder_chip_design/bor__20230426_18/

generate_dataset_normalized_v000/
generate_dataset_normalized_v000.py
generate_dataset_normalized_v001/
generate_dataset_normalized_v001.py
The files `generate_dataset_normalized_v000.py` and
`generate_dataset_normalized_v001.py` are the Python scripts that
generated the corresponding folder with the training data.
This directory contains definitions of training datasets, which are
stored as CSV files inside the subfolder
00_data_for_segmentation_models:
$ lsdoc 01_training_data/00_data_for_segmentation_models/

...
dataset_20210709-160705_3c7baeac.csv
dataset_20210709-160705_3c7baeac__curated.csv
dataset_20210713-121350_748ebf76__curated.csv
dataset_20210713-125007_729710b4.csv
dataset_20210713-125007_729710b4__curated.csv
dataset_20210713-125007_729710b4__curated__plus_single_gl_with_ladder_chip_design.csv
dataset_20210713-125007_729710b4__curated__v001.csv
dataset_20210713-125007_729710b4__curated__v001__with__generate_dataset_for_testing_curated_gls_v000.csv
dataset_20210713-125007_729710b4__curated__v001__with__generate_dataset_for_testing_curated_gls_v001.csv
dataset_20210713-125007_729710b4__curated__v001__with__generate_dataset_for_testing_curated_gls_v002.csv
dataset_20210713-125007_729710b4__curated__v001__without_antibiotics_data.csv
dataset_20210713-125007_729710b4__curated__v001__without_reservoir_data__without_antibiotics_data.csv
dataset_20230509-173823_98521530_dirty.csv
dataset_20230509-174435_a9613ae5.csv
dataset_20230509-174435_a9613ae5__curated.csv
dataset_20230509-203746_dd2519fb.csv
dataset_20230509-203746_dd2519fb__curated.csv
dataset_20230509-205401_6e871ab0.csv
dataset_20230509-205401_6e871ab0__curated.csv
...
Each of these CSV files defines a set of GLs that belong to the dataset:
$ cat 01_training_data/00_data_for_segmentation_models/dataset_20230509-174435_a9613ae5.csv | head -n10
type;dataset;pos_nr;gl_nr;frames;is_empty;path
training;00_tilted_not_overlapping/00_gwendolin_20170512_MM_recA_recN_lexA_high_8channels_design;1;16;114;False;00_tilted_not_overlapping/00_gwendolin_20170512_MM_recA_recN_lexA_high_8channels_design/updated_dataset_normalized__20210712-151323_18ce4a73/Pos1_GL16
...
validation;09_ladder_chip_design/bor__20230426_18;os002;33;25;False;09_ladder_chip_design/bor__20230426_18/generate_dataset_normalized_v001/1-Pos002_GL33
testing;09_ladder_chip_design/bor__20230426_18;os003;27;59;False;09_ladder_chip_design/bor__20230426_18/generate_dataset_normalized_v001/1-Pos003_GL27
The CSV file contains the following columns:
- type: defines, if a GL belongs to either the training, validation, or test dataset.
- dataset: string identifier of the dataset.
- pos_nr: position number of the GL
- gl_nr: number of the GL within the position
- frames: number of images from the GL
- is_empty: indicates if the GL contains cells or not
- path: the relative path to the GL data within the directory: `/scicore/home/nimwegen/GROUP/Moma/Unet_Training/00_deep_moma/00_raw_data`
This directory contains the scripts, which are used for training models and their output data and models:
$ lsdoc 02_model_training/00_phase_contrast_unet_segmentation/

batch_evaluate_model.py
batch_evaluation_dispatcher.py
batch_training_dispatcher.py
batch_train_model.py
check_model_with_test_image.py
convert_keras_to_tf_model.py
evaluate_model_on_experiment_with_fl_data_on_cluster.sh
evaluate_model_on_experiment_with_fl_data.py
logs/
model/
train_model_on_cluster.sh
train_model.py
train_model.sh
The relevant contents are:
- batch_training_dispatcher.py : Python script to dispatch training
jobs to Slurm. This script generates one bash script per trained
model. Each bash script is queued as a Slurm job and calls
`
batch_train_model.py`with a parameter file containing user-defined training parameters. - batch_train_model.py : Python script that executes the training of a model for a given Slurm job.
- model/ : This directory contains the models which are output during training. For each run of batch_training_dispatcher.py, a new folder will be created in this directory, e.g.: model/20230509-212926_8616f16b_batch_training
Each batch training directory (e.g. model/20230509-212926_8616f16b_batch_training) will contain the batch training script that was used for the training and a sub-directory for each dataset:
$ tree -L 3 model/20230509-212926_8616f16b_batch_training
model/20230509-212926_8616f16b_batch_training
├── batch_training_dispatcher.py
└── dataset_20230509-205401_6e871ab0
    ├── 20230509-212926_8616f16b__ndepth_2__nfilters_032__batchsize_004__run_0
    │   ├── batch_train_model.py
    │   ├── FINISHED_TRAINING
    │   ├── history
    │   ├── logs
    │   ├── models
    │   ├── run_training.sh
    │   └── training_parameters.json
    ├── 20230509-212926_8616f16b__ndepth_2__nfilters_032__batchsize_004__run_1
    │   ├── batch_train_model.py
    │   ├── FINISHED_TRAINING
    │   ├── history
    │   ├── logs
    │   ├── models
    │   ├── run_training.sh
    │   └── training_parameters.json
    └── 20230509-212926_8616f16b__ndepth_2__nfilters_032__batchsize_004__run_2
        ├── batch_train_model.py
        ├── FINISHED_TRAINING
        ├── history
        ├── logs
        ├── models
        ├── run_training.sh
        └── training_parameters.json
Each sub-directory of a given dataset contains further sub-directories
for each training run with the naming indicating U-Net parameters (i.e.:
ndepth_2__nfilters_032__batchsize_004 ) and replicates (i.e.: run_0
).
I created the following directory structure, because I expected that I would generate and train additional datasets and models the perform oth tasks than segmentation on PhC images (e.g. to classify viability of cells):
- 01_training_data/00_data_for_segmentation_models/
- 02_model_training/00_phase_contrast_unet_segmentation/
This never materialized and in principle these directories could be removed and their contents moved to their respective parent directories. I did not move the data, because it would significantly affect the Git history and might make it difficult to trace back changes.
The project folder is tracked using a Git repository located in the directory:
/scicore/home/nimwegen/GROUP/Moma/Unet_Training/00_deep_moma/.gitIt tracks both the Python module `deep_moma` located in
00_deep_moma/deepmomaand scripts that are used to generate training data and to train models.
The main branch that tracks changes to the code for generating data and training is:
model_training/mainThe scripts for generating data and training models use the date-time and SHA value of the current Git commit to name files and folders that they generate. This allows us to keep track which commit generated a particular dataset/model and which changes went into creating that dataset and model. The scripts ensure that the Git repository is not dirty and will abort if it is (a Git repository is dirty, when there are changes to files in the repository that have not been commited). This means that, if one of the script gives you an error message that the Git repository is dirty, you will first have to commit your changes, before running it.
It is beneficial to make the code modifications for the new training data and model training on a separate branch, because this groups all the changes that went into the model on a separate branch.
For this tutorial you can start from the pre-existing branch `model_training/tutorial`. To do this,
check out the branch and create a copy of it. Replace USER with your user name:
git checkout model_training/tutorial
git branch model_training/tutorial_USER
git checkout model_training/tutorial_USER
After finishing the tutorial your branch by running:
git branch -d model_training/tutorial_USERNOTE: There exists and additional branch `model_training/tutorial_solution`, which contains the files and modifications that you should obtain _after_ completing this tutorial.
To actually train a new model (not just for the tutorial) you start from the branch `model_training/main`:
git checkout model_training/main
git branch model_training/DESCRIPTION_OF_CHANGES
git checkout model_training/DESCRIPTION_OF_CHANGES
You can merge the changes after finishing the training:
git checkout model_training/main
git merge --no-ff model_training/DESCRIPTION_OF_CHANGES
This will keep a history of the changes that were made.
IMPORTANT: This section describes the procedure for generating training data for GLs that contain cells. The procedure is slightly different for generating data for GLs that do not contain cells. It is described here.
This section describes how to generate training data for training U-Net models.
Training data is generated from pairs of phase contrast (PhC) and corresponding fluorescence (FL) images. We generate mask images from the FL images using an image processing algorithm. This yields pairs of PhC images plus accompanying masks, that indicate which pixels in the PhC image belong to cells and which are background.
Note: More accurately the mask images contain labels for each cell (i.e. pixels belonging to the same cell have a unique integer value for each cell). However, we call them masks here, because during training these labels are not considered (i.e. the label images are converted to binary masks).
We start from the following directory, which contains a template for generating training data:
$ tree  000_TEMPLATES/
000_TEMPLATES/
└── 00_DATA_GENERATION_TEMPLATE
    └── generate_dataset_TEMPLATE.py
generate_dataset_TEMPLATE.py is a template for the Python script that
generates the training data. We will adapt it to generate a subset of
the training data contained in
00_raw_data/09_ladder_chip_design/bor__20230426_18 to illustrate the
process of generating training data.
Here is the content of
00_raw_data/000_TEMPLATES/00_DATA_GENERATION_TEMPLATE/generate_dataset_TEMPLATE.py
with comments for what each code section does:
generate_dataset_TEMPLATE.py (expand source)
#!/usr/bin/env python

# %%
import os

from deep_moma.dataset_generation import DatasetConfiguration
from deep_moma.dataset_generation import DatasetGenerator
from deep_moma.dataset_generation import \
    generate_dataset_config_from_template_with_time_ranges_with_ignores, write_rois_to_dataset_configs
from deep_moma.segmentation_methods import ThresholdSegmenterV006, FluorescenceImageGlCenterer

'''
This defines the dataset_path_template:
This is the path template of a GL ROI TIFF stack within a preprocessing folder of the experimental data.
The template path uses string interpolation to fill in values for position index (i.e.: {pos_ind}) and GL number (i.e.: {gl_ind:02d}).
{pos_ind} and {gl_ind:02d} must be used as place holders for the position index and GL index, when defining the dataset path.
'''
dataset_path_template = "/scicore/home/nimwegen/GROUP/MM_Data/Bor/20230426_18/preprocessing/20230426_preprocess_positions__output__20230430-195820/{pos_ind}/{pos_ind}_GL{gl_ind}/dial2_1560_1440_-100_2_MMStack__{pos_ind}_GL{gl_ind}.tif"

'''
This defines properties of the dataset:
DatasetConfiguration is the class that holds the configuration. It contains the following fields:
mm_data_path: the path template to the dataset
number_of_color_channels: number of channels in the GL ROI.
channel_number_phase_contrast: channel number of the PhC channel within the GL ROI TIFF stack.
channel_number_fluorescence: channel number of the fluorescence channel within the GL ROI TIFF stack.
roi: This field is used to set the default pixel region within the GL ROI image that will be used for generating training images.
     The order of the pixel coordinates are (ROI_LIMIT_TOP, ROI_LIMIT_BOTTOM, ROI_LIMIT_LEFT, ROI_LIMIT_RIGHT). Specifying `None` will use maximal image index in that dimension.
     Note: In this template script we overwrite this value to set the ROI on GL-by-GL basis (see below).
'''
dataset_config = DatasetConfiguration(
    mm_data_path=dataset_path_template,
    number_of_color_channels=3,
    channel_number_phase_contrast=1,
    channel_number_fluorescence=2,
    roi=(None, None, None, None),
)

'''
This block sets the output directory automatically using the script location and name.
'''
script_name = os.path.splitext(os.path.basename(__file__))[0]
dataset_script_path = os.path.dirname(os.path.realpath(__file__))
dataset_config.dataset_path = os.path.join(dataset_script_path, script_name)

'''
Select a subset of positions to analyze. Should be representative of different cases e.g empty space at bottom.
'''
dataset_config.start_time = 0
dataset_config.stop_time = None  # setting 'stop_timestep = None' will use 'mom.get_max_time()' to set dataset_config.stop_time to the last frame of the dataset

'''
This section defines the positions, growthlanes and time-ranges that make up the training data.
This information is stored with in the dictionary `positions_and_growthlanes_and_timesteps`.
The dictionary format is:
{
    POS_ID_1: {
        GL_ID_1: [RANGE_TUPLE_1, RANGE_TUPLE_2, INDIVIDUAL_FRAME_INDEX_1, INDIVIDUAL_FRAME_INDEX_2...],
        GL_ID_2: [RANGE_TUPLE_1, ...],
        ...
    },
    POS_ID_2: {
        ...
    },
    ...
}
with
POS_ID: The index/name of the position.
GL_ID: The index of the GL within the position.
RANGE_TUPLE: This is a tuple that specifies a frame range to include in the training data, where the tuple values are: (start_frame_index, end_frame_index, frame_step_size)
             Specifically, `frame_step_size=1` includes every frame in the range and `frame_step_size=2` would include every second frame, and so on.
             Note: By setting `frame_step_size>1` we can reduce the number of similar frames for slow growing cells, where appearance changes only slowly. I typically used every 4th frame (see below).
INDIVIDUAL_FRAME_INDEX: These can be individual integers indicating a frame number.
'''
positions_and_growthlanes_and_timesteps = {
    '1-Pos000': {
        3: [(1, 440, 4), ],
        22: [(1, 440, 4), ],
    },
    '1-Pos001': {
        3: [(1, 440, 4), ],
        25: [(1, 440, 4), ],
    },
}

'''
This section defines the image regions for each GL that will be used to generate the training images.
This information is stored in a Python dictionary.
The dictionary format is:
{
    POS_ID_1: {
        GL_ID_1: (ROI_LIMIT_TOP, ROI_LIMIT_BOTTOM, ROI_LIMIT_LEFT, ROI_LIMIT_RIGHT),
        GL_ID_2: (ROI_LIMIT_TOP, ROI_LIMIT_BOTTOM, ROI_LIMIT_LEFT, ROI_LIMIT_RIGHT),
        ...
    },
    POS_ID_2: {
        GL_ID_1: (ROI_LIMIT_TOP, ROI_LIMIT_BOTTOM, ROI_LIMIT_LEFT, ROI_LIMIT_RIGHT),
        GL_ID_2: (ROI_LIMIT_TOP, ROI_LIMIT_BOTTOM, ROI_LIMIT_LEFT, ROI_LIMIT_RIGHT),
        ...
    }
}
with
ROI_LIMIT_TOP: Top index of the image ROI.
ROI_LIMIT_BOTTOM: Botton index of ROI.
ROI_LIMIT_LEFT: Left index of ROI.
ROI_LIMIT_RIGHT: Right index of ROI.
Note:
1. The value of ROI_LIMIT_BOTTOM > ROI_LIMIT_TOP, because for images the origin sits in the top right corner of the image and the y-axis points downward.
2. If a field is set to 'none', it will be set to the minimal or maximal possible index in that dimension and direction.
'''
output_width = 64  # IMPORTANT: The image width is set to 64px in _all_ training datasets.
x_start = 21
x_stop = x_start + output_width
y_start = 100

rois = {
    '1-Pos000': {
        3: (y_start, None, x_start, x_stop),
        22: (y_start, None, x_start, x_stop),
    },
    '1-Pos001': {
        3: (y_start, None, x_start, x_stop),
        25: (y_start, None, x_start, x_stop),
    },
}


'''
This section defines frames and frame-ranges that should be ignored.
This information is stored with in the dictionary `timesteps_to_ignore`.
The dictionary format is:
{
    POS_ID_1: {
        GL_ID_1: [RANGE_TUPLE_1, RANGE_TUPLE_2, INDIVIDUAL_FRAME_INDEX_1, INDIVIDUAL_FRAME_INDEX_2...],
        GL_ID_2: [RANGE_TUPLE_1, ...],
        ...
    },
    POS_ID_2: {
        ...
    },
    ...
}
with
POS_ID: The index/name of the position.
GL_ID: The index of the GL within the position.
RANGE_TUPLE: This is a tuple that specifies a frame range to include in the training data, where the tuple values are: (start_frame_index, end_frame_index, frame_step_size)
             IMPORTANT: Set `frame_step_size=1` ensure that _all_ frames in the range are ignored (otherwise you may accidentaly e.g. ignore only every second frame, if you set `frame_step_size=2`).
INDIVIDUAL_FRAME_INDEX: These can be individual integers indicating a single frame to ignore.
'''
timesteps_to_ignore = {
#    '1-Pos000': {
#        3: [33, 61, 65, 105, 201, 225, 257, 293, 309, (345, 357, 1), 421, 425, 429, 433, 437],
#        22: [1, 57, 69, (85, 438, 1)],
#    },
#    '1-Pos001': {
#        3: [37, 49, 85, (97, 438, 1)],
#        25: [(1, 58, 1), (173, 214, 1), 225, 249, 273, 277, 289, 297, 301, 325, 381, 409, 425, 429, 437],
#    },
}

'''
This section generates the dataset configs.
It creates copies of the default dataset configuration `dataset_config` for each GL and overwrites the default values using the values that were defined in the previous sections.
'''
dataset_configs = generate_dataset_config_from_template_with_time_ranges_with_ignores(dataset_config,
                                                                                      positions_and_growthlanes_and_timesteps,
                                                                                      timesteps_to_ignore)
dataset_configs = write_rois_to_dataset_configs(dataset_configs, rois)

'''
This section sets up the segmentation algorithm that is used to generate the cells masks.
`ThresholdSegmenterV006`: This class implements the algorithm that was used for segmenting all previous training data. Using this segmenter with the provided settings yields cell masks that are consistent with previous datasets (assuming image properties of the FL image are maintained).
`FluorescenceImageGlCenterer`: This class centers the cells horizontally within the image ROI using the barycenter of the FL intensity in horizontal direction. This class will ajust the values for ROI_LIMIT_LEFT and ROI_LIMIT_RIGHT on a frame-by-frame basis, while maintaining the defined image width.
'''
segmenter = ThresholdSegmenterV006(gauss_sigma=1.5,
                                   block_size=15,
                                   min_intensity=50,
                                   max_horizontal_centroid_deviation=10,
                                   cell_division_threshold=0.5,)

gl_centerer = FluorescenceImageGlCenterer(vertical_detection_region_start=90)

'''
This section sets up and performs the data-generation step.
'''
generator = DatasetGenerator(dataset_configs,
                             run_interactive=False,
                             segmenter=segmenter,
                             gl_centerer=gl_centerer,
                             show_debug_images=False)

generator.generate_datasets()
To start generating a dataset for this tutorial, we copy the template folder to 000_TUTORIAL_dataset/bor__20230426_18/ .
For simplicity we switch into the directory 00_raw_data:
cd /scicore/home/nimwegen/GROUP/Moma/Unet_Training/00_deep_moma/00_raw_dataCopy and rename the contents of the template folder:
mkdir -p 000_TUTORIAL_dataset/bor__20230426_18

cp 000_TEMPLATES/00_DATA_GENERATION_TEMPLATE/generate_dataset_TEMPLATE.py 000_TUTORIAL_dataset/bor__20230426_18/generate_dataset_v000.py
We will now run through the process of generating and curating this
dataset using the script generate_dataset_v000.py .
-
Connect to Scicore using VNC as explained on here. This is needed to be able to view the TIFF images generated by the script.
-
Open a terminal:
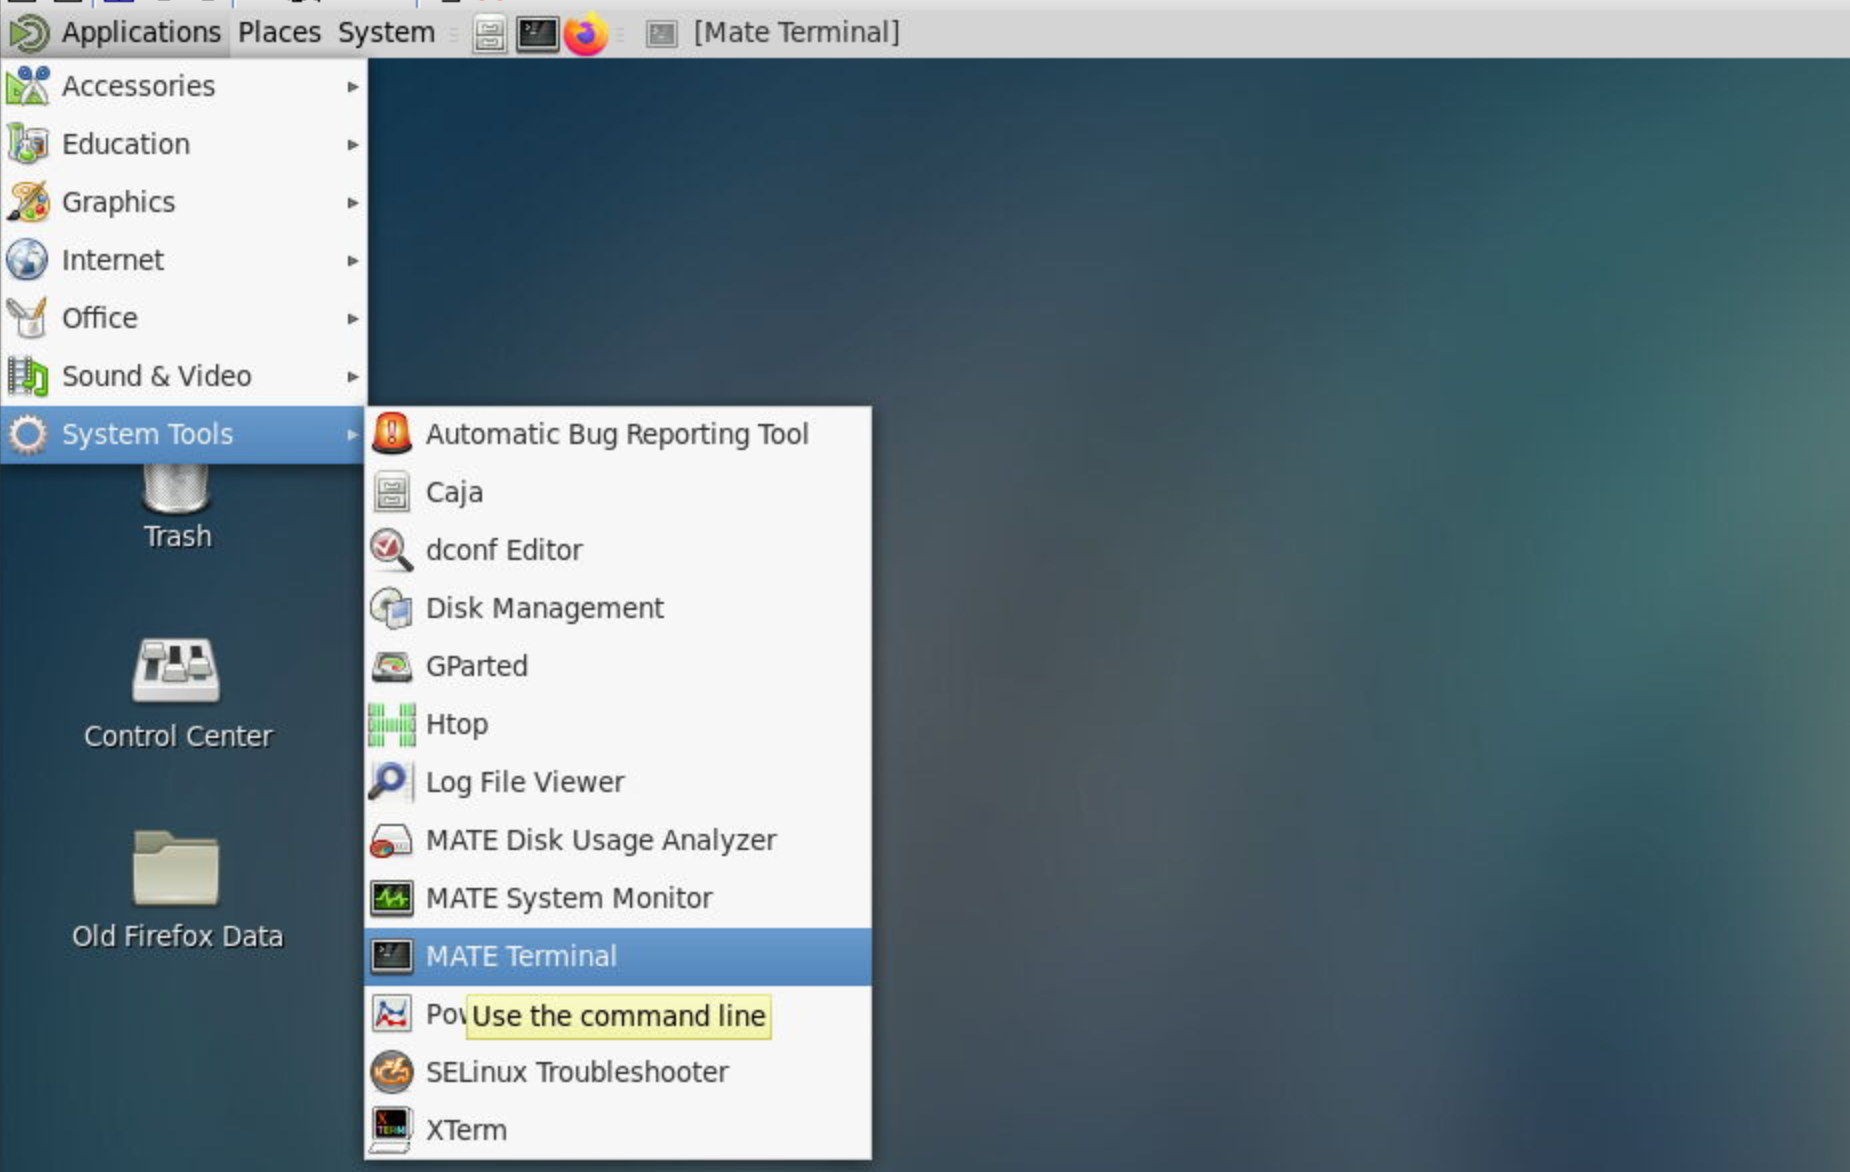
-
Switch to the dataset directory inside the terminal that we created previously:
cd /scicore/home/nimwegen/GROUP/Moma/Unet_Training/00_deep_moma/00_raw_data/000_TUTORIAL_dataset/bor__20230426_18 -
Activate the conda environment deepmoma:
conda activate deepmoma
-
Run the script to generate the dataset:
python generate_dataset_v000.py
-
This generates TIFF images in an output folder with same name as the script (in this case
generate_dataset_v000):$ tree -L 4 bor__20230426_18 ├── generate_dataset_v000 │ ├── 1-Pos000_GL22 │ │ ├── images_fluorescence.tiff │ │ ├── images_phase_contrast.tiff │ │ ├── labels.tiff │ │ └── segmented_cell_growth_animation.tiff │ ├── 1-Pos000_GL3 │ │ ├── images_fluorescence.tiff │ │ ├── images_phase_contrast.tiff │ │ ├── labels.tiff │ │ └── segmented_cell_growth_animation.tiff │ ├── 1-Pos001_GL25 │ │ ├── images_fluorescence.tiff │ │ ├── images_phase_contrast.tiff │ │ ├── labels.tiff │ │ └── segmented_cell_growth_animation.tiff │ ├── 1-Pos001_GL3 │ │ ├── images_fluorescence.tiff │ │ ├── images_phase_contrast.tiff │ │ ├── labels.tiff │ │ └── segmented_cell_growth_animation.tiff │ └── 1-Pos002_GL5 │ ├── images_fluorescence.tiff │ ├── images_phase_contrast.tiff │ ├── labels.tiff │ └── segmented_cell_growth_animation.tiff └── generate_dataset_v000.py
For each GL we obtain four images (see example images below):
-
images_fluorescence.tiff: image stack containing the fluorescence channel images that were used to generate the cell masks.
-
images_phase_contrast.tiff: image stack containing the PhC channel images.
-
labels.tiff: images containing the cell masks (masks also called labels).
-
segmented_cell_growth_animation.tiff: a collage showing the fluorescence and PhC channels with overlay of the cell masks. Note, that this overview indicates two frame numbers:
- "frame": This is index of the frame within the TIFF stack of the training data.
- "orig. frame": This is the index of the frame within the TIFF stack the input data.
Example images:
images_fluorescence.tiff images_phase_contrast.tiff labels.tiff segmented_cell_growth_animation.tiff 


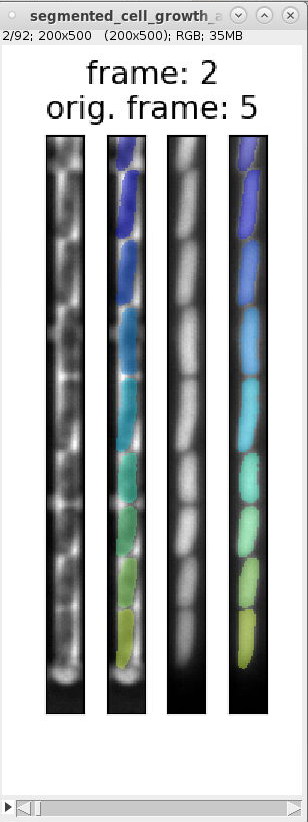
-
-
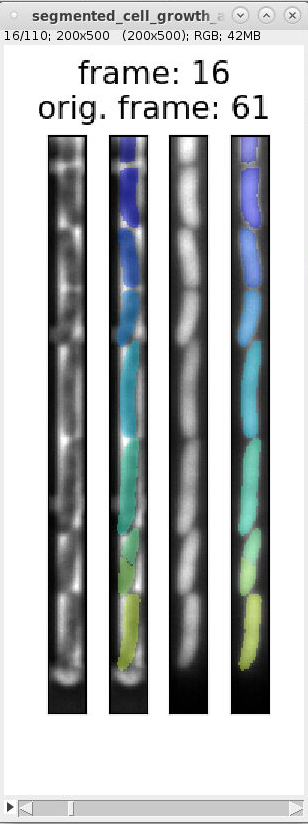
We can use the overview images and indexes in
segmented_cell_growth_animation.tiffto inspect the segmentation and ignore frames with incorrect segmentation. Here are examples of typical segmentation errors (found in file: 000_TUTORIAL_dataset/bor__20230426_18/generate_dataset_v000/1-Pos000_GL3/segmented_cell_growth_animation.tiff):Error: 2nd and 3rd cell from bottom are not split Error: 2nd cell from bottom is incorrectly split Error: 2nd and 3rd cell from bottom are merged Error: 2nd cell from bottom is split Errors in consecutive frames 349 to 357: the cells above the mother cell are merged. 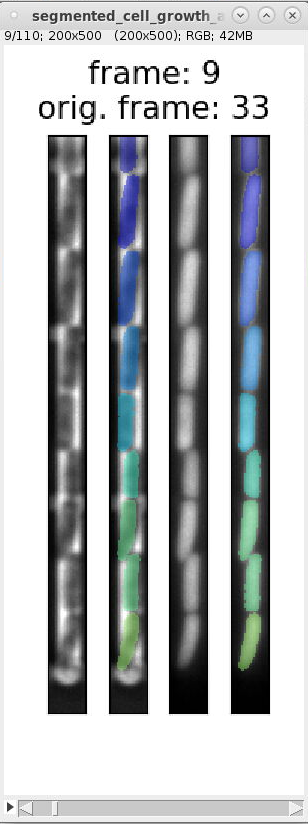
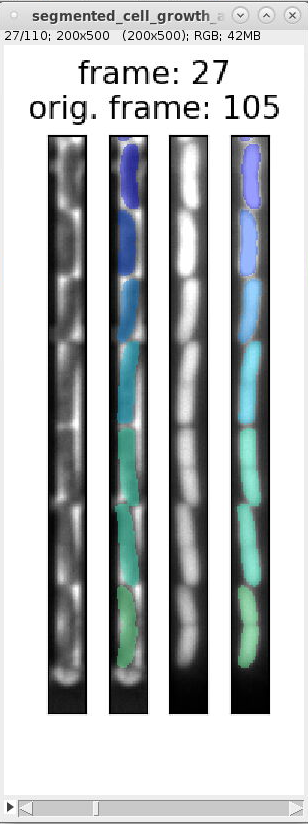
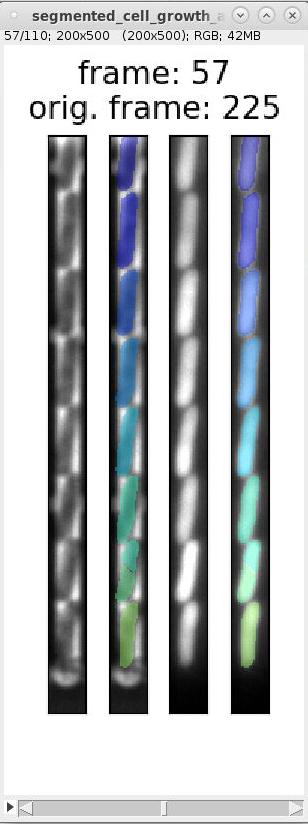
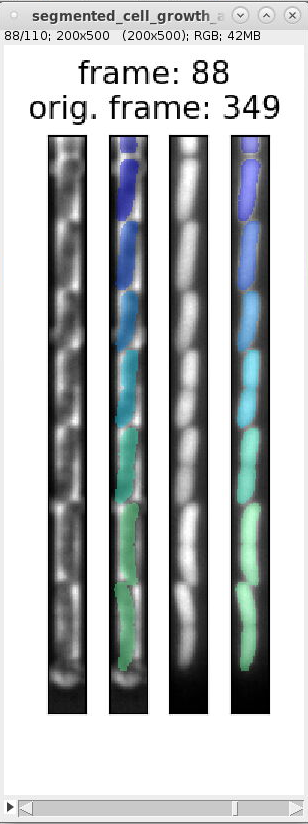
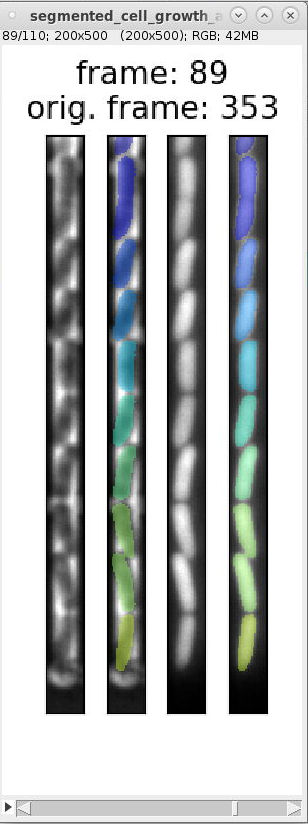
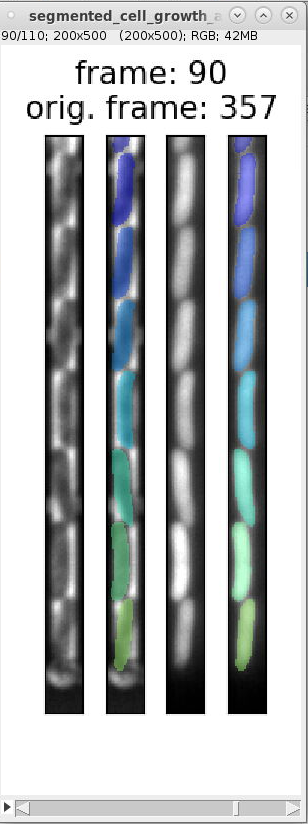
The template script file `
generate_dataset_v000.py`contains the following code section, which specifies frames that should be ignored (it is commented by default):timesteps_to_ignore = { '1-Pos000': { 3: [33, 61, 65, 105, 201, 225, 257, 293, 309, (345, 357, 1), 421, 425, 429, 433, 437], 22: [1, 57, 69, (85, 438, 1)], }, '1-Pos001': { 3: [37, 49, 85, (97, 438, 1)], 25: [(1, 58, 1), (173, 214, 1), 225, 249, 273, 277, 289, 297, 301, 325, 381, 409, 425, 429, 437], }, '1-Pos002': { 5: [169, 173, 297, 317, 389, 393, 397, 405, 417], }, }
This code specifies both individual frame numbers as well as frame ranges to ignore. These numbers correspond to the number indicated by "orig. frame". For example, it specifies the tuple
(345, 357, 1)to ignore the incorrect frame-range shown in segmentation errors above. Uncommenting this code section and rerunninggenerate_dataset_v000.pyremoves the incorrect frames.
An efficient procedure for generating the list of frame to ignore is to first go through all frames and write down the index given by "orig. frame" (I usually did this by hand). After that copy this to the list of ignored frames. -
Add the script to the Git repository, when it is finished (you can also add it, while editing to keep track changes you make to it):
git add bor__20230426_18/generate_dataset_v000.py
git commit -m "Add TUTORIAL training dataset."
-
You will likely add GLs incrementally, when generating a dataset. It is helpful to comment out previously added/processed GLs, so that they are not reprocessed every time you run the script for new GLs. We can do this by putting `#` in front of them in the definition of the dictionary `positions_and_growthlanes_and_timesteps`. E.g.:
positions_and_growthlanes_and_timesteps = {
 #   '1-Pos000': {
 #       3: [(1, 440, 4), ],
 #       22: [(1, 440, 4), ],
 #   },
    '1-Pos001': {
 #       3: [(1, 440, 4), ],
        25: [(1, 440, 4), ],
    },
    '1-Pos002': {
        5: [(1, 440, 4), ],
    },
}
IMPORTANT: These GLs must be readded (uncommented) when you are finished with dataset. It is also advisable to rerun the script one final time to ensure that the data on disk is in "sync" with the final state of the script.
The training data also contains a (smaller) number empty GLs for each Mother machine/channel design. These train the model to correctly classifies empty regions of a GL.
Generating the training data for empty GLs is largely the same as for GLs that contain cells (described in the previous section). Therefore, here we describe more briefly the difference.
A template file for creating training data from empty GLs is located here:
/scicore/home/nimwegen/GROUP/Moma/Unet_Training/00_deep_moma/00_raw_data/000_TEMPLATES/01_DATA_GENERATION_TEMPLATE_FOR_EMPTY_GLs/generate_dataset_v000__TEMPLATE.pyThe relevant difference between this template file and the template file for GLs with cells (of the previous section) are shown here:
from deep_moma.segmentation_methods import EmptyImageSegmenter, PhaseContrastImageGlCenterer

[ELIDED CODE]

positions_and_growthlanes_and_timesteps = {
    '1-Pos000': {
        10: [(1, 440, 4), ],
        20: [(1, 440, 4), ],
    },
    '1-Pos001': {
        7: [(1, 440, 4), ],
        27: [(1, 440, 4), ],
    },
}

[ELIDED CODE]

'''
This section sets up the generation of empty the cells masks.
`EmptyImageSegmenter`: This class returns empty cells masks, where all pixels are set to background.
`PhaseContrastImageGlCenterer`: This class centers the GL horizontally within the image ROI using the barycenter of phase contrast intensity in horizontal direction. It adjusts the values for ROI_LIMIT_LEFT and ROI_LIMIT_RIGHT on a frame-by-frame basis, while maintaining the defined image width.
'''
segmenter = EmptyImageSegmenter()

gl_centerer = PhaseContrastImageGlCenterer(vertical_detection_region_start=120)

'''
This section sets up and performs the data-generation step.
'''
generator = DatasetGenerator(dataset_configs,
                             run_interactive=False,
                             segmenter=segmenter,
                             gl_centerer=gl_centerer,
                             show_debug_images=False)

generator.generate_datasets()
The differences are:
- positions_and_growthlanes_and_timesteps : This is a selection of empty GLs of the input-data: /scicore/home/nimwegen/GROUP/MM_Data/Bor/20230426_18/preprocessing/20230426_preprocess_positions__output__20230430-195820
- EmptyImageSegmenter : This is segmenter outputs masks where all values are set to 0 (i.e. background)
- PhaseContrastImageGlCenterer : This class centers the GL horizonally in the output ROI using the PhC signal (we use the PhC signal, because for empty GLs we do not have a FL signal).
To generate a dataset using this template do:
-
Create folder `05_TUTORIAL_ladder_chips` in the subfolder `
03_empty_channels/` for the new data and copy the template to the subfolder:
cd /scicore/home/nimwegen/GROUP/Moma/Unet_Training/00_deep_moma/00_raw_data/03_empty_channels
mkdir 000_TUTORIAL_ladder_chips
cd 000_TUTORIAL_ladder_chips/
cp /scicore/home/nimwegen/GROUP/Moma/Unet_Training/00_deep_moma/00_raw_data/000_TEMPLATES/01_DATA_GENERATION_TEMPLATE_FOR_EMPTY_GLs/generate_dataset_v000__TEMPLATE.py generate_dataset_v000.py
-
Activate the Conda environment:
conda activate deepmoma
-
Run the script to generate the training data:
./generate_dataset_v000.py
-
The training data for the empty GLs is now located here:
000_TUTORIAL_ladder_chips/generate_dataset_v000
-
Commit to Git after you have finished adding the new dataset:
git add generate_dataset_v000.py
git commit -m "Add empty GLs of ladder chip to training data."
This section describes how to generate a training dataset that includes the new GLs.
-
First edit the script that generates the training dataset. It is located at:
01_training_data/00_data_for_segmentation_models/generate_dataset_csv.py
Add the new data to the list of datasets. Note that there E.g. (generate_dataset_v000.py):
datasets_with_full_gl = [ f"00_tilted_not_overlapping/00_gwendolin_20170512_MM_recA_recN_lexA_high_8channels_design/{dataset_folder_name1}", f"00_tilted_not_overlapping/01_dany_20190515_hi1_med1_med2_rpmB_glu_gly_7_chr_rpmB_curated/{dataset_folder_name1}", f"01_straight_tight/01_thomas_20170120_glcOnly/{dataset_folder_name1}", f"01_straight_tight/00_thomas_20170403_hiPl/{dataset_folder_name1}", f"02_filaments/01_thomas_20170403/{dataset_folder_name1}", f"04_stationary_phase/00_theo_20191018_F11_bolA/{dataset_folder_name1}", f"04_stationary_phase/01_theo_20191112_F11_bolA/{dataset_folder_name1}", f"05_inhomogeneous_phase_contrast_intensity/00_dany_20200417_top_rpmB_rplN_rpsB_rrnB_hi1_hi3_med2_med3_richdefinedmedium/{dataset_folder_name1}", f"05_inhomogeneous_phase_contrast_intensity/01_dany_20200417_top_rpmB_rplN_rpsB_rrnB_hi1_hi3_med2_med3_richdefinedmedium/{dataset_folder_name1}", f"06_with_reservoirs/00_lis_20210303/{dataset_folder_name1}", f"07_with_reservoir_antibiotics/00_gentamicin/thomas_20200910/{dataset_folder_name1}", f"07_with_reservoir_antibiotics/01_ciprofloxacin/thomas_20200910/{dataset_folder_name1}", "09_ladder_chip_design/bor__20230426_18/generate_dataset_normalized_v001", "000_TUTORIAL_dataset/bor__20230426_18/generate_dataset_v000", # NEW DATA FROM GLs WITH CELLS ] ... datasets_with_empty_gls = [ f"03_empty_channels/01_gwendolin_20170512_MM_recA_recN_lexA_high_8channels_design/{dataset_folder_name2}", f"03_empty_channels/02_thomas_20170403_hiPl/{dataset_folder_name2}", f"03_empty_channels/03_thomas_20170120_glcOnly/{dataset_folder_name2}", "03_empty_channels/04_ladder_chips/bor__20230426_18/generate_dataset_normalized_v000", "03_empty_channels/05_TUTORIAL_ladder_chips/generate_dataset_v000", # NEW DATA FROM EMPTY GLs ] -
Commit the change to the Git repository with a useful description:
git add -u generate_dataset_csv.py
git commit -m "add tutorial training dataset"
Now run the script:
python generate_dataset_csv.py
You will get an error message, if you do not commit the change before running:
$ python generate_dataset_csv.py
RNG SEED: 101234
ERROR: Repository is dirty. Commit first. Aborting.
Having to commit to Git before running the script ensures, that any modification to the training data are versioned in the Git repository.
The output file of this script will contain the date and the SHA of the current Git commit, which links the dataset to the Git commit (here: `2a26ea9d`):dataset_20230627-231111_2a26ea9d.csv
You can see a diff between the previous dataset and the newly created dataset using `vimdiff` (or a diff-tool of your preference)
NOTE: This example does not include the data/paths of the empty GLs, because I added this part to the documentation afterwards.vimdiff dataset_20230509-205401_6e871ab0.csv dataset_20230627-231111_2a26ea9d.csv

-
The current production datasets contain manual changes that you can see by running, e.g.:
vimdiff dataset_20230509-205401_6e871ab0__curated.csv dataset_20230627-231111_2a26ea9d.csv

Here you can see that the GL in line 238 was manually changed to type "training" (there are further changes below, which are not shown here).
You will have to manually copy these changes todataset_20230627-231111_2a26ea9d.csvin order to create dataset that is identical on the previous production dataset plus the new data. To do so, first create a copy:cp dataset_20230627-231111_2a26ea9d.csv dataset_20230627-231111_2a26ea9d__curated.csv
NOTE: I appended "__curated" to all datasets that were changed manually.
Start vimdiff or another diff tool to manually copy the changes from the previous dataset:
vimdiff dataset_20230509-205401_6e871ab0__curated.csv dataset_20230627-231111_2a26ea9d__curated.csv
Commit the new training dataset to Git:
git add dataset_20230627-231111_2a26ea9d.csv dataset_20230627-231111_2a26ea9d__curated.csv
git commit -m "Commit new dataset with manual changes as in the previous dataset: dataset_20230509-205401_6e871ab0__curated.csv"
This section describes how to train a U-Net model using the dataset that we created in the previous section:
-
Change into the training directory:
cd /scicore/home/nimwegen/GROUP/Moma/Unet_Training/00_deep_moma/02_model_training/00_phase_contrast_unet_segmentation -
Edit the training dispatch script to use the new dataset for training:
vim batch_training_dispatcher.py
Add dataset path as the only entry in the list `dataset_csv_config_paths`:
dataset_csv_config_paths = [
"/scicore/home/nimwegen/GROUP/Moma/Unet_Training/00_deep_moma/01_training_data/00_data_for_segmentation_models/dataset_20230627-231111_2a26ea9d__curated.csv",
]
NOTE: You can add multiple datasets to this list and training will run separately for each dataset.
-
Commit the changes to Git
:git add batch_training_dispatcher.py git commit -m "Train new model using the TUTORIAL dataset dataset_20230627-231111_2a26ea9d__curated.csv. This dataset is the same as previous the dataset, but adds GLs from TUTORIAL data. The settings for the U-Net model and data augmentation are the same as in previous models." -
Activate the deepmoma Conda environment:
conda activate deepmoma
-
Run dispatcher script, which will start the training jobs:
./batch_training_dispatcher.py
-
Check that the training jobs were correctly submitted to Slurm:
$ squeue -u $USER
JOBID     PARTITION           NAME                USER      STATE     TIME        TIME_LIMIT  QOS       NODELIST(REASON)
45178337  pascal              20230629-173418_0474micuby52  PENDING   0:00        1-00:00:00  1day      (None)
45178336  pascal              20230629-173418_0474micuby52  PENDING   0:00        1-00:00:00  1day      (None)
45178335  pascal              20230629-173418_0474micuby52  PENDING   0:00        1-00:00:00  1day      (None)
Running the model training as described in the previous section produces the following folder structure inside the directory `model`:
$ tree -L 2 model/20230629-180303_f4088f57_batch_training/dataset_20230627-231111_2a26ea9d__curated

model/20230629-180303_f4088f57_batch_training/dataset_20230627-231111_2a26ea9d__curated
├── 20230629-180303_f4088f57__ndepth_2__nfilters_032__batchsize_004__run_0
│   ├── batch_train_model.py
│   ├── FINISHED_TRAINING
│   ├── history
│   ├── logs
│   ├── models
│   ├── run_training.sh
│   └── training_parameters.json
├── 20230629-180303_f4088f57__ndepth_2__nfilters_032__batchsize_004__run_1
│   ├── batch_train_model.py
│   ├── FINISHED_TRAINING
│   ├── history/
│   ├── logs/
│   ├── models
│   ├── run_training.sh
│   └── training_parameters.json
└── 20230629-180303_f4088f57__ndepth_2__nfilters_032__batchsize_004__run_2
    ├── batch_train_model.py
    ├── FINISHED_TRAINING
    ├── history
    ├── logs
    ├── models
    ├── run_training.sh
    └── training_parameters.json
The path to the trained models contains the following information:
- 20230629-180303_f4088f57_batch_training : The identifier for the
training run. It consists of the starting date-time, the SHA value
of the current Git commit, and the postfix '_batch_training'.
NOTE: The postfix '_batch_training' was added to distinguish batch-runs from individual training-runs of single models that are started manually (which I did previously, but do not do anymore). - dataset_20230627-231111_2a26ea9d__curated : Name of the dataset used for the training. When you specify multiple datasets in the list `dataset_csv_config_paths` in the previous section, you will have a sub-directory for each dataset.
The batch-script started multiple training runs for each dataset, which
can be configured using the setting runs_per_model in
batch_training_dispatcher.py (it was set to 3 in this case). This
created the three subdirectories:
- 20230629-180303_f4088f57__ndepth_2__nfilters_032__batchsize_004__run_0
- 20230629-180303_f4088f57__ndepth_2__nfilters_032__batchsize_004__run_1
- 20230629-180303_f4088f57__ndepth_2__nfilters_032__batchsize_004__run_2
These folders contain the results of replicate training runs, which differ only by the random number generator (RNG) seeds that were used to draw batches for the stochastic gradient descent during model training:
$ tree --filelimit 10 -F model/20230629-180303_f4088f57_batch_training/dataset_20230627-231111_2a26ea9d__curated/20230629-180303_f4088f57__ndepth_2__nfilters_032__batchsize_004__run_0/
model/20230629-180303_f4088f57_batch_training/dataset_20230627-231111_2a26ea9d__curated/20230629-180303_f4088f57__ndepth_2__nfilters_032__batchsize_004__run_0/
├── batch_train_model.py*
├── FINISHED_TRAINING
├── history/
│   ├── tensorboard/
│   │   ├── training/
│   │   │   └── events.out.tfevents.1688054672.sgi22.cluster.bc2.ch
│   │   └── validation/
│   │       └── events.out.tfevents.1688054769.sgi22.cluster.bc2.ch
│   └── training_history/ [21 entries exceeds filelimit, not opening dir]
├── logs/
│   ├── error.log
│   └── output.log
├── models/ [36 entries exceeds filelimit, not opening dir]
├── run_training.sh*
└── training_parameters.json
The files in the directory (e.g. `20230629-180303_f4088f57__ndepth_2__nfilters_032__batchsize_004__run_0`) are:
- run_training.sh : The bash-script to start the training. This was
commited as Slurm job (i.e. using:
`
sbatch run_trainging.sh`). - batch_train_model.py : The Python script which runs the training.
This is called by
run_training.sh. - training_parameters.json : Settings that were used by
`
batch_train_model.py`during the training. - FINISHED_TRAINING : Empty file that indicates that training has finished.
The subdirectories in e.g. `20230629-180303_f4088f57__ndepth_2__nfilters_032__batchsize_004__run_0` are (in order of relevance):
-
models/ : Contains the trained models in h5 format used by Keras and as ZIP file format for TensorFlow (which is used by MoMA). Models are stored for each training epoch, where the objective cost for the validation dataset improved upon previous epochs. In addition, the model output of the final epoch (in this case epoch 200) is always stored (irrespective of its cost value):
$ lsdoc 20230629-180303_f4088f57__ndepth_2__nfilters_032__batchsize_004__run_0/models/
keras_model.epoch-0001-val_binary_crossentropy_adapter-0.0420.h5
keras_model.epoch-0002-val_binary_crossentropy_adapter-0.0365.h5
...
keras_model.epoch-0102-val_binary_crossentropy_adapter-0.0255.h5
keras_model.epoch-0200-val_binary_crossentropy_adapter-0.0258.h5
tensorflow_model.epoch-0001-val_binary_crossentropy_adapter-0.0420.zip
tensorflow_model.epoch-0002-val_binary_crossentropy_adapter-0.0365.zip
...
tensorflow_model.epoch-0102-val_binary_crossentropy_adapter-0.0255.zip
tensorflow_model.epoch-0200-val_binary_crossentropy_adapter-0.0258.zip
The model filename contains the information:
- "keras_model" / "tensorflow_model" : The format of the model file.
- "epoch-0001" : The training step of the epoch ("0001").
- "val_binary_crossentropy_adapter-0.0420" : Name of the loss function ("binary_crossentropy_adapter") and its value ("0.0420") evaluated on the validation dataset (indicated by "val") at the end of the epoch.
-
logs/ : Contains the output that was logged during training:
-
error.log : Contains errors and warnings from the Slurm job and training run.
-
output.log : Contains information (as output by Keras) on the model and the training run:
``` bash
$ head -n 20 logs/output.log
Model: "model_1"
__________________________________________________________________________________________________
Layer (type)                    Output Shape         Param #     Connected to
==================================================================================================
input (InputLayer)              (None, None, None, 1 0
__________________________________________________________________________________________________
down_level_0_no_0 (Conv2D)      (None, None, None, 3 320         input[0][0]
__________________________________________________________________________________________________
batch_normalization_1 (BatchNor (None, None, None, 3 128         down_level_0_no_0[0][0]
__________________________________________________________________________________________________
activation_1 (Activation)       (None, None, None, 3 0           batch_normalization_1[0][0]
__________________________________________________________________________________________________
down_level_0_no_1 (Conv2D)      (None, None, None, 3 9248        activation_1[0][0]
...
__________________________________________________________________________________________________
activation_10 (Activation)      (None, None, None, 3 0           batch_normalization_10[0][0]
__________________________________________________________________________________________________
conv2d_1 (Conv2D)               (None, None, None, 1 33          activation_10[0][0]
==================================================================================================
Total params: 468,513
Trainable params: 467,233
Non-trainable params: 1,280
__________________________________________________________________________________________________
Epoch 1/200

   1/5961 [..............................] - ETA: 3:40:38 - loss: 1.0801 - binary_crossentropy_adapter: 1.0801 - pixelwise_weighted_binary_crossentropy: 2.1144 - dice_coef: 0.3024 - dice_loss: 0.6976
   4/5961 [..............................] - ETA: 56:39 - loss: 0.9646 - binary_crossentropy_adapter: 0.9646 - pixelwise_weighted_binary_crossentropy: 1.7949 - dice_coef: 0.3384 - dice_loss: 0.6616

...

5958/5961 [============================>.] - ETA: 0s - loss: 0.0934 - binary_crossentropy_adapter: 0.0934 - pixelwise_weighted_binary_crossentropy: 0.5670 - dice_coef: 0.8438 - dice_loss: 0.1562
5961/5961 [==============================] - 91s 15ms/step - loss: 0.0934 - binary_crossentropy_adapter: 0.0934 - pixelwise_weighted_binary_crossentropy: 0.5669 - dice_coef: 0.8438 - dice_loss: 0.1562 - val_loss: 0.0202 - val_binary_crossentropy_adapter: 0.0420 - val_pixelwise_weighted_binary_crossentropy: 0.2991 - val_dice_coef: 0.8922 - val_dice_loss: 0.1078
Epoch 2/200

...
```

NOTE: The last output of each training epoch contains the
results for the validation dataset (e.g.
"val_binary_crossentropy_adapter: 0.0420"), which is the
information that is used in the model file name.
-
-
history/ : Contains data to evaluate the training run.
$ tree history/ history/ ├── tensorboard │ ├── training │ │ └── events.out.tfevents.1688054672.sgi22.cluster.bc2.ch │ └── validation │ └── events.out.tfevents.1688054769.sgi22.cluster.bc2.ch └── training_history ├── training_history-epoch-0010.pkl ├── training_history-epoch-0020.pkl ├── training_history-epoch-0030.pkl ...-
tensorboard/ : Output for evaluation with Tensorboard. Tensorboard allows evaluation of the training progress in real time. See here for instructions.
-
training_history/ : Contains pickled Python dictionaries for each of the trained models (stored every 10 epochs). This can be used to evaluate the training with Python. E.g.:
-
        >>> import numpy as np
        >>> r=np.load('training_history-epoch-0200.pkl', allow_pickle=True)
        >>> type(r)
        <class 'dict'>
        >>> r.keys()
        dict_keys(['val_loss', 'val_binary_crossentropy_adapter', 'val_pixelwise_weighted_binary_crossentropy', 'val_dice_coef', 'val_dice_loss', 'loss', 'binary_crossentropy_adapter', 'pixelwise_weighted_binary_crossentropy', 'dice_coef', 'dice_loss', 'lr'])
        >>> len(r['val_binary_crossentropy_adapter'])
        200  # The validation loss for all 200 epochs
Note: The data in e.g. training_history-epoch-0010.pkl is a subset (up to epoch 10) of the data in training_history-epoch-0200.pkl (containing all 200 epochs). So after training is finished it is sufficient to only evaluate training_history-epoch-0200.pkl .
There are two Python scripts involved in the batch-training:
- batch_training_dispatcher.py : Script to dispatch the training to Slurm jobs. It allows us to train different configurations of the U-Net model on a set of CSV training datasets. Historically, this script was used to determine optimal U-Net model size (i.e. number of training parameters) and topology (i.e. number layers/model-depth and filter-sizes in each layer).
- batch_train_model.py : Script to run the training within a Slurm job. This script contains settings, which are shared between all training runs of a batch-run. These include settings for loss-function, data augmentation, etc.
These are the settings in `batch_training_dispatcher.py`:
### training configuration
dataset_csv_config_paths = [
"/scicore/home/nimwegen/GROUP/Moma/Unet_Training/00_deep_moma/01_training_data/00_data_for_segmentation_models/dataset_20230627-231111_2a26ea9d__curated.csv",
]
model_output_path = "/scicore/home/nimwegen/GROUP/Moma/Unet_Training/00_deep_moma/02_model_training/00_phase_contrast_unet_segmentation/model"

runs_per_model = 3
batch_sizes = [4, 8, 16]
model_configs = [
    {'n_depth': 2, 'n_filter_base': [16, 32]},
]

### SLURM parameters
partition = "pascal"
time = "23:59:59"
cpumemory = "16G"
The settings are:
- dataset_csv_config_paths : List of paths to dataset CSV files. Each model configuration and repeat will be trained for each CSV file.
- model_output_path : The path where the models will be stored. This will contain one subfolder per dataset.
- runs_per_model: Number of training repeats for each model configuration and dataset. Each repeat is run with a different RNG seed to generate different sample batches during the stochastic gradient descent. Training multiple models allows us to test if the models converge to the same loss value.
- model_configs: List of configurations of the U-Net model (also
called it depth).
- n_depth : The number of layers of the U-Net model.
- n_filter_base: List of values that define the filter size in the input and lower layers. Each entry in this list yields a separate model.
- batch_size: List of the number of samples used in a batch during training.
During training, each combination of these settings is written to `training_parameters.json` and passed to the script `batch_train_model.py`.
This is e.g. the content of the file `model/20230629-180303_f4088f57_batch_training/dataset_20230627-231111_2a26ea9d__curated/20230629-180303_f4088f57__ndepth_2__nfilters_032__batchsize_004__run_0/training_parameters.json` from the step-by-step guide:
{
  "dataset_csv_config_path": "/scicore/home/nimwegen/GROUP/Moma/Unet_Training/00_deep_moma/01_training_data/00_data_for_segmentation_models/dataset_20230627-231111_2a26ea9d__curated.csv",
  "model_output_path": "/scicore/home/nimwegen/GROUP/Moma/Unet_Training/00_deep_moma/02_model_training/00_phase_contrast_unet_segmentation/model/20230629-180303_f4088f57_batch_training/dataset_20230627-231111_2a26ea9d__curated/20230629-180303_f4088f57__ndepth_2__nfilters_032__batch
  "history_output_path": "/scicore/home/nimwegen/GROUP/Moma/Unet_Training/00_deep_moma/02_model_training/00_phase_contrast_unet_segmentation/model/20230629-180303_f4088f57_batch_training/dataset_20230627-231111_2a26ea9d__curated/20230629-180303_f4088f57__ndepth_2__nfilters_032__bat
  "rng_seeds": [
    5326,
    4693,
    3969
  ],
  "n_depth": 2,
  "n_filter_base": 32,
  "batch_size": 4
}This section briefly explain the relevant parts in the script batch_train_model.py. I did not change these settings anymore after deciding on optimal training parameters (i.e. also not, when retraining models with additional data). So these should not be changed, if you want stay consistent with previous models. Still they may be relevant in the future:
-
This snippets sets the optimizer and learning rate:
opt = Adam(learning_rate=0.0004)
-
This section configures part of the data augmentation. With this setting images will be flipped randomly in horizontal and vertical direction:
data_gen_args = dict(
    horizontal_flip=True,
    vertical_flip=True,
    histogram_voodoo=False,
    illumination_voodoo=False,
    add_noise=False)

data_augmenter = DataAugmenter_v000(data_gen_args)
-
This section configures further data augmentation settings. The comments in the excerpt explain what each setting does:
    image_cropper=AugmentingImageCropper_v000((128, 32),  # size of the cropped image that is passed to the model during training
                                              rotation_angle_min=-1,                   # minimum value of random tilt angle of image in [degree]; images are randomly tilted during training
                                              rotation_angle_max=1,                    # maximum value of random tilt angle of image in [degree]; images are randomly tilted during training
                                              xshift=0.3,                              # maximal value of random horizontal shift as a fraction of the _cropped_ image width; this sets a random x-shift range of +/-0.3*32 (because we set the image size to (128, 32) above)
                                              rng_seed=rng_seeds[2],                               # uses the 3rd RNG seed that is passed as a parameter to this script to seed the random augmentation operations
                                              rescale_factor_max=1.0,                              # the maximal factor for rescaling image size; setting this 1.0 causes no scaling
                                              intensity_rescaler=RandomIntensityAugmenter_v000(
                                                  rng_seed=rng_seeds[2],               # uses the 3rd RNG seed that is passed as a parameter to this script to seed the random augmentation operations
                                                                                                  # Two methods are used for intensity augmentation:
                                                                                              # (1) this method scales the standard deviation of the image intensity without change the mean intensity
                                                                                              # (2) this method modifies the minimum and maximum image intensities in the interval [0,1] independently.
                                                  min_intensity_rescale_range_1=0.25,  # sets the minimum value of the range of the rescaling factor in method 1.
                                                  max_intensity_rescale_range_1=1.0,   # sets the maximum value of the range of the rescaling factor in method 1.
                                                  min_intensity_rescale_range_2=0.6,   # sets the minimum value of the range of the rescaling factor in method 2. It sets the range for shifting the maximum and minimum intensity.
                                                  max_intensity_rescale_range_2=0.6    # sets the maximum value of the range of the rescaling factor in method 2. It sets the range for shifting the maximum and minimum intensity.
                                               ))