-
Notifications
You must be signed in to change notification settings - Fork 17
devon4j mts
This template will configure your PL instance to have a 'ready to use' My-Thai-Star devonfw application. It is only an example. In order to start a new project, please use the other templates. This includes:
-
Cloning the official
My-Thai-Star(https://github.com/devonfw/my-thai-star) repository into your GitLab, which allows you to do customizations on your own. -
Adding a build job for the Angular front-end, including a SonarQube analysis and a delivery to Nexus as zip and docker image.
-
Adding a build job for the Java back-end, including a SonarQube analysis and a deployment to Nexus as zip and docker image.
-
Adding a deployment job for the Angular front-end
-
Adding a deployment job for the Java back-end
-
Adding a deployment job for the reverse proxy. Please see My Thai Star deployment documentation
Especially the build and deployment jobs require several additional Jenkins plugins, which are not part of the PL by default. The Template will also take care of those installations.
All build and deployment jobs are taken from the official My-Thai-Star (https://github.com/devonfw/my-thai-star) repository. The created build and deployment jobs inside Jenkins will use the Jenkinsfiles from the cloned repo in Gitlab. These are currently the following Jenkinsfiles:
| Jenkins job name | Path to Jenkinsfile in repo | Description |
|---|---|---|
MyThaiStar_FRONTEND_BUILD |
jenkins/angular/cicd/Jenkinsfile |
Builds and tests the Angular frontend. Pushes artifacts to Nexus. |
MyThaiStar_SERVER_BUILD |
jenkins/java/cicd/Jenkinsfile |
Builds and tests the Java backend. Pushes artifacts to Nexus. |
MyThaiStar_FRONTEND_DEPLOY |
jenkins/angular/deployment/Jenkinsfile |
Frontend deployment job. Downloads the docker images from Nexus3 and starts a new container using that image. |
MyThaiStar_SERVER_DEPLOY |
jenkins/java/deployment/Jenkinsfile |
Backend deployment job. Downloads the docker images from Nexus3 and starts a new container using that image. |
MyThaiStar_REVERSE-PROXY_DEPLOY |
jenkins/deployment/Jenkinsfile |
Reverse proxy deployment job. Downloads the docker images from Nexus3 and starts a new container using that image. With this job you can also build the reverse proxy image. |
This template is independent from PL and devonfw releases and is also not really connected to one of the projects. Therefore issues that occur during the template setup or execution should be tracked in the issue section of this GitHub project.
To use the template you need to make sure that your PL has the following components installed:
-
Jenkins (required to run the template and to execute the build/deployment Jobs)
-
SonarQube (required for a static code analysis)
-
GitLab (required as a repository)
-
Nexus3 (required to store the build artifacts)
|
💡
|
Additional components can be ordered from the ProductionLine service team. |
In order to configure the services, we need technical users for the following components:
-
Gitlab
-
Nexus3
-
SonarQube
The following sections describe how to configure the components to enable technical users and tokens.
In order to configure the Production Line components manually you can follow this guide
In order to configure the Production Line components automatically you can follow this guide
There is one thing that initialize-template can not do automatically: the gitlab token creation.
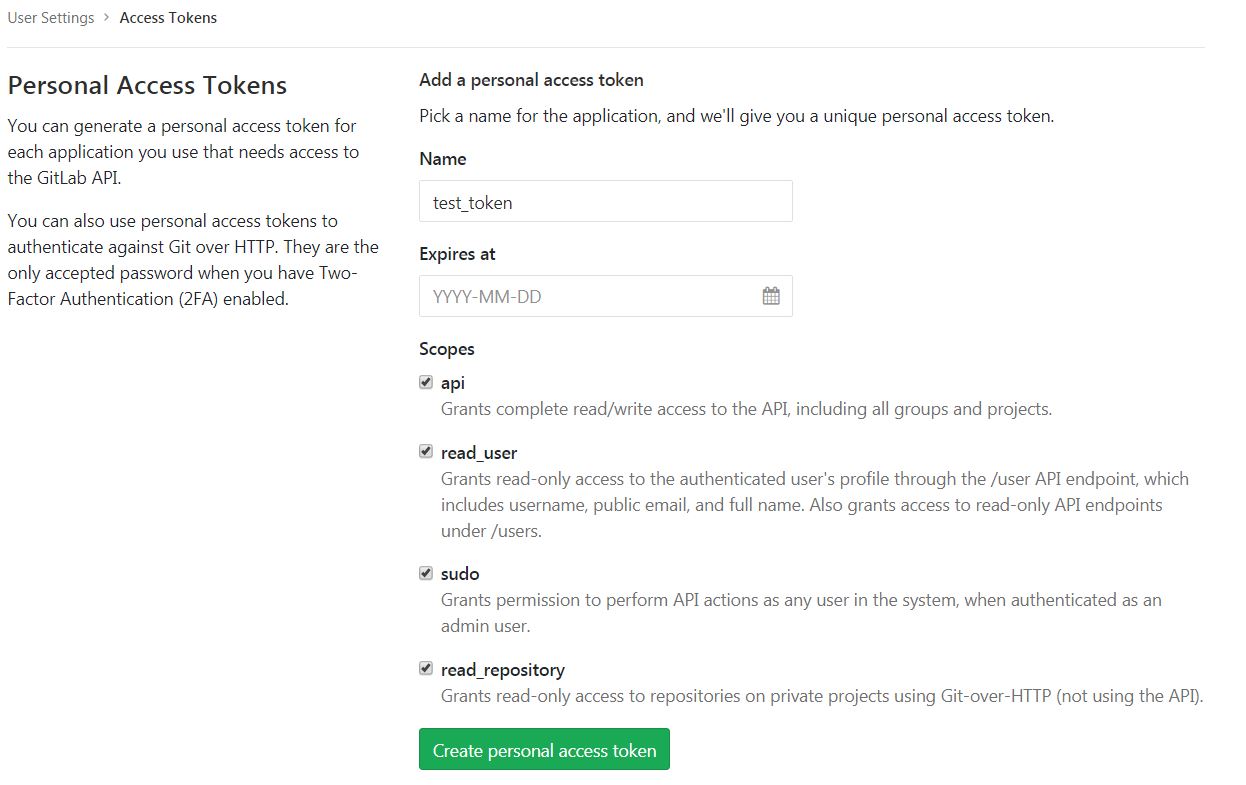
The creation of the GitLab Group and Project will require a private GitLab token which has to be created manually. The token can be obtained like this:
-
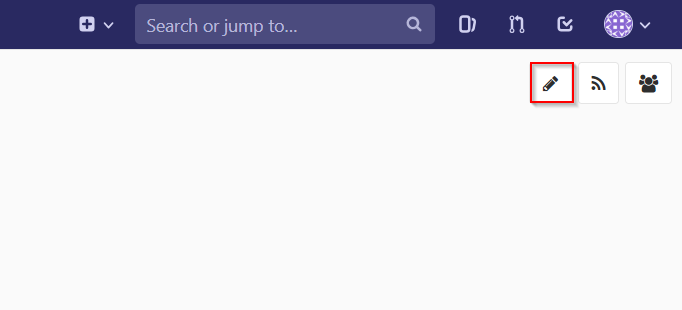
Go to your Profile in Gitlab

-
Next click on the pen icon

-
On the left menu choose Access Tokens and put token name and check fields like below

-
Click "Create personal access token", you should receive notification about created token and token string. Copy the token string.

|
❗
|
The GitLab API user needs to have API access and the rights to create a new group. To set this permission follow the next steps: |
-
Enter the Admin control panel
-
Select 'Users'
-
Select the user(s) in question and click 'Edit'
-
Scroll down to 'Access' and un-tick 'Can Create Group'
The My Thai Star CICD pipelines will create a docker image and then the deployment pipelines will use it in order to deploy the application. As Production Line do not include a docker daemon, you need an additional server to do it. Those server needs:
-
Docker-CE has to be installed
|
|
If Jenkins needs to install plugins, a restart will be performed. So please make sure, that nothing important is running. |
|
❗
|
We have job-parameters inside the template Jenkinsfile that will only be active if Jenkins has run the job at least once! |
The guide on how to add a template to your Jenkins can be found in the root directory of the template repository: https://github.com/devonfw/production-line.git
-
Go to the Jenkins job.
-
Execute job.
-
It will try to configure and setup the PL components such as Jenkins/Gitlab and Nexus.
|
❗
|
If a restart was needed, you need to trigger the job again! |
-
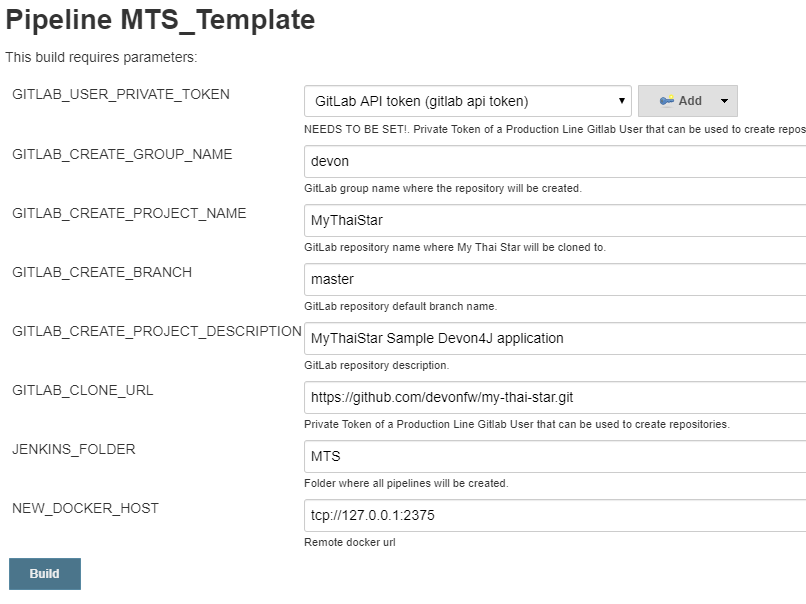
The job should now show the required parameters, you only need to change the GITLAB PRIVATE TOKEN that you should have generated in the prerequisite section

When everything is "green" the template is done and you can have a look in the created "MTS" folder in Jenkins.
|
❗
|
It will take a few minutes to clone the official MTS repository to the internal Gitlab. So you need to wait before executing the build jobs at the first time. |
You can now execute the build for the frontend and also the backend. They do not require any parameters to run. The expected result is, that both jobs can run without any errors. They will build, test and deploy the artifacts to Nexus3.
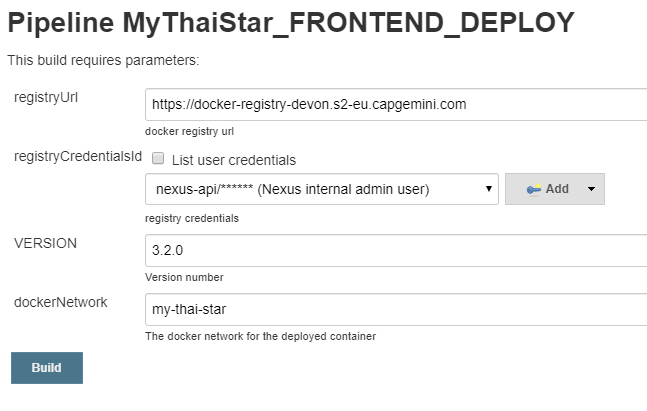
All deployment jobs have several parameters configured in their Jenkinsfile. Unfortunately, Jenkins does not pick them up immediately, so you need to execute the job once, by pressing the "Build now" button. The run should fail quite fast and once you refresh the page, the "Build now" button should have changed to "Build with Parameters". If you now click on the button you should see the parameters below:

You need to set the following parameters in order to get it running:
| Parameter | Description |
|---|---|
registryUrl |
The docker registry URL where image is stored. |
registryCredentialsId |
The nexus credentials to access to the docker registry. |
VERSION |
The version of the image that was built in the build jobs. For example "1.12.3-SNAPSHOT". |
dockerNetwork |
The docker network where the container will be deployed. |
Also, the reverse proxy deployment has two more parameters:
| Parameter | Description |
|---|---|
buildReverseProxy |
If true, it will build a new reverse proxy docker image and then deploy that image. |
port |
The port where the application will be listening. It’s a host port, not a container port. |
|
ℹ️
|
You can deploy multiple versions of My Thai Star in the same machine by changing the docker network in all deployments and the port in the reverse proxy deployment. |
|
❗
|
You must choose the same docker network for all deployments |
|
❗
|
You need to deploy the angular and java applications before the reverse proxy. Also, the first you need to check the |
-
-
devonfw Technologies Templates
-
Utility Templates
-
MrChecker
-
Samples
-