-
Notifications
You must be signed in to change notification settings - Fork 72
Interface Documentation
zeevy edited this page Jul 14, 2018
·
11 revisions
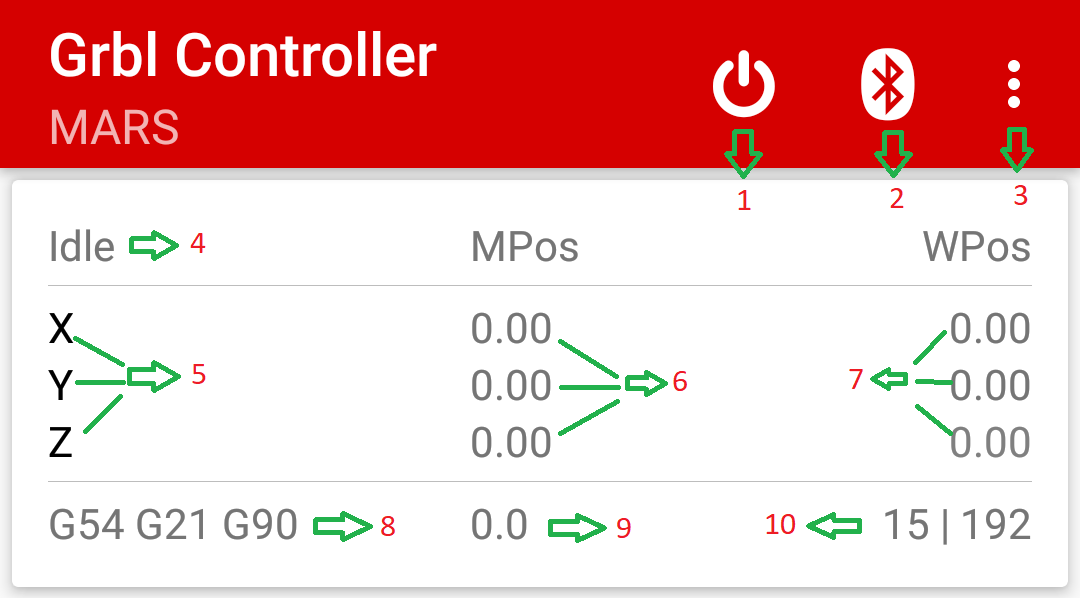
- Area 1: Grbl soft reset button. (asks for confirmation)
- Area 2: Bluetooth device connect and disconnect button.
- Area 3: Menu drop down
- Area 4: Machine current status as reported by grbl ? query.
- Area 5: X,Y and Z co-ordinates. These co-ordinates will change to red color if corresponding limit switch is triggered.
- Area 6: Machine position as reported by the grbl ? query.
- Area 7: Work position as reported by the grbl ? query. Z axis co-ordinate will change to red color if TLO is active.
- Area 8: Shows current active coordinate system, Units and Distance mode.
- Area 9: Current feed rate as reported by grbl ? query.
- Area 10: Grbl buffer status. (need to enable via 0=2)
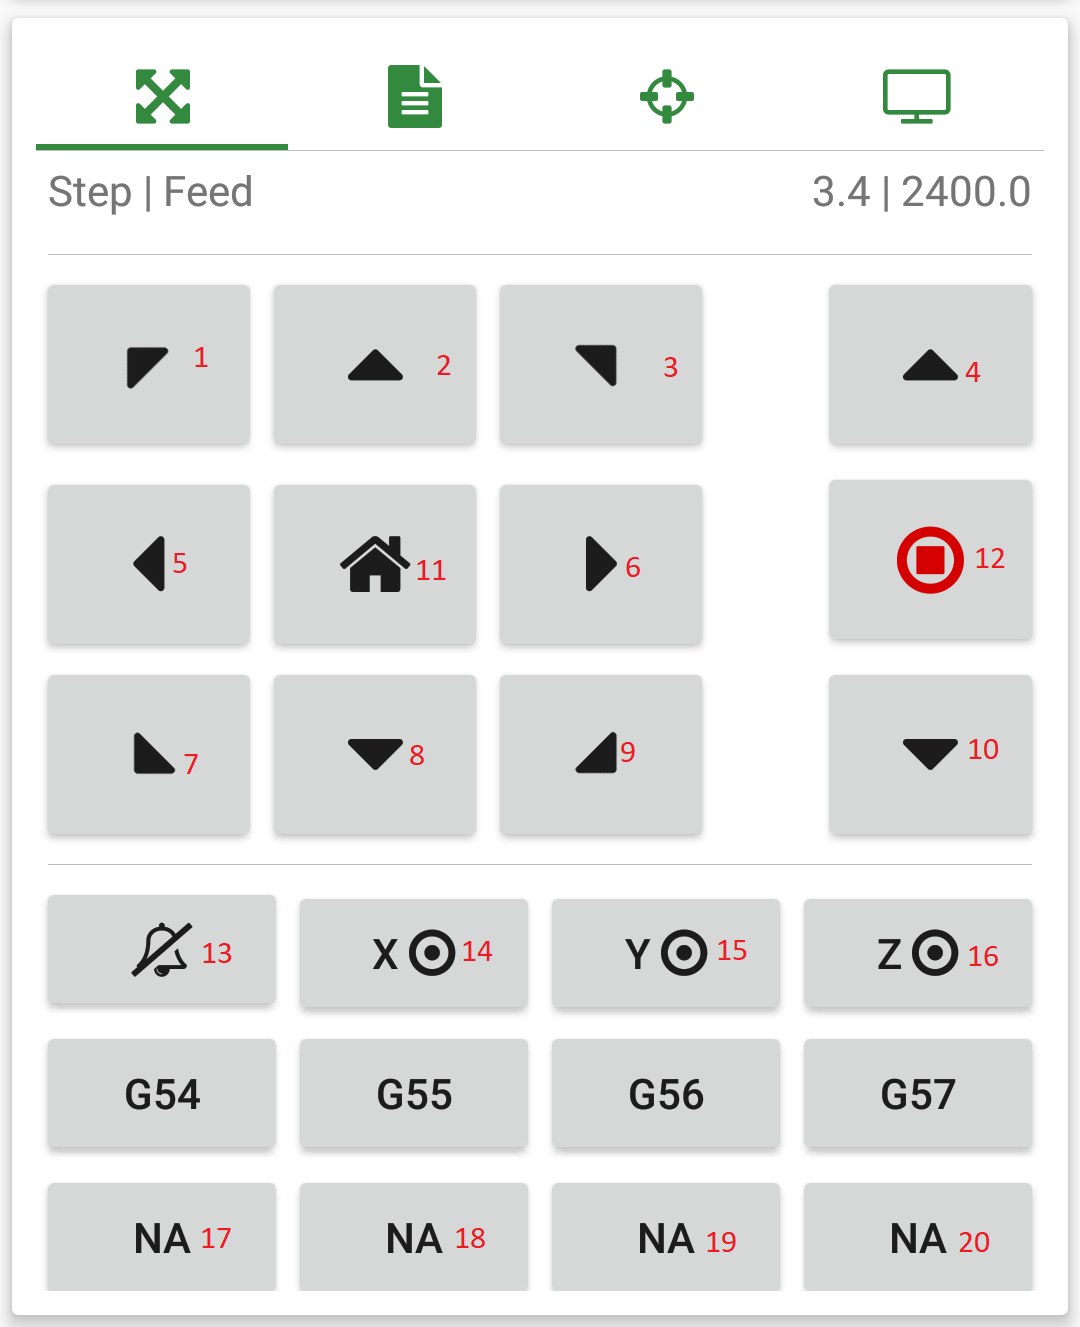
- Buttons 1 to Button 10 are used to control the machine jog direction.
- Button 11: Short click will do machine homing using $H. Long click will set all axes location in the active coordinate system to zero using G10 L20 P0 X0Y0Z0. Both methods will ask for a confirmation.
- Button 12: Short click will send the jog stop command 0x85. Long click will move the machine to zero position using G0 rapid move. Z-Axis will be moved up first, X and Y will be moved at the same time then Z is moved to zero position. Long click will ask for confirmation.
- Button 13: This button will turn to red color if alarm is active. Clicking on this will clear the alarm.
- Button 14 to Button 16: Short click will set selected axis position to zero using G10 L20 P0 X0|Y0|Z0. Long click will move the selected axis to its zero position using G0 rapid move. Both methods will ask for confirmation.
- Button G54, G55, G56, and G57 are used to select or set the coordinate system. Short click will select the corresponding coordinate system, while long click will save the current work position in the corresponding coordinate system.
- Button 17 to Button 20 are custom button which needs to be enabled in settings. These buttons supports both short and long clicks and can be used to send custom commands.
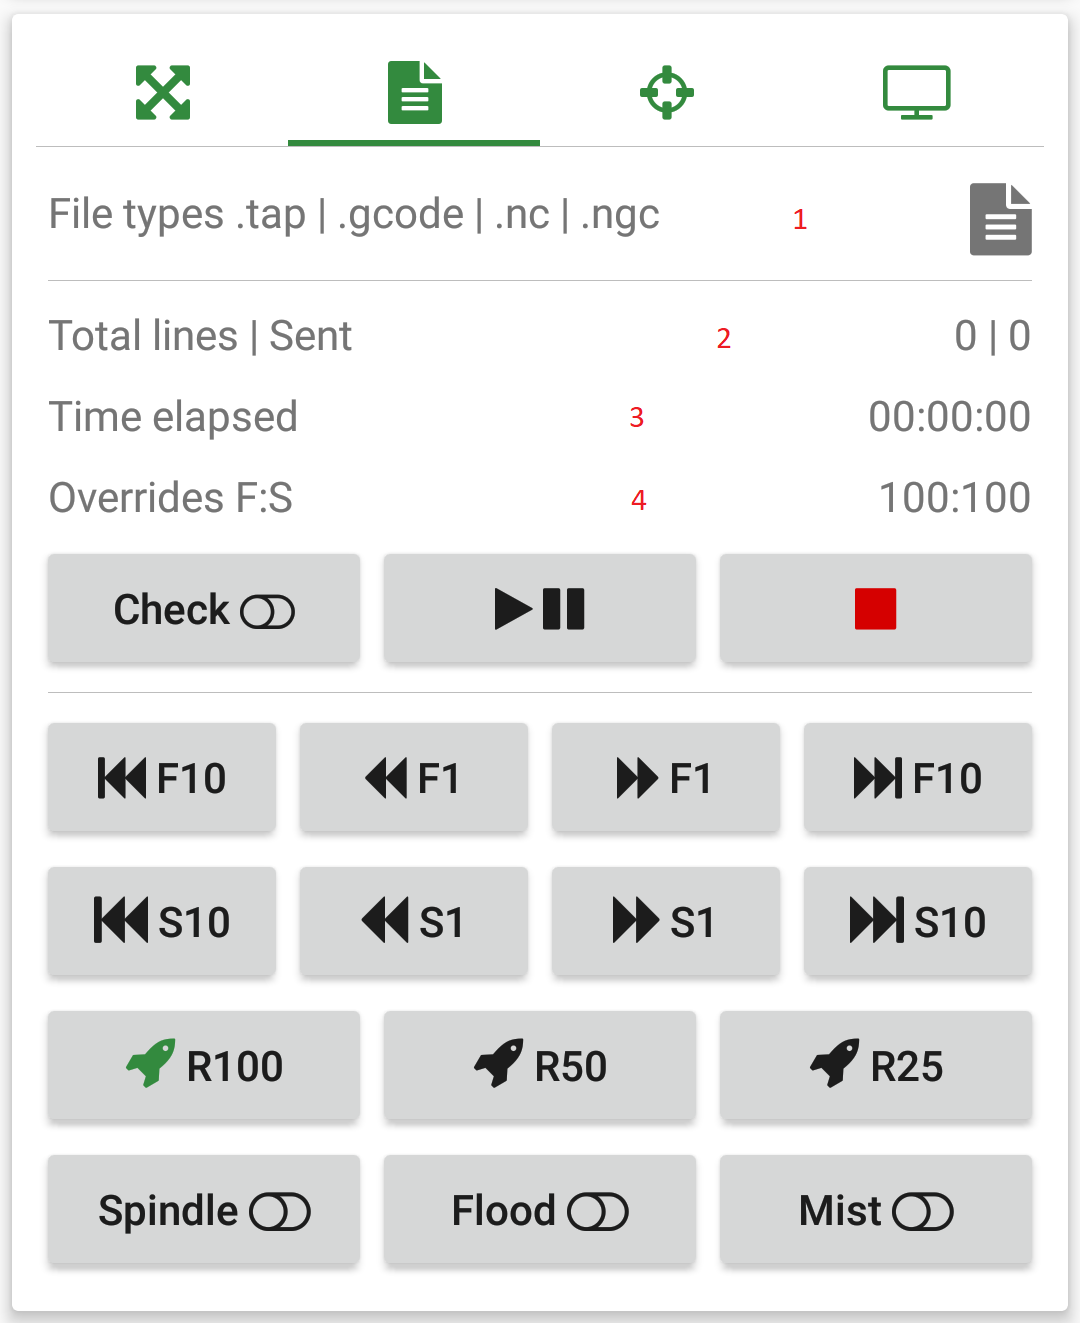
- Area 1: This button is used to select a gcode file stored in phone memory or external memory. gcode file must end with any of the supported extensions.
- Area 2: This will report the total lines in the gcode file and number lines sent while streaming. Line count will not include comment lines.
- Area 3: Shows the time taken while streaming.
- Area 4: Shows current overrides percents (feed and spindle) reported by grbl. It will also shows spindle speed if variable spindle is enabled.
- Buttons F1 and F10 are used to change the feed overrides. Long click will set feed override to 100%
- Buttons S1 and S10 are used to change the spindle overrides. Long click will set spindle override to 100%
- Buttons R100, R50 and R25 are used to change the rapid overrides.
- Buttons Spindle, Flood and Mist are used to toggle their status.
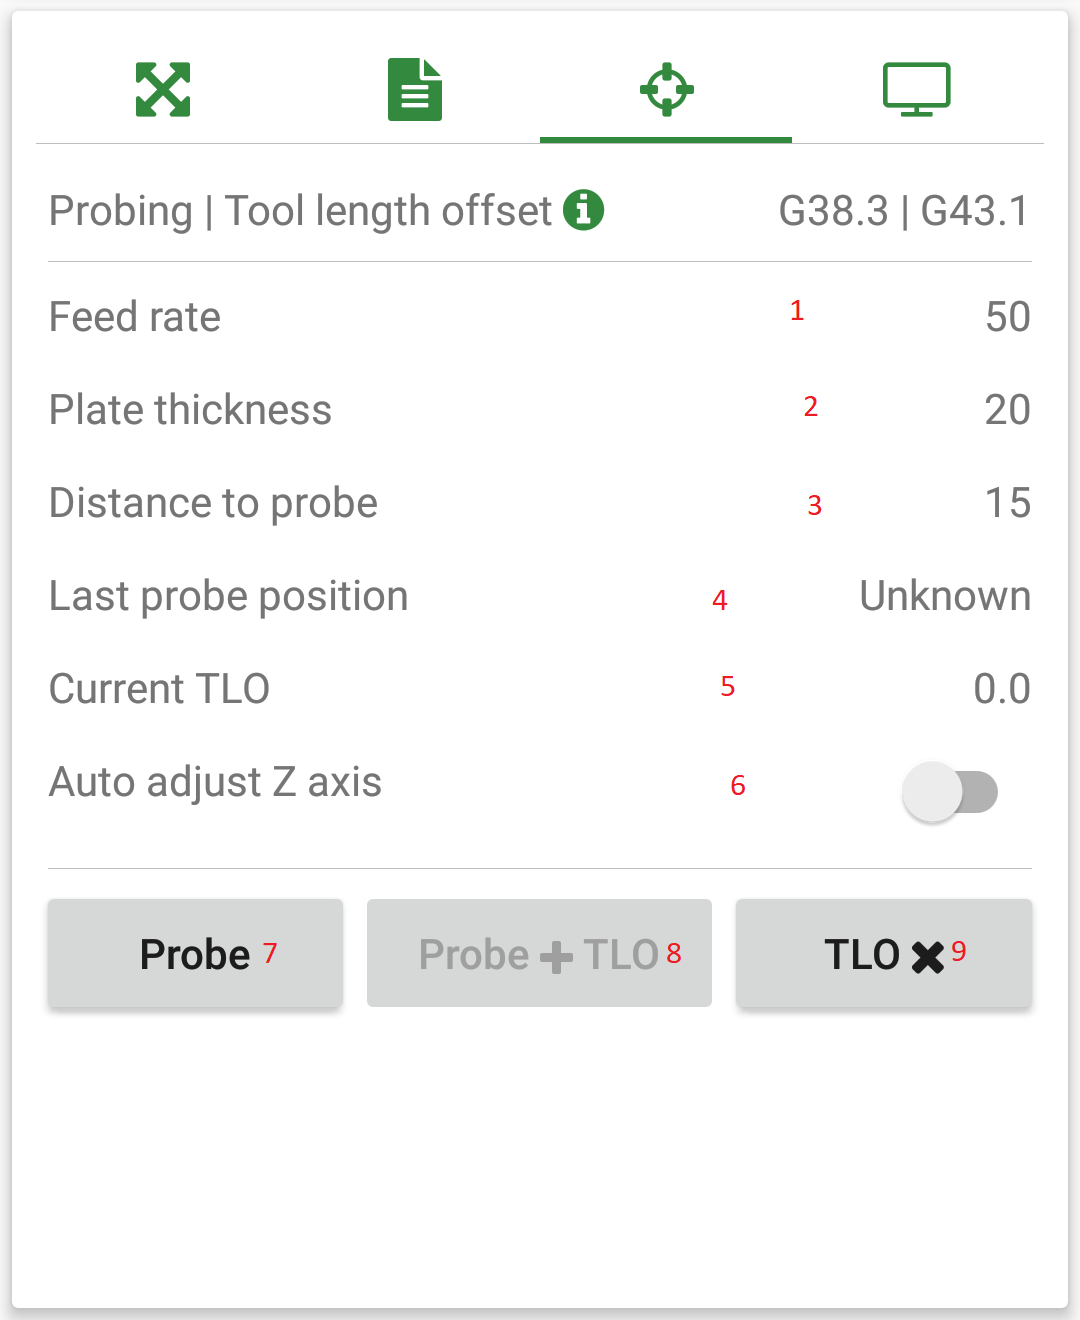
- Area 1: Feed rate for probing.
- Area 2: Probing plate thickness.
- Area 3: Total distance to probe from the current position.
- Area 4: Last successful probing position of Z-Axis.
- Area 5: It Shows the current active TLO value.
- Switch 6: When on it will auto zero the Z-Axis based on the probing plate thickness after a successful probe. This will toggle to off position after a successful probe.
- Button 7: Probe clicking on this will start the probe cycle using G38.3. Before probing it saves the current distance mode (G90, G91) and units (G20, G21) and restores them after probing completed.
- Button 8: Probe + TLO this used of tool change.
- Probe with the first tool.
- Change the tool.
- Press Probe + TLO, this should be done at the same place where you have done step 1.
- TLO is applied using G43.1 as abs(lastProbe) - abs(currentProbe)
- Button 9: TLO Cancel Click on this will cancel current tool length offset.
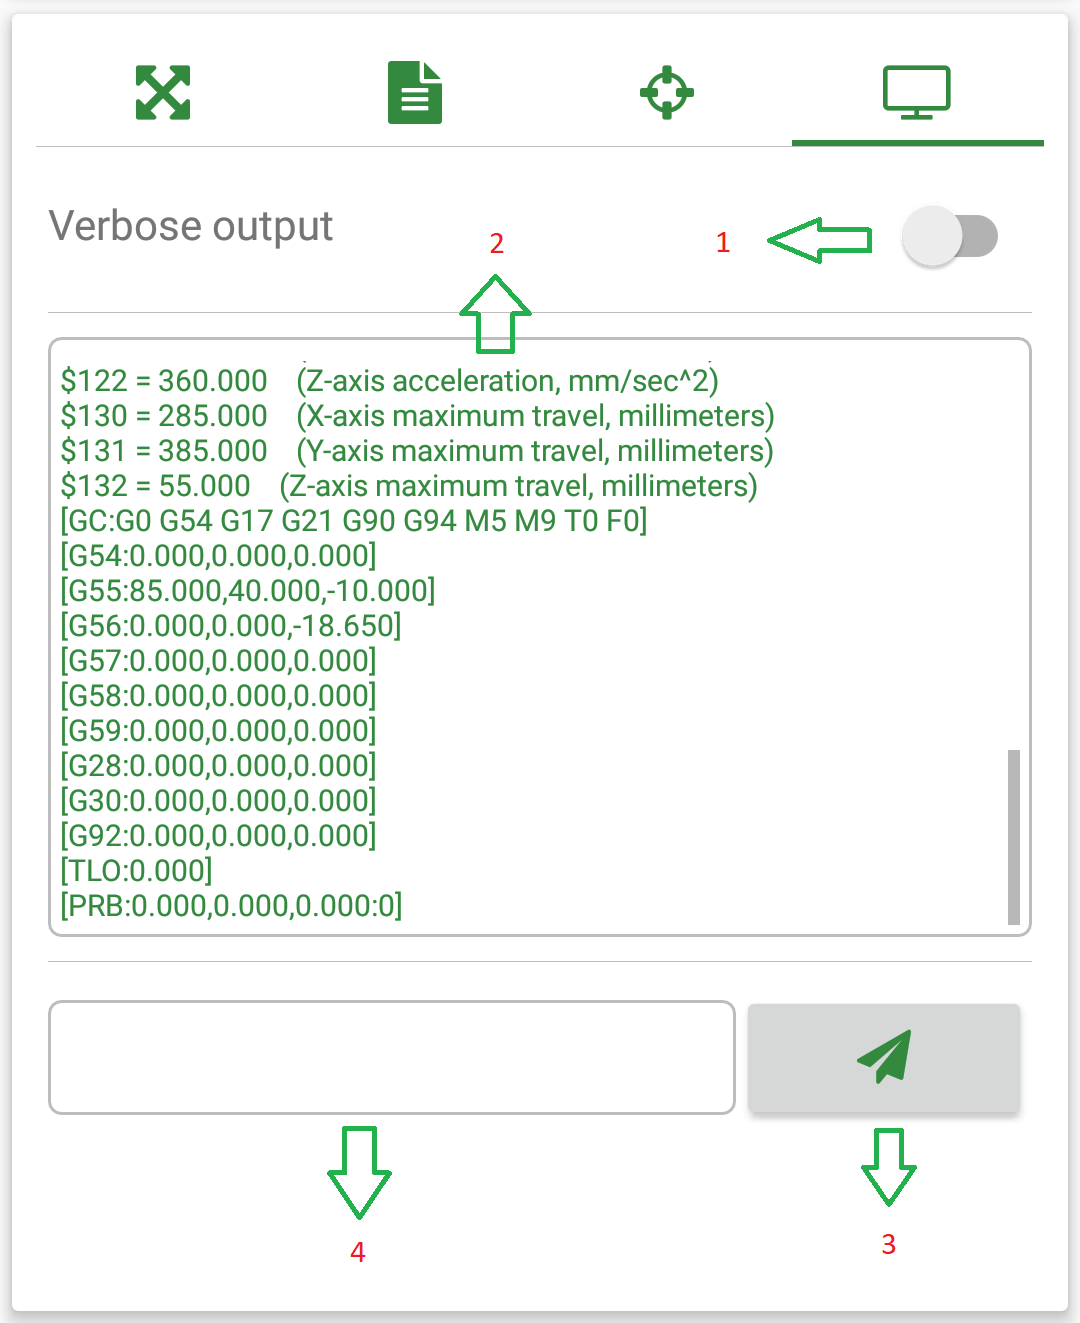
- Area 1: Toggles the Grbl status messages in console.
- Area 2: This will display the last 128 commands sent to Grbl.
- Button 3: Short click will send the commands typed in the text box to Grbl. Long click will clear the console messages.
- Area 4: This is where you type in your custom commands to Grbl.