This article is not intended to be a tutorial on routing in Angular. If you are new to Routing in Angular then I highly recommend you check out one of the the following resources:
The following represents a pattern that I've developed at my day job after building several enterprise Angular applications. While most online tutorials do a great job laying out the fundamentals, I had a hard time locating articles that showed recommended conventions and patterns for large and scalable applications.
With this pattern you should have a clean and concise organization for all routing related concerns in your applications.
For context, this article assumes you are using the following version of Angular:
- Angular v7.2.6
The official Angular docs recommend creating a full-blown
app-routing.module.tsfor your top-level routing. I have found this extra layer to be unnecessary in most cases.
HOT TIP: Only register top-level routes here, if you plan to implement feature modules, then the child routes would live underneath the respective
feature.routes.tsfile. We want to keep this top-level routes file as clean as possible and follow the component tree structure.
Let's go with the following approach:
-
Create a new file named
app.routes.tsin the rootsrc/appdirectory. This file will hold our top-levelRoutesarray. We will come back later throughout the article and fill this in. For now, let's scaffold it with the following contents:import { Routes } from '@angular/router'; export const AppRoutes: Routes = [];
-
Register
AppRoutesin theapp.module.tsfile.- Import
AppRoutesfromapp.routes.ts. - Import
RouterModulefrom@angular/router. - Add
RouterModule.forRoot(AppRoutes)to yourimportsarray
Your updated
app.module.tswill look similar to the following:import { NgModule } from '@angular/core'; import { BrowserModule } from '@angular/platform-browser'; import { RouterModule } from '@angular/router'; import { AppComponent } from './app.component'; import { AppRoutes } from './app.routes'; @NgModule({ declarations: [AppComponent], imports: [BrowserModule, RouterModule.forRoot(AppRoutes)], providers: [], bootstrap: [AppComponent] }) export class AppModule {}
- Import
In similar fashion to how we constructed the app.routes.ts we will create a feature.routes.ts to list out the individual routes for this feature module. We want to keep our routes as close to the source as possible. This will be in keeping with a clean code approach, and having a good separation of concerns.
-
Create a new file named
feature/feature.routes.tswherefeaturematches the name of yourfeature.module.tsprefix. This file will hold our feature-levelRoutesarray. Keeping in mind that you would replaceFeaturewith the actual name of your module, let's scaffold it with the following contents:import { Routes } from '@angular/router'; export const FeatureRoutes: Routes = [];
-
Register
FeatureRoutesin thefeature/feature.module.tsfile. We will make use of theRouterModule.forChildimport so that these routes are automatically registered with lazy loading.- Import
FeatureRoutesfromfeature.routes.ts. - Import
RouterModulefrom@angular/router. - Add
RouterModule.forChild(FeatureRoutes)to yourimportsarray
Your updated
feature/feature.module.tswill look similar to the following:import { CommonModule } from '@angular/common'; import { NgModule } from '@angular/core'; import { RouterModule } from '@angular/router'; import { FeatureRoutes } from './feature.routes'; @NgModule({ declarations: [], imports: [CommonModule, RouterModule.forChild(FeatureRoutes)] }) export class FeatureModule {}
An example of a
feature.routes.tsfile with child route(s) may look like the following:import { Routes } from '@angular/router'; import { FeatureOneComponent } from './feature-one.component'; import { FeatureSpecificCanActivateGuard } from './_guards'; export const FeatureOneRoutes: Routes = [ { path: '', pathMatch: 'full', redirectTo: 'feature-one-component' }, { path: 'feature-one-component', component: FeatureOneComponent, canActivate: [FeatureSpecificCanActivateGuard] } ];
- Import
Lazy loading is the concept of deferring load of code assets (javascript, styles) until the user actually needs to utilize the resources. This can bring large performance increases to perceived load times of your application as the entire code set doesn't have to download on first paint.
Angular provides a nice way to handle this with the
loadChildrenoption for a given route. More information can be found in the official Angular docs.
Once you've created your app.routes.ts and *.routes.ts files, you need to register any feature modules that you want to load lazily.
Update the AppRoutes array in the app.routes.ts file to include a new route the feature:
import { Routes } from '@angular/router';

export const AppRoutes: Routes = [
  {
    path: 'feature',
    loadChildren: './feature/feature.module#FeatureModule'
  }
];
By adding the above route to the array, when the user requests /feature in the browser, Angular lazy loads the module using the path given and then automatically registers any routes defined in the feature.routes.ts FeatureRoutes array using the RouterModule.forChild import.
For each additional feature module, you would add another item to the AppRoutes array. If you have multiple features, it might look something like the following:
import { Routes } from '@angular/router';

export const AppRoutes: Routes = [
  {
    path: '',
    pathMatch: 'full',
    redirectTo: 'feature-one'
  },
  {
    path: 'feature-one',
    loadChildren: './feature-one/feature-one.module#FeatureOneModule'
  },
  {
    path: 'feature-two',
    loadChildren: './feature-two/feature-two.module#FeatureTwoModule'
  }
];Here are a few tips to keep your router guards organized. These are just guidelines, but I have found them to be very helpful.
Guards should use the following naming convention:
- File Name:
name.function.guard.ts - Class Name:
NameFunctionGuard
Each part being identified as:
name- this is the name of your guard. What are you guarding against?function- this is the function your guard will be attached to. Angular supportsCanActivate,CanActivateChild,CanDeactivate, andResolve.
An example of an Auth Guard that is attached to the CanActivate function would be named as follows:
- File Name:
auth.can-activate.guard - Class Name:
AuthCanActivateGuard
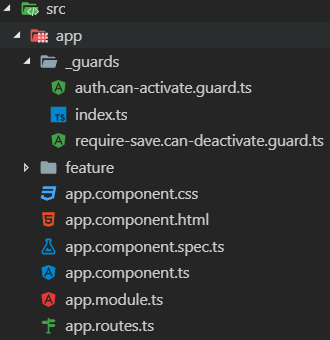
Organize all top-level guards under a folder named src/app/_guards. I have seen apps dump guards in the top level directory and this is messy, especially if you end up with more than a few guards.
The jury is still out on whether or not using barrel exports is officially considered a "best practice" or even supported by the Angular style guide. However, I am a big fan of the clean organization this provides. This method is offered as a suggestion.
Make sure that src/app/_guards has a nice and clean index.ts barrel export. Barrel exports are simply index.ts files that group together and export all public files from a directory. An example is as follows:
export * from './auth.can-activate.guard';
export * from './require-save.can-deactivate.guard';
Without Barrel Exporting:
import { AuthCanActivateGuard } from 'src/app/_guards/auth.can-activate.guard';
import { RequireSaveCanDeactivateGuard } from 'src/app/_guards/require-save.can-deactivate.guard';
With Barrel Exporting:
import {
  AuthCanActivateGuard,
  RequireSaveCanDeactivateGuard
} from 'src/app/_guards';
An example application with a _guards directory would look as follows:
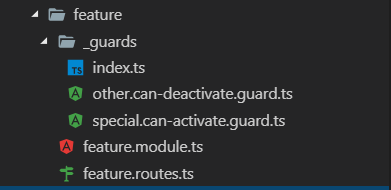
If you have guards that are only used in a particular FeatureRoutes array, then store these routes underneath a folder named _guards underneath your feature folder. Make sure to follow the same naming conventions defined above, as well as barrel exporting.
- Place guards under a folder named
_guardsunderneath your feature folder - Make sure to create a barrel export
index.tsfor clean importing
An example feature directory with _guards would look as follows:
A completed application structure should look something like the following:
I have created a demonstration repository on GitHub. Feel free to fork, clone, and submit PRs.
https://github.com/wesleygrimes/angular-routing-best-practices
It's important to remember that I have implemented these best practices in several "real world" applications. While I have found these best practices helpful, and maintainable, I do not believe they are an end-all be-all solution to organizing routes in projects; it's just what has worked for me. I am curious as to what you all think? Please feel free to offer any suggestions, tips, or best practices you've learned when building enterprise Angular applications with routing and I will update the article to reflect as such. Happy Coding!


