-
Notifications
You must be signed in to change notification settings - Fork 3
pinpoint php aop 내부 원리
pinpoint-php-aop는 pinpoint-php 에이전트를 지원하는 라이브러리입니다.
- PHP 내장 함수 자동 주입, 예: redis, pdo, mysqli
- 사용자 정의 클래스 자동 주입, 예: guzzlehttp, predis
내장 함수 설명:
    PHP comes standard with many functions and constructs. There are also functions that require specific
    PHP extensions compiled in, otherwise fatal "undefined function" errors will appear. For example, to
    use image functions such as imagecreatetruecolor(), PHP must be compiled with GD support. Or, to use
    mysqli_connect(), PHP must be compiled with MySQLi support. There are many core functions that are
    included in every version of PHP, such as the string and variable functions. A call to phpinfo()
    or get_loaded_extensions() will show which extensions are loaded into PHP. Also note that many
    extensions are enabled by default and that the PHP manual is split up by extension. ...

> https://www.php.net/manual/en/functions.internal.php#functions.internal
Inspired by https://www.phpinternalsbook.com/php7/extensions_design/hooks.html#overwriting-an-internal-function
PHP 커널은 전역 class_table을 제공하며, 사용자는 이를 통해 원래 함수를 대체하여 해당 함수를 래핑하는 목적을 달성할 수 있습니다. 예를 들어, 보안 플러그인 코드 삽입을 실현할 수 있습니다.
- ext_pinpoint-php는 내장 함수 대체 기능을 제공합니다.
// https://github.com/pinpoint-apm/pinpoint-c-agent/blob/9c544f139665dde3a9cee2a244a9c3be2f32bff9/src/PHP/pinpoint_php.cpp#L887
zend_function *func = (zend_function *)zend_hash_str_find_ptr(
      CG(function_table), ZSTR_VAL(name), ZSTR_LEN(name));
  if (func != NULL &&
      func->internal_function.handler == pinpoint_interceptor_handler_entry) {
    pp_trace("function `%s` interceptor already added", ZSTR_VAL(name));
  } else if (func != NULL) {
    pp_interceptor_v_t *interceptor =
        make_interceptor(name, before, end, exception, func);
    // insert into hash
    if (!zend_hash_add_ptr(PPG(interceptors), name, interceptor)) {
      free_interceptor(interceptor);
      pp_trace("added interceptor on `function`: %s failed. reason: already "
               "exist ",
               ZSTR_VAL(name));
      return;
    }
    func->internal_function.handler = pinpoint_interceptor_handler_entry;
pp_trace("added interceptor on `function`: %s success", ZSTR_VAL(name));- 첫 번째 스텝 기능을 기반으로 삽입점에 pinpoint의 비즈니스 로직 플러그인을 추가합니다.
// https://github.com/pinpoint-apm/pinpoint-php-aop/blob/5994253869d516c38d528a8ef784a5c1c18b20f3/lib/Pinpoint/Plugins/SysV2/_curl/curl.php#L78
pinpoint_join_cut(
    ["curl_close"],
    function ($ch) use (&$ch_res) {
        unset($ch_res[(int) $ch]);
        pinpoint_start_trace();
        pinpoint_add_clue(PP_INTERCEPTOR_NAME, "curl_close");
        pinpoint_add_clue(PP_SERVER_TYPE, PP_PHP_METHOD);
    },
    function ($ret) {
        pinpoint_end_trace();
    },
    function ($e) {
    }
);- 플러그인을 활성화하려면 필요한 요구 사항을 설치합니다.
// https://github.com/pinpoint-apm/pinpoint-php-aop/blob/5994253869d516c38d528a8ef784a5c1c18b20f3/lib/Pinpoint/Plugins/PinpointPerRequestPlugins.php#L126C12-L126C58
if(sampled){
    require_once __DIR__ . "/SysV2/__init__.php";
}else{
    require_once __DIR__ . "/SysV2/_curl/__init__.php";
}그 전에 클래스 로더에 대해 이해해야 합니다.
By registering autoloaders, PHP is given a last chance to load the class or interface before it fails with an error.
> https://www.php.net/manual/en/language.oop5.autoload.php
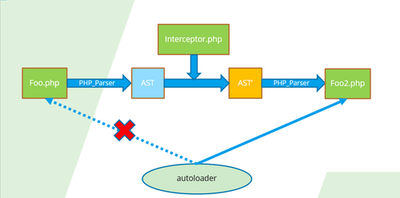
PHP의 경우, 사용자가 use 등을 통해 클래스를 로드하려고 할 때, 커널은 해당 클래스가 이미 로드되었는지 확인합니다. 만약 그렇지 않다면, auto_loader 호출을 통해 대응 파일을 호출합니다. pinpoint-php-aop는 바로 이 시점에 클래스를 가로챕니다.
-
PHP의 클래스 로더가 초기화된 후, pinpoint-php-aop의 클래스 로더가 모든 로드된 클래스와 함수를 가로챕니다. 가로채야 할 클래스를 발견하면, 해당 클래스를 pinpoint 플러그인이 추가된 클래스로 지시합니다.
-
Pinpoint 로더가 해당 파일이 pinpoint 플러그인으로 가로채지 않았음을 발견하면, pinpoint 플러그인이 추가된 클래스를 생성하여 클래스 로더에 등록합니다. 더 중요한 것은, 이러한 클래스가 cache_dir에 캐시된다는 점입니다. 후속 요청이 들어오면 이러한 클래스 파일이 재사용됩니다. 이는 많은 요청 시간을 절약할 수 있다는 장점이 있습니다.

조금 헷갈리실 수도 있을텐데🥴 예제
Pinpoint\Plugins\autoload\_MongoPlugin를 통해 전체 프로세스를 다시 설명해 보겠습니다:
- 예를 들어 프로젝트에서 mongodb 클라이언트를 사용합니다.
//https://github.com/pinpoint-apm/pinpoint-c-agent/blob/9c544f139665dde3a9cee2a244a9c3be2f32bff9/testapps/SimplePHP/run.php#L92-L93
$client = new MongoDB\Client("mongodb://$mongodb_host:27017");- Pinpoint-php-aop가 제공하는 함수를 통해
MongoDB\Client클래스의__construct메서드와 대응 플러그인을 등록하고 가로챕니다.
//https://github.com/pinpoint-apm/pinpoint-php-aop/blob/5994253869d516c38d528a8ef784a5c1c18b20f3/lib/Pinpoint/Plugins/autoload/_MongoPlugin/__init__.php#L25
$classHandler = new AspectClassHandle(\MongoDB\Client::class);
$classHandler->addJoinPoint('__construct', MongoPlugin::class);
$cls[] = $classHandler;- Pinpoint 초기화가 완료되면
/tmp/.cache/__class_index.php경로에 파일이 생성됩니다.
default cache directory is
/tmp/
$pinpoint_class_map = array('MongoDB\\Client' => '/tmp/.cache/MongoDB/Client.php', ...);
return $pinpoint_class_map;
여기에는 pinpoint 플러그인이 추가된 클래스 파일도 포함됩니다.
//Client.php
namespace MongoDB;
class Client{
...
    // origin methods
    public function __pinpoint____construct(?string $uri = null, array $uriOptions = [], array $driverOptions = [])
    {

    }
    // rendered methods
    public function __construct(?string $uri = null, array $uriOptions = [], array $driverOptions = [])
    {
        $_pinpoint___construct_var = new \Pinpoint\Plugins\autoload\_MongoPlugin\MongoPlugin(__METHOD__, $this, $uri, $uriOptions, $driverOptions);
        try {
            $_pinpoint___construct_var->onBefore();
            $this->__pinpoint____construct($uri, $uriOptions, $driverOptions);
            $_pinpoint___construct_var->onEnd($_pinpoint___construct_ret);
        } catch (\Exception $e) {
            $_pinpoint___construct_var->onException($e);
            throw $e;
        }
    }
...
}- 위의 클래스(Client.php)가 PHP 커널에 로드되면 pinpoint 플러그인이 프로젝트에서 정상적으로 작동하게 됩니다.
i.e. 이로써 사용자 정의 클래스도 pinpoint에 의해 성공적으로 가로채졌습니다.
by hu-keyu