-
Notifications
You must be signed in to change notification settings - Fork 15
Shared Repository Model
Create a branch in our Github master repository by clicking on the Branch button and typing a branch name.
To clone that branch on your local machine:
$ git clone -b my-branch-name https://github.com/level5-engineers/system-integration.git
Checkout a branch...
$ git checkout
Work on your code, then...
$ git add [files]      or: $ git add .
$ git commit -m "Updates to add some new features"
or
$ git commit -a
and add a commit message. That commit is now in your local repository.
To push it to the team repository (into your own branch), run
$ git push
We have a protected master, so a pull request is necessary to begin the process toward merging code.
- On the Github team repository page, select the Pull requests tab.
- Click the green "New pull request" button. Note how this operation takes you to udacity/CarND_Capstone. Don't worry.
- CRITICAL: From the first drop-down button (base fork), select our repository "level5-engineers/system-integration" This will update the screen to indicate that you are now back on the team repository.
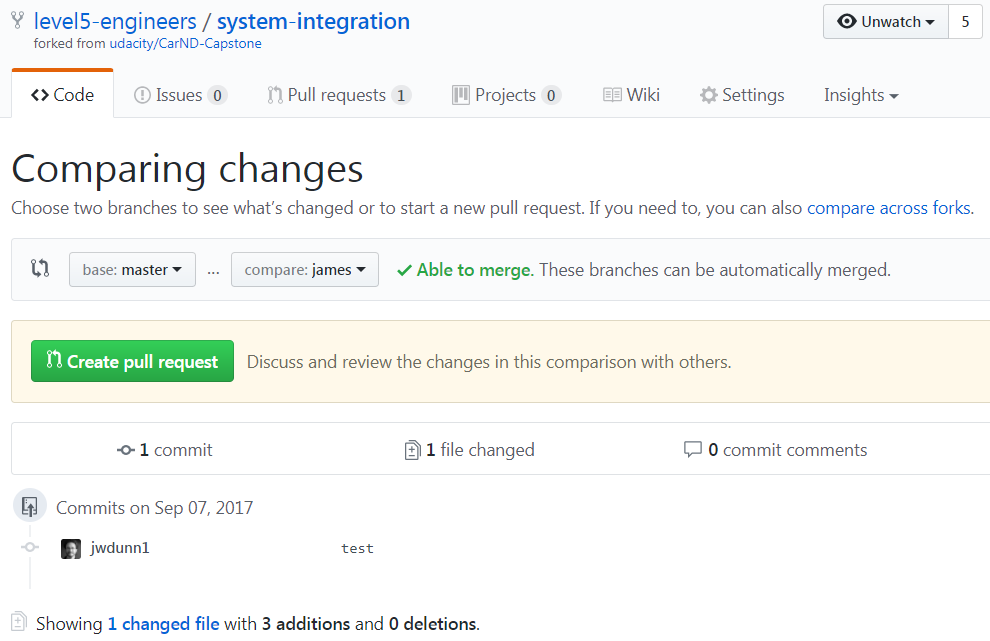
- Now, select your branch name from the second drop-down button. You should see something similar to the following (with your own branch name and commits):

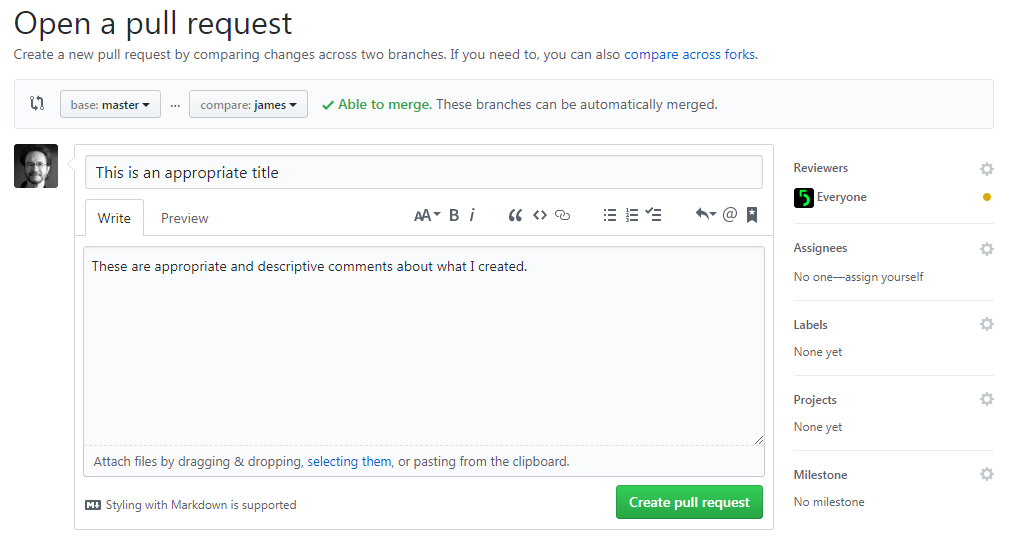
- Almost there! Next, as seen in the image above, click the green "Create pull request" button. The form will change to something similar to the image below.
- Enter an appropriate title and comments regarding your updates.
- Then click the "gear" icon next to the word Reviewers on the right side panel and select the Everyone group. (These instructions are subject to change, i.e. to specific team-members in the future, but let's experiment.)
- You are ready to push the green "Create pull request" button!
We all have the power to approve and merge a pull request created by other members (but not your own). Before you approve a pull request, be sure to examine the changes. If they are minor and make sense, then go ahead and approve. If something does not make sense, create a comment and describe the concern to open some discussion. If the changes are not minor, ideally, you should pull down the branch and test it. If the test results are good, then approve, otherwise, describe what happened in comment.
After approving a pull request, you have a choice of merging the changes with the master branch. You can also leave this task to the pull request owner or another team member. When a pull request is merged, everyone who branches from the master thereafter will have the new changes.
Note: If a pull request cannot be merged automatically, a manual process is required. See: https://help.github.com/articles/resolving-a-merge-conflict-on-github/
Example:
Command line steps to resolve merge conflict: GitHub Desktop created a local copy branch called pr/10
Switch to a new branch called udacity-master
git checkout -b udacity-master master
Merge from upstream Udacity master
git pull https://github.com/udacity/CarND-Capstone.git master
Auto-merging ros/src/styx/server.py
CONFLICT (content): Merge conflict in ros/src/styx/server.py
Automatic merge failed; fix conflicts and then commit the result.
At this point, edit the identified conflict file(s) and fix conflicts.
Check status to indicate the changes to be committed and the unmerged paths
git status
Add file(s) to mark resolution
git add <path/file>
Conclude the merge
git commit -m "Resolve conflicts"
Checkout the team master
git checkout master
Merge the udacity-master branch into team master
git merge --no-ff udacity-master
Push the local copy back up to GitHub I pushed using a button in GitHub Desktop
