WCH CH32V series is a family of General-Purpose 32bit RISC-V MCU, please refer to official website for more infomations.
- Hardware prerequist
- Toolchain overview
- RISC-V GNU Toolchain
- SDK
- Programming
- Debugging
- Project templates
- ch32v003evt
- ch32x035evt
- ch32v103evt
- ch32l103evt
- ch32v20xevt
- ch32v307evt
- ch573evt
- ch583evt
- ch585evt
- ch592evt
- How to rescue a bricked CH32V and WCH-LinkE
- How to update firmware of WCH-Link/E
- CH32V/X/L board
- WCH-LinkE(ch32v305fbp6 based) or WCH-Link(ch549 based), with latest firmware
Note: WCH-Link does not support 1-wire SDI interface used by ch32v003, you need a WCH-LinkE to program/debug ch32v003.
WCH have an official online store on AliExpress, you can buy the EVT boards and WCH-LinkE from it.
- Compiler: gcc
- SDK: WCH official EVT source package
- Programmer:
- wchisp for ISP mode
- wlink for WCH-LinkE.
- WCH OpenOCD for WCH-LinkE.
- Debugger: WCH OpenOCD and gdb
CH32V is well supported by riscv-gnu-toolchain.
The RISC-V GNU toolchain, which contains compilers and linkers like gcc and g++ as well as helper programs like objcopy and size is available from riscv-gnu-toolchain. There are also some prebuilt release provided by nuclei or other teams, such as 'xpack', so you can either build it yourself or download a prebuilt release.
If you want to use a prebuilt release, just ignore this section.
Building a cross compile gnu toolchain was difficult long time ago, you need to understand and use configuration options very carefully. riscv-gnu-toolchain provided a simpler way to help us building a workable toolchain. It supports two build modes: a generic ELF/Newlib toolchain and a more sophisticated Linux-ELF/glibc toolchain. we only need the 'generic ELF/Newlib toolchain' for CH32V.
git clone https://github.com/riscv-collab/riscv-gnu-toolchain.git
cd riscv-gnu-toolchain
mkdir build
cd build
../configure --prefix=/opt/riscv-gnu-toolchain --disable-linux --with-abi=ilp32 --with-arch=rv32imac
make -j<nprocs>
make install
NOTE, for ch32v003, you should build gcc with --with-abi=ilp32e --with-arch=rv32ec_zicsr.
It will be installed to "/opt/riscv-gnu-toolchain" dir, and the target triplet of gcc should be 'riscv32-unknown-elf-'.
Since the prefix is not set to standard dir, you need add '/opt/riscv-gnu-toolchain/bin' to PATH env. for example, for bash, add it to ~/.bashrc:
export PATH=/opt/riscv-gnu-toolchain/bin:$PATH
MounRiver Studio (WCH official IDE) provide a standalone linux toolchain that you can use directly, especially for some chips with WCH private RISCV instructions, for example CH584/585, you have to use MRS toolchain. Up to now, the currect version is v1.92.1, you can download it from here.
Download and extract it as:
wget http://file-oss.mounriver.com/tools/MRS_Toolchain_Linux_x64_V1.92.1.tar.xz
sudo mkdir -p /opt/MRS_toolchain
sudo tar xf MRS_Toolchain_Linux_x64_V1.92.1.tar.xz -C /opt/MRS_toolchain --strip-components=1
And add /opt/MRS_toolchain/RISC-V_Embedded_GCC12/bin to your PATH env.
NOTE, the target triplet of MRS toolchain is riscv-none-elf.
xpack-dev-tools provde a prebuilt toolchain for riscv. you can download it from https://github.com/xpack-dev-tools/riscv-none-elf-gcc-xpack/. The lastest version is '14.2.0', download and extract it as:
sudo mkdir -p /opt/xpack-riscv-toolchain
sudo tar xf xpack-riscv-none-elf-gcc-14.2.0-2-linux-x64.tar.gz -C /opt/xpack-riscv-toolchain --strip-components=1
And add /opt/xpack-riscv-toolchain/bin to PATH env according to your shell.
NOTE, the target triplet of xpack riscv toolchain is riscv-none-elf and it can support ch32v003 development.
If you used to do stm32 programming, you will feel very familiar with CH32V SDK.
WCH provide evaluate source code package for every CH32V MCU model and licensed under Apache-2.0, you can download them from WCH official website according to your MCU model.
For ch32v003, https://www.wch.cn/downloads/CH32V003EVT_ZIP.html
For ch32x035, https://www.wch.cn/downloads/CH32X035EVT_ZIP.html
For ch32v103, http://www.wch.cn/downloads/CH32V103EVT_ZIP.html.
For ch32l103, https://www.wch.cn/downloads/CH32L103EVT_ZIP.html
For ch32v20x, https://www.wch.cn/downloads/CH32V20xEVT_ZIP.html
For ch32v30x, http://www.wch.cn/downloads/CH32V307EVT_ZIP.html
For ch571/573, https://www.wch.cn/downloads/CH573EVT_ZIP.html
For ch581/582/583, https://www.wch.cn/downloads/CH583EVT_ZIP.html
For ch584/585, https://www.wch.cn/downloads/CH585EVT_ZIP.html
For ch591/592, https://www.wch.cn/downloads/CH592EVT_ZIP.html
These evt packages contains core SDK and a lot of demo routines but lack Makefile support, here provide ch32v evt project template and convertor and ch5xx evt project template and convertor to convert EVT packages to makefile project.
git clone https://github.com/cjacker/ch32v_evt_makefile_gcc_project_template
cd ch32v_evt_makefile_gcc_project_template
./generate_project_from_evt.sh <part>
the <part> can be obtained with running ./generate_project_from_evt.sh without any args.
Then type make to build the project.
After building complete, you will get build/<part>.elf, build/<part>.hex and build/part.bin, which can be used for debugging and programming later.
git clone https://github.com/cjacker/ch5xx_riscv_ble_evt_makefile_gcc_project_template
cd ch5xx_riscv_ble_evt_makefile_gcc_project_template
./generate_project_from_evt.sh <part>
the <part> can be obtained with running ./generate_project_from_evt.sh without any args.
Then type make to build the project.
After building complete, you will get build/<part>.elf, build/<part>.hex and build/<part>.bin, which can be used for debugging and programming later.
Note 1: These demo only blink LED connect to PA8.
Note 2: These evt packages are partial opensourced, there is no source of ISP static library.
Note 3: For ch584/585, you have to use MRS toolchain to support 'mcpy' instruction.
ISP programming doesn't need a WCH-LinkE adapter, it program the target device via USB port directly.
The best opensource WCH ISP tool is wchisp, which support more parts than other opensource solutions.
Installation:
git clone https://github.com/ch32-rs/wchisp.git
cd wchisp
cargo build --release
sudo install -m0755 target/release/wchisp /usr/bin/wchisp
Programming:
You need enter ISP mode first. please find the 'BOOT0' and 'RESET' button on your development board
- hold the 'BOOT0' button down and power on the device (connect the device to USB port).
or
- connect your development board directly to Linux PC USB port.
- hold the BOOT0 button down, press the RESET button then release it, after a while (about 1 second), release BOOT0 button.
Then
- run
lsusb, you will find something like '4348:55e0 WinChipHead'.
After enter ISP mode, you can program the target board as:
sudo wchisp flash build/ch32v.bin
You may need to press 'RESET' button to reset the board after programming.
A forked version of ch55xtool can also support program WCH CH32V103/307, you can have a try yourself.
CH32V103/203/208/305/307 use a proprietary 2-wire debugging interface named 'RVSWD' and requires a special (but very cheap) usb programmer/debugger named 'WCH-Link' or 'WCH-LinkE', and the software support was implemented in WCH forked OpenOCD as 'wlink' interface.
When CH32V003 released, A new 1-wire interface named 'SDI' was introduced with CH32V003, Only 'WCH-LinkE' can support SDI interface.
Before programming with WCH-LinkE, please wire up 'WCH-LinkE' with target board (pins as same as SWD). for CH32V003, only the 'PD1 / SWDIO' pin is needed.
Since WCH-LinkE support dual mode (RV and DAP), please make sure your WCH-LinkE adapter is in RV mode. refer to next section to learn how to switch mode of WCH-LinkE with wlink.
And if you encounter any problem when using WCH-LinkE, you should try to update its firmware first. Please refer to How to update firmware of WCH-Link/E to update the firmware.
wlink is a command line tool work with WCH-LinkE programmer/debugger.
wlink features:
- Flash firmware, support Intel HEX, ELF and raw binary format
- Erase chip
- Halt, resume, reset support
- Read chip info
- Read chip memory(flash)
- Read/write chip register - very handy for debugging
- Code-Protect & Code-Unprotect for supported chips
- Enable or Disable 3.3V, 5V output
- SDI print support, requires 2.10+ firmware
- Serial port watching for a smooth development experience
Installation:
cargo install --git https://github.com/ch32-rs/wlink
WCH-LinkE mode switch:
Switch WCH-LinkE to RV mode:
wlink mode-switch --rv
Programming:
wlink flash firmware.bin
wlink is good enough to work with WCH-Link/E, this section is not recommended.
I put the latest source of WCH official OpenOCD here. It can work with all known version of WCH-LinkE and support all WCH CH32V/L/X series MCUs.
Installation:
git clone https://github.com/cjacker/wch-openocd
cd wch-openocd

./configure --prefix=/opt/wch-openocd --program-prefix=wch- --enable-wlinke --disable-ch347 --disable-linuxgpiod --disable-werror

make
sudo make install
After installation finished, add '/opt/wch-openocd/bin' to PATH env.
Programming:
# to erase all
sudo wch-openocd -f wch-riscv.cfg -c init -c halt -c "flash erase_sector wch_riscv 0 last " -c exit
# to program and verify
sudo wch-openocd -f wch-riscv.cfg -c init -c halt -c "program xxx.hex\bin\elf verify" -c exit
# to verify
sudo wch-openocd -f wch-riscv.cfg -c init -c halt -c "verify_image xxx.hex\bin\elf" -c exit
# to reset/resume
sudo wch-openocd -f wch-riscv.cfg -c init -c halt -c "wlink_reset_resume" -c exit
Launch OpenOcd to connect to the target device:
sudo wch-openocd -f wch-riscv.cfg
Open another terminal and run:
riscv-none-elf-gdb ./build/ch32v103.elf
(gdb) target remote :3333
Remote debugging using :3333
_start () at Startup/startup_ch32v10x.S:15
15              j       handle_reset
(gdb) load
Loading section .init, size 0x38 lma 0x0
Loading section .vector, size 0x108 lma 0x38
Loading section .text, size 0x211c lma 0x140
Loading section .data, size 0x84 lma 0x225c
Start address 0x00000000, load size 8928
Transfer rate: 3 KB/sec, 2232 bytes/write.
(gdb)
Then you can set breakpoints, run, step, continue as usual gdb.
The pre-converted project templates from WCH official EVT packages and supported parts:
- ch32v003evt_gcc_makefile
- ch32v003j4m6
- ch32v003a4m6
- ch32v003f4u6
- ch32v003f4p6
- ch32x035evt_gcc_makefile
- ch32x035r8t6
- ch32x035c8t6
- ch32x035g8u6
- ch32x035g8r6
- ch32x035f8u6
- ch32x035f7p6
- ch32x033f8p6
- ch32v103evt_gcc_makefile
- ch32v103c6t6
- ch32v103c8u6
- ch32v103c8t6
- ch32v103r8t6
- ch32l103evt_gcc_makefile
- ch32l103f8p6
- ch32l103f8u6
- ch32l103g8r6
- ch32l103k8u6
- ch32l103c8t6
- ch32v20xevt_gcc_makefile
- ch32v203f6p6
- ch32v203g6u6
- ch32v203k6t6
- ch32v203c6t6
- ch32v203f8p6
- ch32v203f8u6
- ch32v203g8r6
- ch32v203k8t6
- ch32v203c8t6
- ch32v203c8u6
- ch32v203rbt6
- ch32v208gbu6
- ch32v208cbu6
- ch32v208rbt6
- ch32v208wbu6
- ch32v307evt_gcc_makefile
- ch32v303cbt6
- ch32v303rbt6
- ch32v303rct6
- ch32v303vct6
- ch32v305fbp6
- ch32v305rbt6
- ch32v307rct6
- ch32v307wcu6
- ch32v307vct6
- ch573evt
- ch573
- ch571
- ch583evt
- ch583
- ch582
- ch581
- ch585evt
- ch585
- ch584
- ch592evt
- ch592
- ch591
NOTE: below steps can also rescue a bricked WCH-LinkE.
If accidently programing wrong firmware to target board, the SWDIO/SWCLK pins may be occupied for other purpose, the target board may not be probed and programmed by WCH-LinkE anymore.
Please try to activate ISP mode first, it may still work. If the target board don't have ISP port exported or ISP not works anymore, you have a bricked CH32V now...
To rescue a bricked CH32V, you need to erase all code flash.
Wire up WCH-LinkE and bricked CH32V as:
 +------------+            +---------------+
 |            |----3v3-----|               |
 |            |            |               |
 |            |----gnd-----|               |
 |            |            |               |
 | WCH-LinkE  |----dio-----| bricked CH32V |
 |            |            |               |
 |            |----clk-----|               |
 |            |            |               |
 |            |----nrst----|               |
 +------------+            +---------------+
Run:
wlink erase --method pin-rst --speed low --chip <chip type>
Possible value of chip type: CH32V103, CH57X, CH56X, CH32V20X, CH32V30X, CH582, CH32V003, CH8571, CH59X, CH643, CH32X035, CH32L103, CH641, CH585, CH564, CH32V007, CH645, CH32V317
You can also use WCH-LinkUtility if you have windows system.
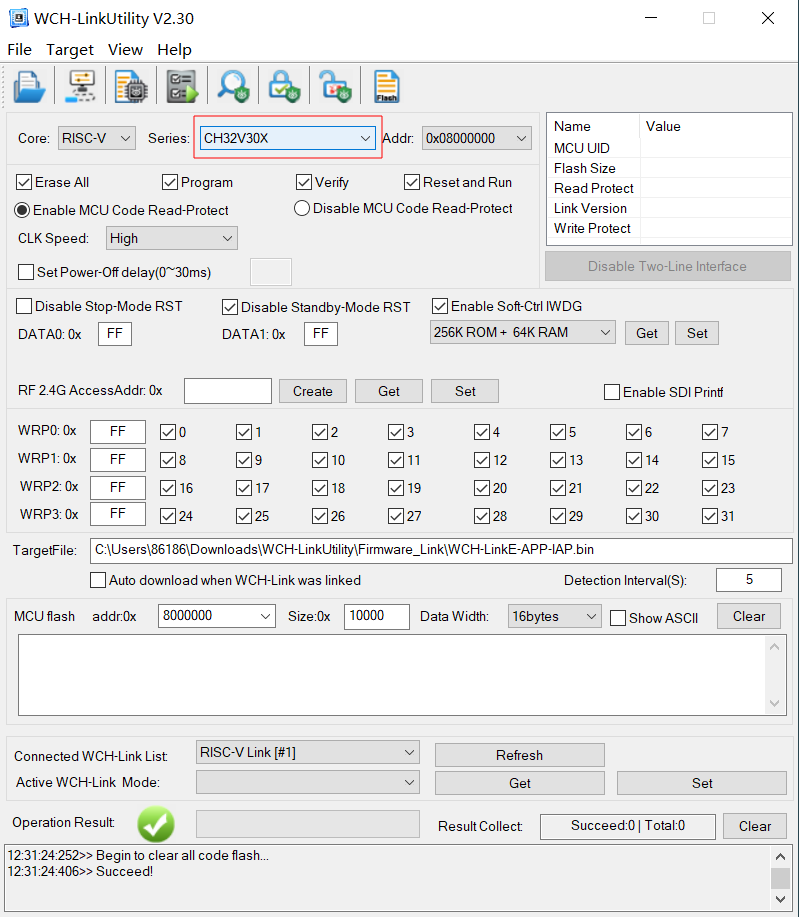
Open WCH LinkUtility and select the correct MCU series as:
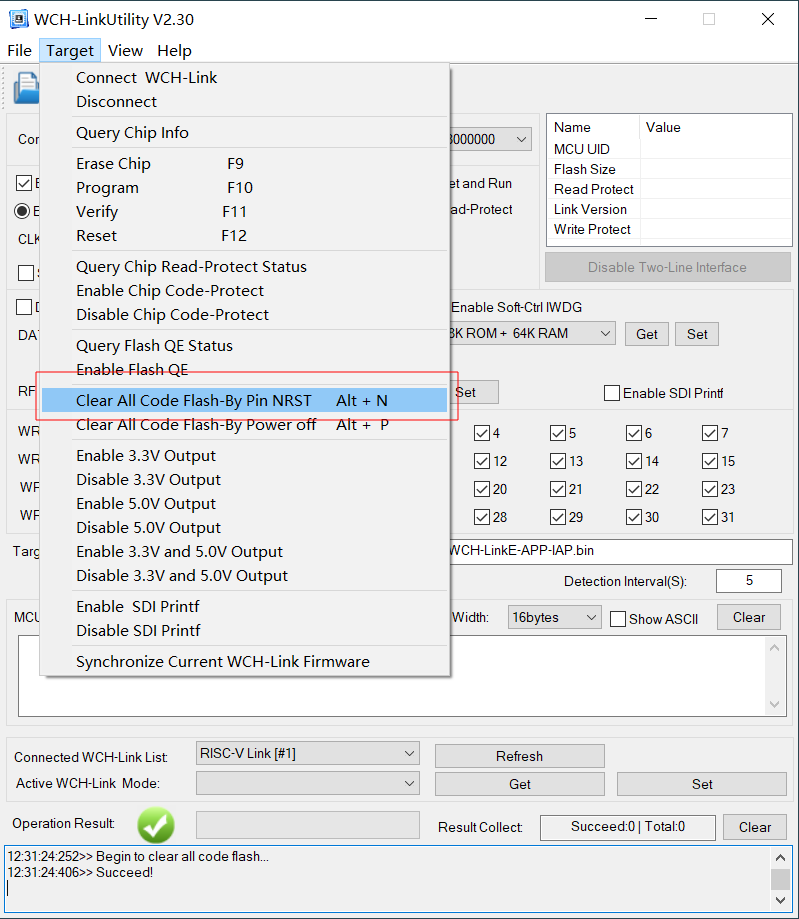
Then click 'Clear All Code Flash By Pin NRST' will erase code flash of bricked CH32V:
If the bricked board did not export NRST pin, you can solder a wire to MCU NRST pin directly.
This way don't require NRST pin, wire up WCH-LinkE and bricked CH32V as:
 +------------+            +---------------+
 |            |            |               |
 |            |            |               |
 |            |----dio-----|               |
 |            |            |               |
 | WCH-LinkE  |            | bricked CH32V |
 |            |            |               |
 |            |----clk-----|               |
 |            |            |               |
 |            |            |               |
 +------------+            +---------------+
Run:
wlink erase --method power-off --speed low --chip <chip type>
Possible value of chip type: CH32V103, CH57X, CH56X, CH32V20X, CH32V30X, CH582, CH32V003, CH8571, CH59X, CH643, CH32X035, CH32L103, CH641, CH585, CH564, CH32V007, CH645, CH32V317
Then power up the bricked CH32V as quick as possible after the command excuted, for example, plug the usb cable to PC host quickly. You may need to try several times to succeed and it will erase all code flash of bricked CH32V.
You can also use WCH-LinkUtility if you have windows system.
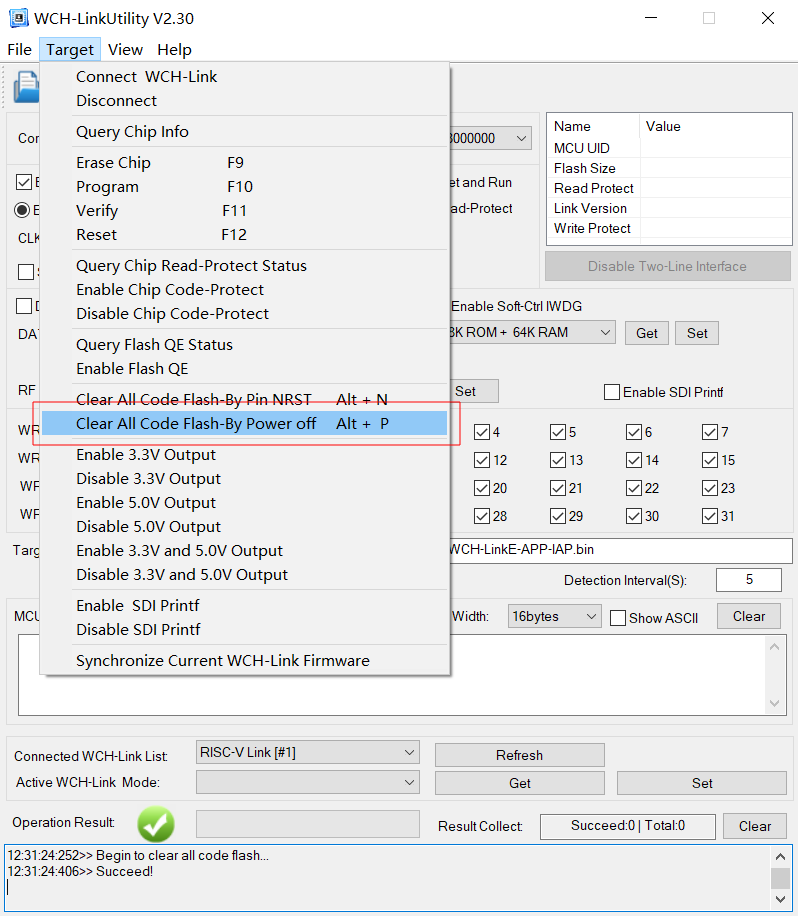
Open WCH LinkUtility and click 'Clear All Code Flash By Power Off'.
NOTE: If you have windows system, you can update WCH-Link/WCH-LinkE firmware online using IAP method by WCH-LinkUtility. For linux, you should use wlink-iap.
If you don't use windows, please follow below steps to update the firmware of WCH-Link/LinkE:
Official firmwares from WCH can be extracted from WCH-LinkUtility. Download and extract it, find the Firmware_Link dir. I also put a copy of v2.8 and v2.15 firmwares in this repo.
Firmware_Link/
├── WCH-LinkE-APP-IAP.bin      # firmware for WCH-LinkE
├── WCH-Link_APP_IAP_RV.bin    # RV SWD firmware for WCH-Link
├── WCH-Link_APP_IAP_ARM.bin   # ARM DAP firmware for WCH-Link
├── FIRMWARE_CH32V305.bin      # firmware of WCH-LinkE, for IAP
├── FIRMWARE_CH549.bin         # RV SWD firmware of WCH-Link, for IAP.
├── FIRMWARE_DAP_CH549.bin     # ARM DAP firmware of WCH-Link, for IAP.
At first, WCH-Link can also toggle DAP/RV mode by a button or software like WCH-LinkE, but due to the firmware size increased, it doesn't support dual mode anymore. MounRiver Studio also flash the corresponding firmware everytime when you toggle the mode of WCH-Link(without E).
wlink-iap is a cli tool to upgrade / downgrade WCH-LinkE firmware online using IAP method under linux.
You don't have to enter ISP mode or buy another WCH-LinkE to upgrade the firmwares.
The usage is very simple, just Plug the to-be-updated WCH-Link/LinkE to PC USB port and run:
wlink-iap -f FIRMWARE_XXXX.bin
NOTE: You should use IAP App firmwares (filename start with 'FIRMWARE_') with wlink-iap.
WCH-Link use CH549 MCU, it can be programmed by ISP under linux.
To program CH549, we need install ch552tool first. And short DP pin (P5.1) and 3v3 VCC pin when power up to enter ISP mode.
After enter ISP mode, lsusb like:
Bus 001 Device 020: ID 4348:55e0 WinChipHead
Then erase the flash as:
# sudo ch55xtool -e -c
Found CH549 with SubId:18
BTVER:02.40
UID:64-63-49-43-00-00-AD-A6
Erasing chip data flash. Done.
Erasing chip flash. Done.
Finalize communication. Done.
Then program WCH-Link_APP_IAP_RV.bin or WCH-Link_APP_IAP_ARM.bin as:
sudo ch55xtool -f WCH-Link_APP_IAP_RV.bin
Found CH549 with SubId:18
BTVER:02.40
UID:64-63-49-43-00-00-AD-A6
Erasing chip flash. Done.
Flashing chip. Done.
Finalize communication. Done.
WCH-LinkE use CH32V305fbp6, you need another workable WCH-LinkE to program it.
Wire up WCH-LinkE and the target WCH-LinkE as:
 +------------+            +-----------+
 |            |----3v3-----|           |
 |            |            |           |
 |            |----gnd-----|           |
 |            |            |  target   |
 | WCH-LinkE  |----dio-----| WCH-LinkE |
 |            |            |  to be    |
 |            |----clk-----|  update   |
 |            |            |           |
 |            |----nrst----|           |
 +------------+            +-----------+
Hold the "IAP" button of "target WCH-LinkE" down and plug WCH-LinkE to PC USB port, it will force the "target WCH-LinkE" enter IAP mode.
IAP mode is not required to program the target WCH-LinkE, but under IAP mode, the target WCH-LinkE released the ocuppied pins and make itself able to be programmed as common CH32V dev board.
Official WCH-LinkE has a plastic case, it prevent user to press the IAP button accidently unless break the case, you can use wlink-iap to switch WCH-LinkE to IAP mode from commandline.
To enter IAP mode, plug the "target WCH-LinkE" to PC USB port:
wlink-iap -i
to quit IAP mode:
wlink-iap -q
After switch "target WCH-LinkE" to IAP mode, unplug it. Then you don't need to hold the IAP button of "target WCH-LinkE" down when plug another WCH-LinkE directly to PC USB port.
Then update the "target WCH-LinkE" firmware as:
# erase the code flash by pin-rst
wlink erase --method pin-rst --speed low --chip CH32V30X
# write the latest firmware, note the firmware I used here.
wlink flash WCH-LinkE-APP-IAP.bin


