-
Notifications
You must be signed in to change notification settings - Fork 51
Game Boy Color
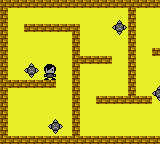
In order to create a rom for the Game Boy Color you just need to change the target of your project to ReleaseColor or DebugColor and build it (or run build_Color.bat or build_DebugColor.bat). This new build will take advantage of the better processor that the Game Boy Color has and will run twice faster. By default it will load a black and white palette, so let's see how to add some color.
Adding color to tiles
- Open the file tiles.bgr with the Gameboy Tile Designer and select View->Color Set->Gameboy Color. Everything will look the same but if you click on the palettes list you'll see there are now 8 palettes to choose from.
- Select the fist tile and click on the second palette. Now go to View->Palettes (or click control+A) and edit the second palette to add some colors
- Finally go to File->Export To and in the Advanced tab set Include palette colors and then select 1 byte per entry on CGB palettes. Click Ok to export everything.
Now in your code:
- Open the file StateGame.c and declare the palette for the background before the method Start_STATE_GAME like this
#include "Palette.h"
const UINT16 bg_palette[] = {PALETTE_FROM_HEADER(tiles)};
The macro PALETTE_FROM_HEADER will take the palette exported on one of the files. The parameter passed should be the same that you used on the Label on export settings:
- Load the palette inside Start_STATE_GAME using
void Start_STATE_GAME() {
...
SetPalette(BG_PALETTE, 0, 8, bg_palette, bank_STATE_GAME);
...
}
- Change the line
InitScrollTiles(0, 2, tiles, 3);
to
InitScrollTilesColor(0, 2, tiles, 3);
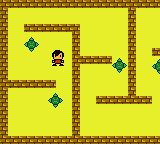
Build the project and you should see your background in color

Adding color to sprites
The process for sprites is very similar to what we did for the tiles
- Add some color to player.bgr the same way we did with the tiles
- Select View->Color Set->Gameboy Color to set it as a Gameboy Color file
- Edit the Second palette
- Assign it to all the sprites
- Set Include palette colors and change CGB palettes to 1 byte per entry in the Advanced tab in File->Export To...
- Save your file and export it
Now in your code:
- Open the file ZGBMain.h and change the INIT_SPRITE_DMG call for your sprite for INIT_SPRITE_COLOR, like this
void InitSprites() {
	INIT_SPRITE_COLOR(SPRITE_PLAYER, player, 3, FRAME_16x16, 3);
	...
}
- Similar to what we did with the tiles we need to declare a palette for the sprites in StateGame.c. Do this next the background palette declaration
#include "..\res\src\player.h"
#include "Palette.h"
UINT16 bg_palette[] = {PALETTE_FROM_HEADER(tiles)};
UINT16 sprites_palette[] = {PALETTE_FROM_HEADER(player)};
Note we have also included ..\res\src\player.h since that is the file where the palette we want is (we didn't need to do this for the tiles since ..\res\src\tiles.h was already included)
- Finally load the palette for the sprites inside Start_STATE_GAME
void Start_STATE_GAME() {
...
SetPalette(BG_PALETTE, 0, 8, bg_palette, bank_STATE_GAME);
   SetPalette(SPRITES_PALETTE, 0, 8, sprites_palette, bank_STATE_GAME);
...
}
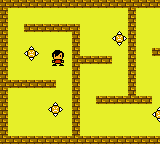
Build the project and your main character will appear in glorious 4 colors

Note: It seems that by default BGB doesn't show colors properly, so ensure you have GBC LCD colors disabled inside Options->Graphics
Composing a palette from various files
Do the same thing that you did on the player with the enemy. But this time use the 3rd palette instead of the 2nd one (because that one is already being used by the player)
Now in your code:
- In ZGBMain_b.c change INIT_SPRITE to INIT_SPRITE_COLOR
void InitSprites() {
...
	INIT_SPRITE_COLOR(SPRITE_ENEMY,  enemy,  3, FRAME_16x16, 1);
}
- In StateGame.c change the palette for the sprites that we declared in the previous step
#include "..\res\src\player.h"
UINT16 sprites_palette[] = {PALETTE_FROM_HEADER(player)};
to
#include "..\res\src\player.h"
#include "..\res\src\enemy.h"
UINT16 sprites_palette[] = {
	PALETTE_INDEX(player, 0),
	PALETTE_INDEX(player, 1),
	PALETTE_INDEX(enemy,  2),
	PALETTE_INDEX(player, 3),
	PALETTE_INDEX(player, 4),
	PALETTE_INDEX(player, 5),
	PALETTE_INDEX(player, 6),
	PALETTE_INDEX(player, 7),
};
basically what this piece of code is doing is declaring an 8 palettes array and filling the the 3rd position with the enemy info and the rest with the player info. This is how you can combine palettes created on several files.
Another way of accomplishing the same thing would be copying the palette slot that we have on enemy.bgr to player.bgr using the Gameboy Tile Designer and then leave the palette initialization as it was.

Note: this new build created for the Game Boy Color will also work on the classic Game Boy (but it will run a bit slower than if you create it for the Game Boy specifically)