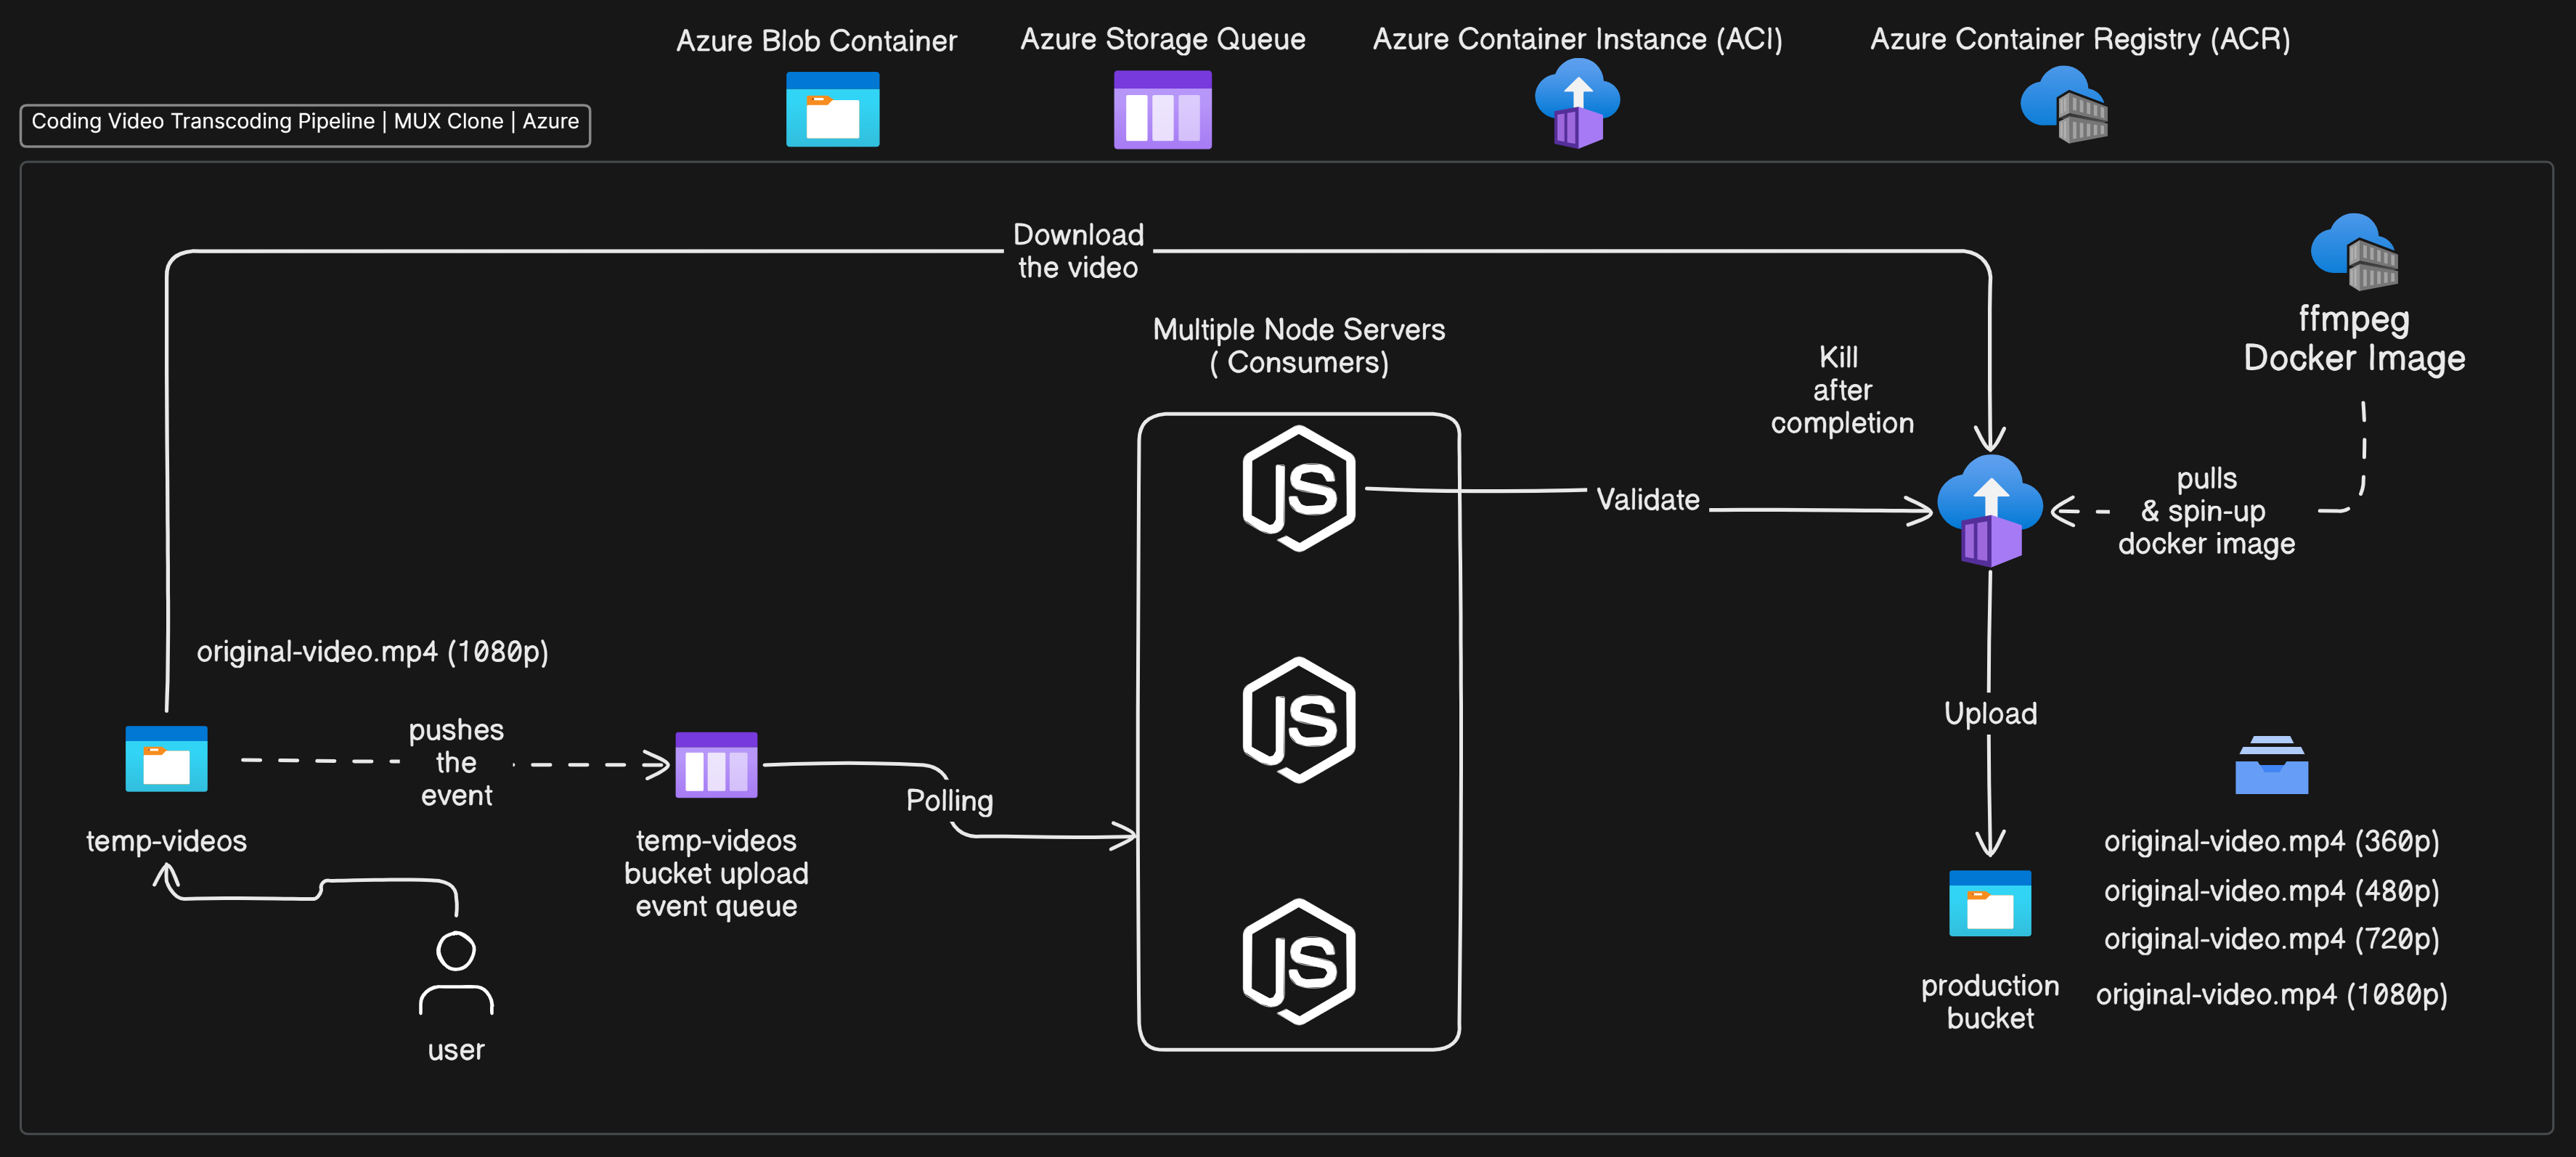
A scalable video transcoding pipeline designed to convert videos into multiple resolutions, leveraging Azure's powerful cloud services. This project is inspired by Mux and demonstrates how to build a video processing pipeline that can be easily scaled to handle large volumes of videos.
- Overview
- Tech Stack
- Azure Services Used
- Pipeline Workflow
- Setup and Installation
- Usage
- Contributing
- License
This project automates the process of transcoding videos into multiple resolutions using Azure services. The pipeline downloads a video from Azure Blob Storage, transcodes it into different resolutions (360p, 480p, 720p), and uploads the transcoded videos back to Azure Blob Storage with a suffix indicating the resolution. This allows for easy selection of videos based on desired resolution.
Why settle for one resolution when you can have them all? Transcode like a ninja!✨
- Node.js: The runtime environment used to execute JavaScript code on the server side.
- TypeScript: Superset of JavaScript used for type safety and improved developer experience.
- Fluent-ffmpeg: A Node.js library for working with FFmpeg, used here for video transcoding.
- Azure SDK for JavaScript: Used for interacting with various Azure services.
- Purpose: Used for storing the original video files and the transcoded videos.
- Role: The pipeline retrieves the input video from a specified container, processes it, and stores the output videos back in another container.
- Purpose: Used for queuing video processing requests.
- Role: The pipeline listens to the queue, retrieves messages, and processes videos accordingly. This allows for asynchronous processing and easy scaling.
- Purpose: Provides a platform for running the containerized video transcoding service.
- Role: The pipeline spins up containers on demand to handle video transcoding, ensuring that resources are used efficiently.
- Purpose: Stores container images.
- Role: The pipeline pulls the Docker image from the registry to spin up container instances for video processing.
-
Message Queue: The pipeline starts by receiving a message from an Azure Storage Queue, which contains the name of the video blob to be processed.
-
Video Download: The pipeline downloads the video from Azure Blob Storage.
-
Video Transcoding: The video is transcoded into multiple resolutions using
fluent-ffmpeg. -
Video Upload: The transcoded videos are uploaded back to Azure Blob Storage with filenames that include the resolution suffix (e.g.,
video-360p.mp4). -
Repeat: The pipeline continues to listen to the queue for new messages, allowing for continuous processing.
- Node.js and npm/yarn installed.
- Azure account with the following services set up:
- Blob Storage containers (input and output)
- Storage Queue
- Container Registry with a Docker image for the transcoding service
- Container Instance setup
-
Clone the repository:
git clone https://github.com/VinayakVispute/Multi-Resolution-Transcoder-Pipeline-Mux.git cd Multi-Resolution-Transcoder-Pipeline-Mux -
Install dependencies:
npm install
-
Set up environment variables: Create a
.envfile in the root directory and populate it with the following values:AZURE_STORAGE_CONNECTION_STRING=your_connection_string AZURE_RESOURCE_GROUP=your_resource_group AZURE_CONTAINER_REGISTRY_SERVER=your_registry_server CONTAINER_GROUP_NAME=your_container_group_name CONTAINER_NAME=your_container_name BUCKET_NAME=input_blob_container_name OUTPUT_VIDEO_BUCKET=output_blob_container_name SUBSCRIPTION_ID=your_subscription_id ACR_USERNAME=your_acr_username ACR_PASSWORD=your_acr_password QUEUE_NAME=your_queue_name RESOURCE_GROUP_LOCATION=location_for_resource_group -
Run the pipeline:
npm start
- Input: The pipeline processes video files stored in an Azure Blob Storage container. The video file's name is extracted from a message received from an Azure Storage Queue.
- Output: The transcoded videos are stored in another Azure Blob Storage container with filenames suffixed with the resolution (e.g.,
video-360p.mp4,video-480p.mp4,video-720p.mp4).
Contributions are welcome! Please fork this repository, create a feature branch, and submit a pull request for any enhancements or fixes.
This project is licensed under the MIT License - see the LICENSE file for details.
This README provides a comprehensive overview of your project, its components, and how to use it.
