Releases: CarvellWakeman/plantergb
Latest Release
This is the latest release of the PlanterGB lighting system.
Last Update: May 14th, 2018
Version: Release 1.0
Software Installation Instructions:
-
Download PiBakery at http://www.pibakery.org/download.html This will take a long time
-
Install PiBakery with raspbian lite, though the desktop version should run fine if you want to use it instead.
-
Download setup.xml from this release.
-
Open PiBakery and import the setup.xml file.
-
Change the WiFi block to match your network name and password. Make sure they match perfectly or this whole process will fail.
6) Modify the Run Command (timezone) block with your timezone. (This was temporarily removed - we will hopefully have a better solution for this in the future. For now, the firstboot.py file is hardcoded for Los_Angeles, sorry)
a) Make sure to keep the format the same as it currently is, with the timezone.sh script followed by the name of your timezone
b) Ex: The default value is America/Los_Angeles. Changing that to state that you live in London would look like this:
cp /usr/share/zoneinfo/Europe/London /etc/localtime
c) A list of timezones can be found here: https://en.wikipedia.org/wiki/List_of_tz_database_time_zones
-
Change the default user password. You probably won't need this unless you plug the Pi into a monitor and keyboard, but it's a good idea to remember it anyways.
a) Everything after the password block should be left alone -
Insert a microSD card using some kind of card reader, and determine its drive letter (Ex: D:/)
-
In PiBakery, click the write button at the top of the screen, and follow the prompts by choosing your microSD card, Raspbian Lite (preferred) or Rasbian Desktop (slower). This will take a long time, ~10 mins
a) If this process fails at the very end (as it often did for us), do it again but select the "boot" drive. It usually succeeds on the second try. -
Properly eject the microSD card from your machine and give it a moment to cool down if it is warm.
Hardware Installation Instructions:
-
If you want to connect a monitor and/or keyboard, do so before plugging in the raspberry Pi.
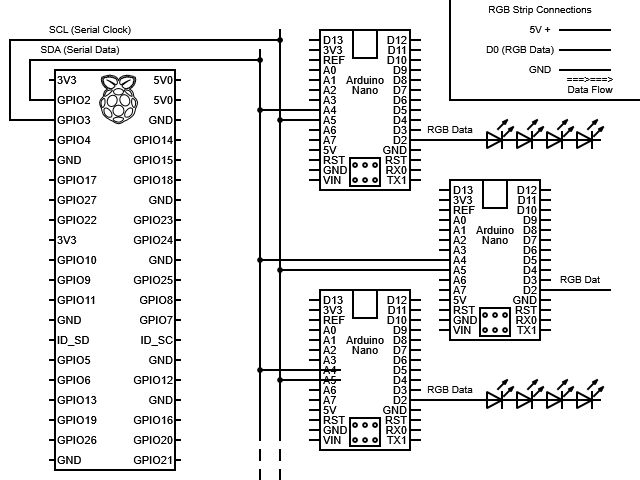
This is the data diagram that shows how to connect the I2C bus and LEDs to the arduino nanos.

2.5) Make sure to measure how many amps the system will use and choose an appropriate power supply. The raspberry Pi will use about 1 amp, each nano will use about 0.5 amps, and the strips of lights will use at most 60 milliamps per LED at full brightness. This all depends on which LED strips you get.
-
Insert the microSD card into the Raspberry Pi
-
Finally, plug the power in for the system.
System Configuration:
-
When your system is first connected to power, it may take quite a while to get setup. This will take a long time, ~15 mins
-
Now that the system is set up, the IP address of the raspberry pi can be used to access the interface. There are several ways to do this.
a) If you have access to your router, connect to it through the browser. This is typically an address such as 192.168.1.1 or 192.168.1.0. The router will prompt you to log in. Once you are logged in, find a part of the interface about attached devices or something along those lines. The raspberry Pi will be in the Wifi section, and will probably have a device name similar to raspberrypi. Keep note of its IP address.
b) If you have physical access to the Raspberry Pi Zero W, as well as a microHDMI adapter, you can plug a monitor into the Pi before booting it up. Once it is booted, one of the last lines before the login prompt will by My address is xxx.xxx.x.x. -
Once you know the IP address of the raspberry Pi, (ex: 192.168.1.18) and type that into the browser, followed by :8080. Here is what a full address would look like: http://192.168.1.18:8080/ If everything was successful, you will see the welcome page to the system.
Software Update Instructions:
- TBD. Short answer: load the microSD card into your machine, wipe it clean, and start the software installation process over again.
