This repository includes instructions on how to automate the deployment of a pre-populated Microsoft Purview demo environment.
- An active Azure subscription.
- No Azure Policies preventing creation of Storage accounts or Event Hub namespaces. Purview will deploy a managed Storage account and Event Hub when it is created. If a blocking policy exists and needs to remain in place, please follow the Purview exception tag guide to create an exception for Purview accounts.
- Click Deploy to Azure.
- Select a Region.
Note: If you are planning to create a NEW Resource Group for the set of resources that will be created as part of this template, ensure to select a Region BEFORE creating a new Resource Group (otherwise the Resource Group will be created with the default location).
- Select the target Azure Subscription.
- Select an existing OR create a new Resource Group.
Note: If you are selecting an existing Resource Group, this will be automatically set to the existing Resource Group's location.
- [OPTIONAL] Change the SQL Server Admin Login.
- [OPTIONAL] Change the SQL Server Admin Password.
Note: You do not need to know the password, the post deployment script will automatically store the secret in Key Vault and Purview will use this secret to successfully scan the Azure SQL Database.
- The template should take approximately 10 minutes to complete.
- Once complete, all Azure resources will have been provisioned, RBAC assignments applied, and data plane operations executed, see below for more details.
Note: An additional 10 minutes post-deployment may be required for:
- Azure Data Factory pipeline to finish running and push lineage to Microsoft Purview.
- Microsoft Purview to finish scanning registered sources and populate the catalog.
- The status of these jobs can be monitored within the respective service.
-
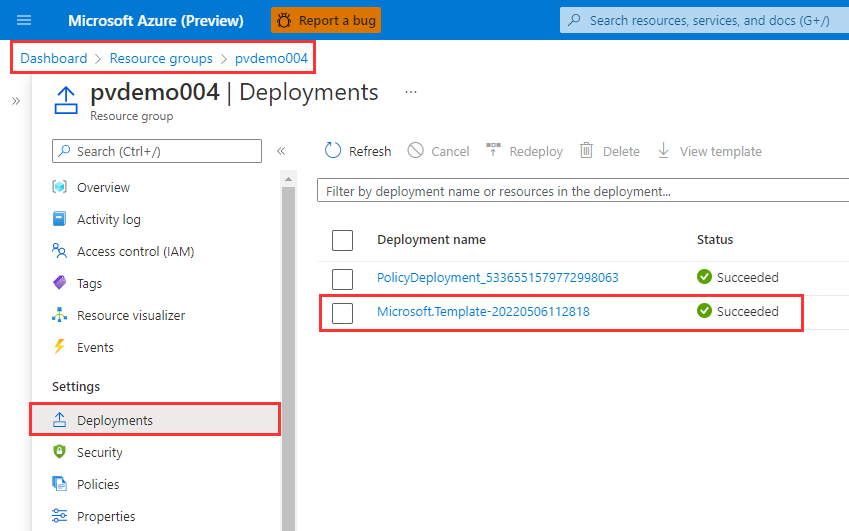
Navigate to the Azure Portal, locate your Resource Group, click Deployments. You should see that the deployment has Succeeded.
-
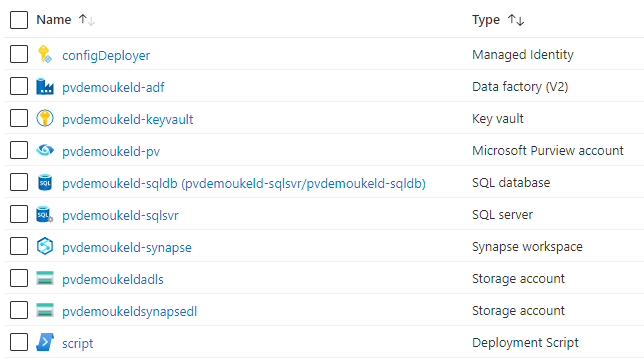
Within your resource group, you should see the following set of Azure resources.
-
Navigate to your Microsoft Purview Account (e.g.
pvdemo{RAND_STRING}-pv), click Open Governance Portal > Data Map. You should see 3 collections and 2 sources.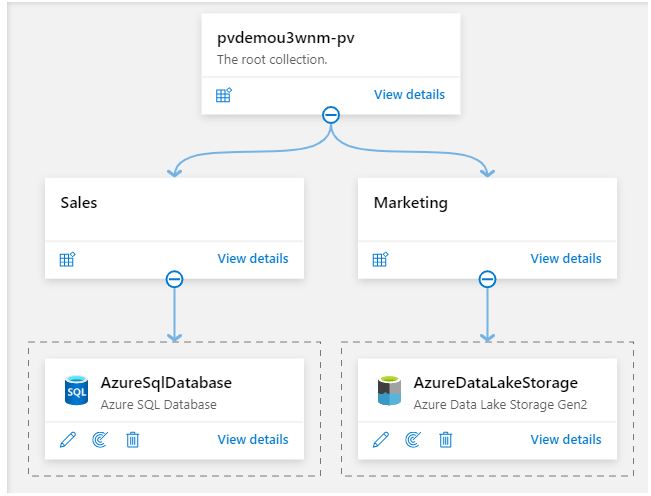
-
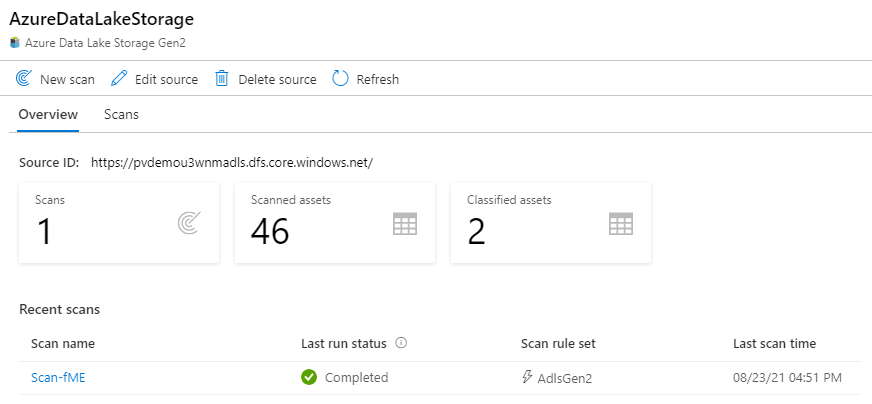
Within the Azure Data Lake Storage Gen2 source, click View Details, you should see a scan. Note: The scan may still be in progress and can take up to 10 minutes to complete.
-
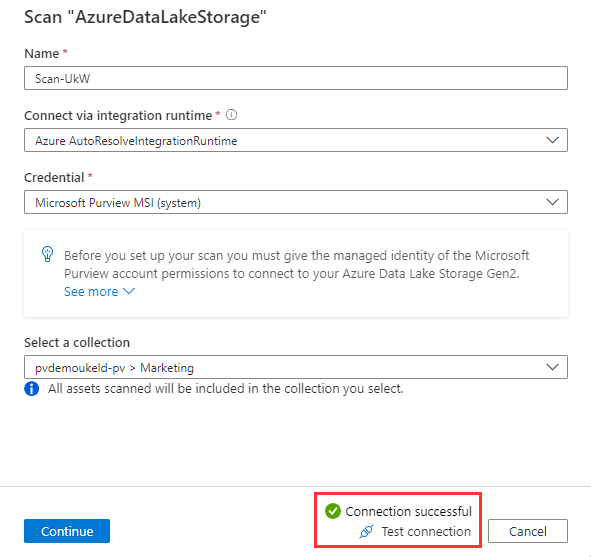
Within the Azure Data Lake Storage Gen2 source, click the New Scan icon, click Test connection. The connection should be successful.
-
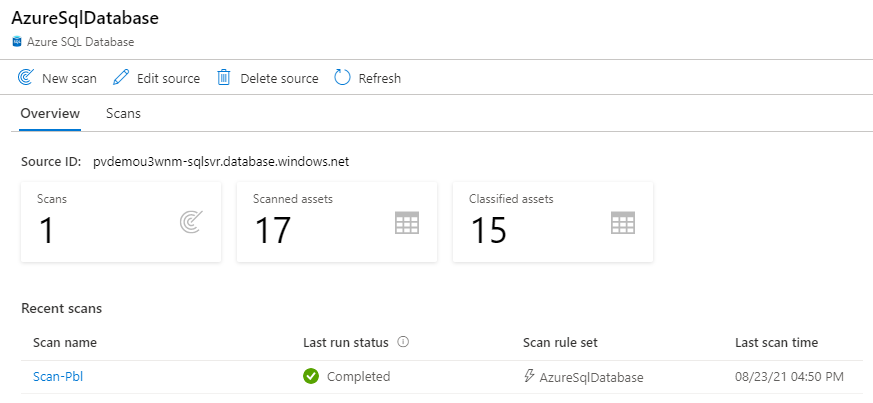
Within the Azure SQL Database source, click View Details, you should see a scan. Note: The scan may still be in progress and can take up to 10 minutes to complete.
-
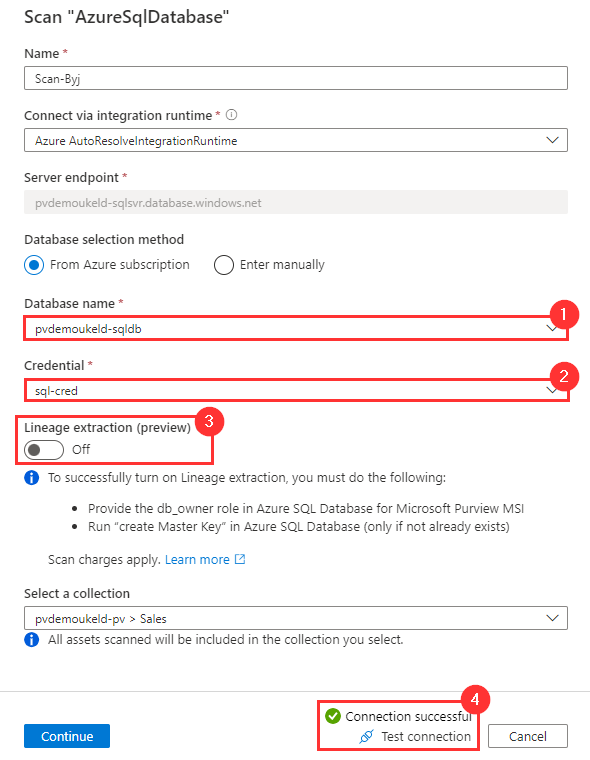
Within the Azure SQL Database source, click the New Scan icon, select a Database name, set Credential to sql-cred , toggle Lineage extraction to Off, and click Test connection. The connection should be successful.
-
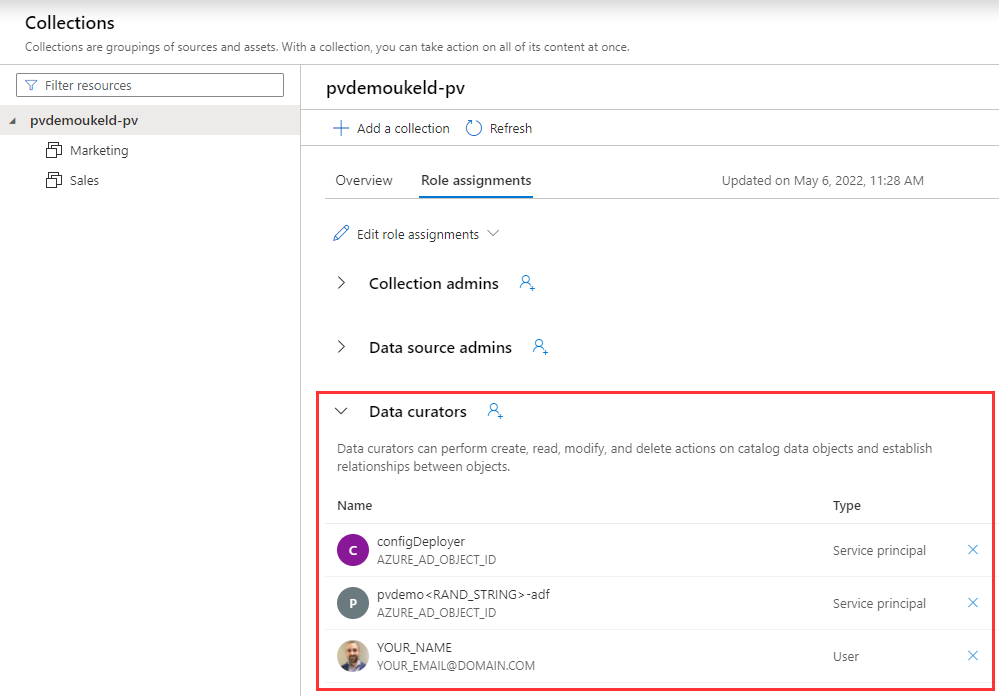
Navigate to Data Map > Collections > Role assignments. You should see your user added to each role (Collection admin, Data Source admin, Data curator, Data reader), you should also see the Azure Data Factory Managed Identity added as a Data Curator.
-
Navigate to Management > Data Factory. You should see a Connected Azure Data Factory account.

-
Navigate to Data Catalog > Manage Glossary and click Hierarchical view. You should see a pre-populated Glossary.

-
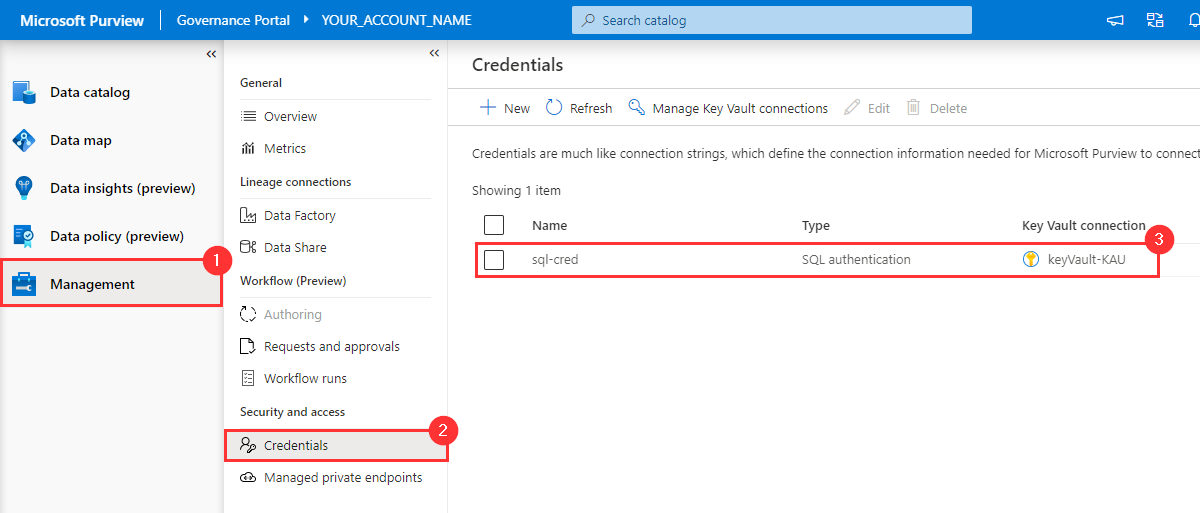
Navigate to Management > Credentials. You should see credential from Azure Key Vault.
-
Within the search bar, search for "copy" and navigate to the
Copy_a9casset within Purview and then click Lineage. You should see lineage from the Azure Data Factory Copy Activity. Note: The pipeline within Azure Data Factory may still be running and can take up to 10 minutes to complete. To check the status of the pipeline, navigate to Azure Data Factory and check Monitoring.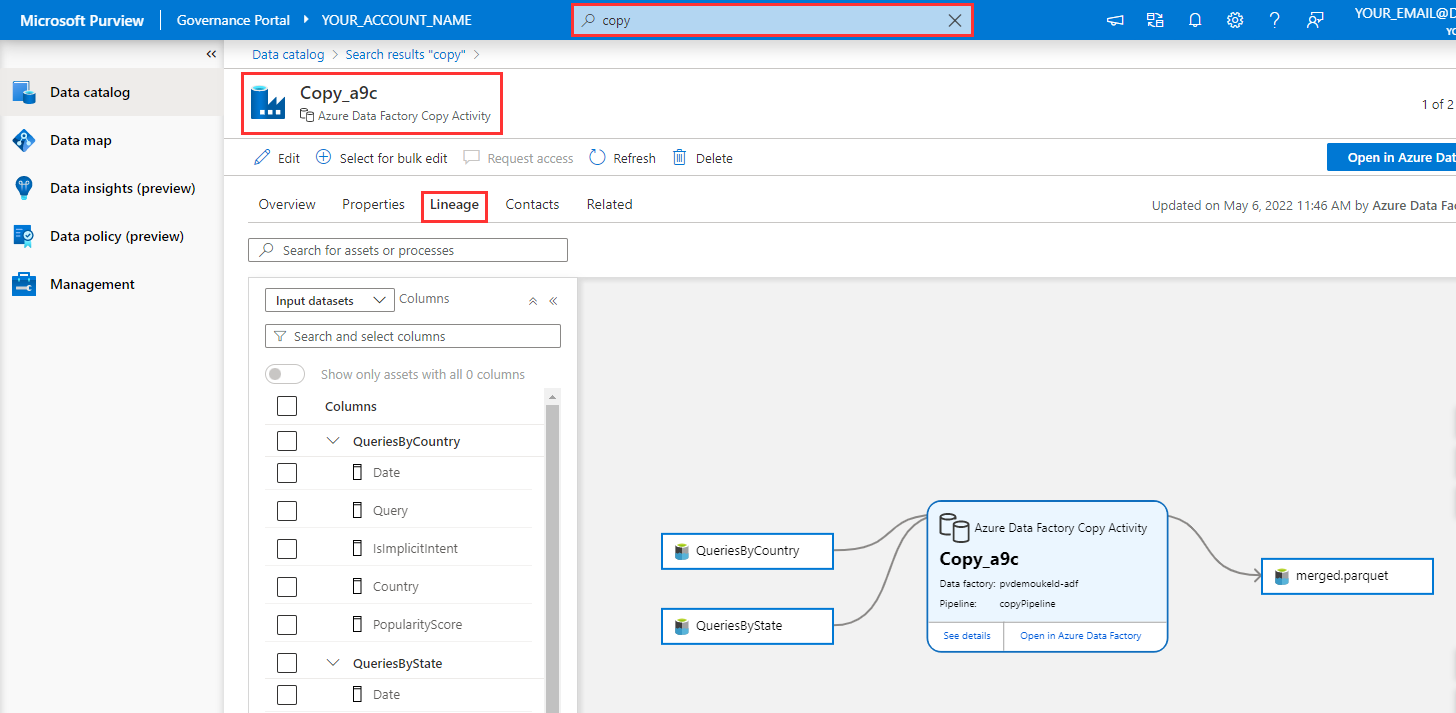
- Microsoft Purview Account
- Azure Key Vault
- Azure SQL Database
- Azure Data Lake Storage Gen2 Account
- Azure Data Factory
- Azure Synapse Analytics Workspace
| # | Scope | Principal | Role Definition |
|---|---|---|---|
| 1 | Azure Storage Account | Current User | Storage Blob Data Reader |
| 2 | Azure Storage Account | Azure Synapse MI | Storage Blob Data Contributor |
| 3 | Azure Storage Account | Microsoft Purview MI | Storage Blob Data Reader |
| 4 | Azure Storage Account | Azure Data Factory MI | Storage Blob Data Contributor |
| # | Service | Action |
|---|---|---|
| 1 | Identity Provider | Get Access Token |
| 2 | Microsoft Purview | Create Azure Key Vault Connection |
| 3 | Microsoft Purview | Create Credential |
| 4 | Microsoft Purview | Update Root Collection Policy |
| 5 | Microsoft Purview | Create Collections |
| 6 | Microsoft Purview | Azure SQL DB: Register Source |
| 7 | Microsoft Purview | Azure SQL DB: Create Scan |
| 8 | Microsoft Purview | Azure SQL DB: Run Scan |
| 9 | Azure Data Lake Storage Gen2 | Load Sample Data |
| 10 | Microsoft Purview | ADLS Gen2: Register Source |
| 11 | Microsoft Purview | ADLS Gen2: Create Scan |
| 12 | Microsoft Purview | ADLS Gen2: Run Scan |
| 13 | Azure Data Factory | Run Pipeline |
| 14 | Microsoft Purview | Populate Glossary |