This reposistory is an example Qt Creator for use with ARM Cortex m-devices. This readme will describe a tutorial to set this all up. The main reason for creating this reposistory is to answer this question thoroughly on StackExchange Electronics
Requisites:
- Qt Creator (download from QT site)
- ARM GCC (Ubuntu: apt-get install gcc-arm-none-eabi)
- GDB source archive (download from archive)
- OpenOCD (Ubuntu: apt-get install openocd)
I used versions: Qt Creator 3.6.0, ARM GCC 4.8.2-14ubuntu1+6, ARM GDB 7.6/7.10 with python support and OpenOCD 0.7.0.
-
Install Qt Creator. Open Help -> About Plugins. Find category Device Support and check BareMetal.

-
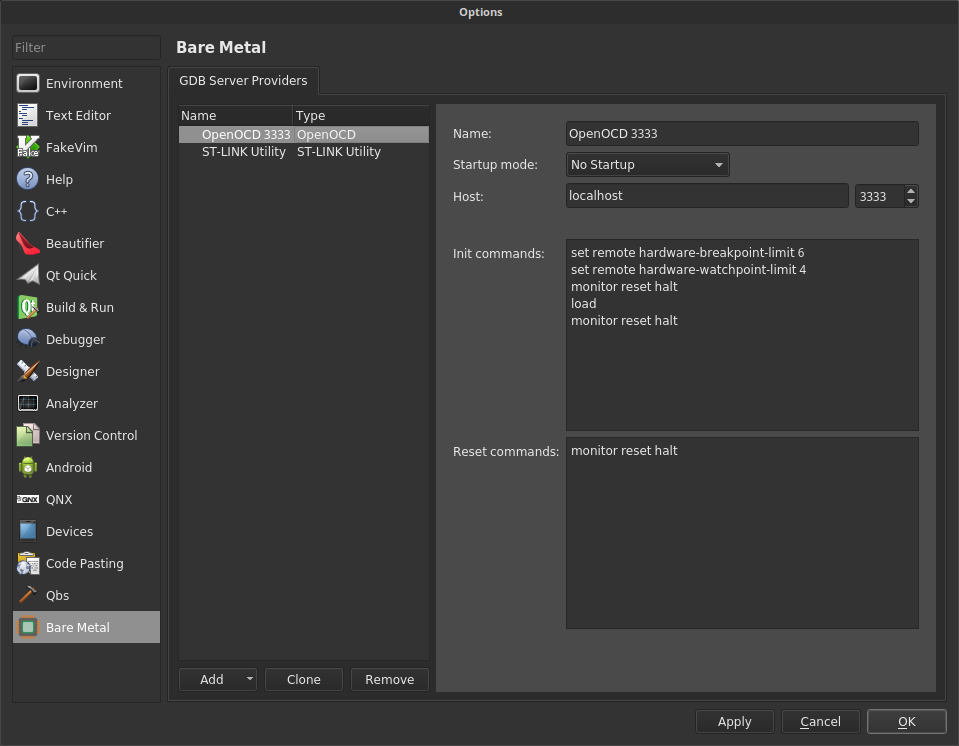
Go to Tools -> Options. There are a few settings we need to create and adjust in order to compile for an ARM Cortex controller.
a) Go to "Bare Metal" (last category) - add a debugger of your choice. I personally use OpenOCD. At this point you can set the connection to gdb and it's port, as well as init commands. The standard commands are set for STM32F4xx chips - but I guess you can modify it to work with any ARM Cortex controller.

b) Go to "Devices". Add a new device, choose Bare Metal and the GDB provider you have just created. There is nothing else to setup here.

c) Go to "Build & Run" - tab Debuggers. This has been the most trickiest thing to do.
You need an arm gdb version with python scripting support. At the time (about 9 months back when I write this post) the binaries in Ubuntu repo does not have this option. You can save a lot of time/hassle by checking if this has changed.
Nevertheless if you do need to compile GDB with python support, here is how to do it. Download GDB from the download archives. I still use GDB-7.6 which seems to work fine, but for this tutorial I have recompiled it for GDB-7.10.
Extract the source archive. Open in terminal and run "./configure --with-python --target=arm-elf". This sets up the make environment for ARM targets with python scripting enabled. Then run make. This takes a while, depending on your system speed. Unfortunately you may be a bit on your own once the compilation stops because of dependency issues. Don't be afraid - this happened to me on my first try too and I figured it out with a bunch of google searches! If python fails, make sure to install the python2.x-dev package (check your version no - likely 2.7). Assuming compilation went well, you can find the gdb executable in the main directory.
If you're on Mac, the process will likely be similar. But I am not familiar with OSX. If you're on Windows, sorry you will need to google a bit on how to do this with Mingw or whatever (honestly I don't know). Or maybe find binaries that have this support enabled.
Once you acquired a gdb executable, call it e.g. "ARM GDB" and set the path to it. I personally don't bother to place it in /usr/bin/, but I guess you could.
This window will throw an error if you use a gdb executable that is not compiled with Python Scripting.

d) Tab "Build & Run" - "Compilers"
Create a new "GCC compiler" and call it "ARM GCC". For path use "/usr/bin/arm-none-eabi-gcc". The "ABI" is not really important, I have just set it to arm-unknown-unknown-unknown-32bit.
e) Tab "Build & Run" - "Kits". Add a new kit, I called mine "ARM Bare Metal". Device type: "Bare Metal" Device: point to the Device you have created with it's OpenOCD/St link GDB server Sysroot: leave it empty Compiler: ARM GCC Debugger: ARM GDB Qt Version: None - You obviously cannot run the QT runtime on a Cortex m4! Cmake tool: unused
Make sure there are no warnings in any of the Build & Run tabs
- Make your make/qmake/QBS project. This reposistory contains an example QBS project for the STM32F4 discovery. It contains the CMSIS library, linker script as well as an (outdated?) ethernet library for the STM32F407.
On left side go to tab "projects" and at left-top add the "ARM Bare Metal" kit. This should work without errors. Your project may start out with a desktop kit. Replacing usually does not work. In that case add an ARM kit and then remove the desktop one.
- Start your OpenOcd server. I use a STM32F4 discovery for development, and also off-board programming to my own STM32 boards. For any STM32F40x/STM32F41x targets run:
openocd -f board/stm32f4discovery.cfg
This starts a gdb server at port 3333 and a telnet server (for OpenOCD commands) at 4444. As a shortcut I create a few .sh files in my home directory for a quick startup of a GDB server.
- Start the debug session. It should program and run now! :)
You can set breakpoints, step through code, even move PC back, watch call stack, variables (locals / watch), and disassembly. I'm really quited please with this, but obviously it lacks a few things like:
- "Register view". Yes it has one, but that's just the CPU registers. I want register view of my peripherals as well.
- Download progress or more detailed info about connection state. You need to refer to openocd for this.
