-
Notifications
You must be signed in to change notification settings - Fork 248
Mass Action Tool
 This content is new and in-progress for MSI and includes content for "in development" and 1.0.0 Beta features. Information may change depending on development.
You can use the use the Mass Action tool to make quick updates across multiple products. This is helpful for transferring inventory between sources and removing a source without editing each product individually.
- Assign product sources - Add sources to multiple products.
- Transfer Inventory - Move all quantities of products from one source to another for Multi Source merchants.
- Unassign product sources - Remove sources from the products. Any inventory quantity assigned to that source is no longer available.
Use the Assign Sources tool to add one or more sources to your products. The tool helps when creating and assigning custom sources to your Default Stock or custom stocks and preparing new locations and inventory.
Currently, there is a limitation for Default Source and Default Stock to remember when mass assigning sources:
- Bundle and Grouped products must be assigned to Default Source and Default Stock. You can mass assign Default Source to these products. In future releases, we will expand source and stock support for these products.
- You can assign custom sources (not including Default Source) to your Default Stock or custom stocks.
- You can assign the Default Source to a custom stock (not the Default Stock).
After adding new custom sources, you can add inventory quantities per product or for multiple products using the import feature. See MSI Import and Export Product Data for details.
-
On the Admin sidebar, tap Catalog. Then choose Products.
-
Select the products you want to modify sources. Browse or search to find the products and select those checkboxes.
-
Tap the Actions drop-down menu, and choose Assign Inventory Source. Tap OK to verify the Mass Action tool.
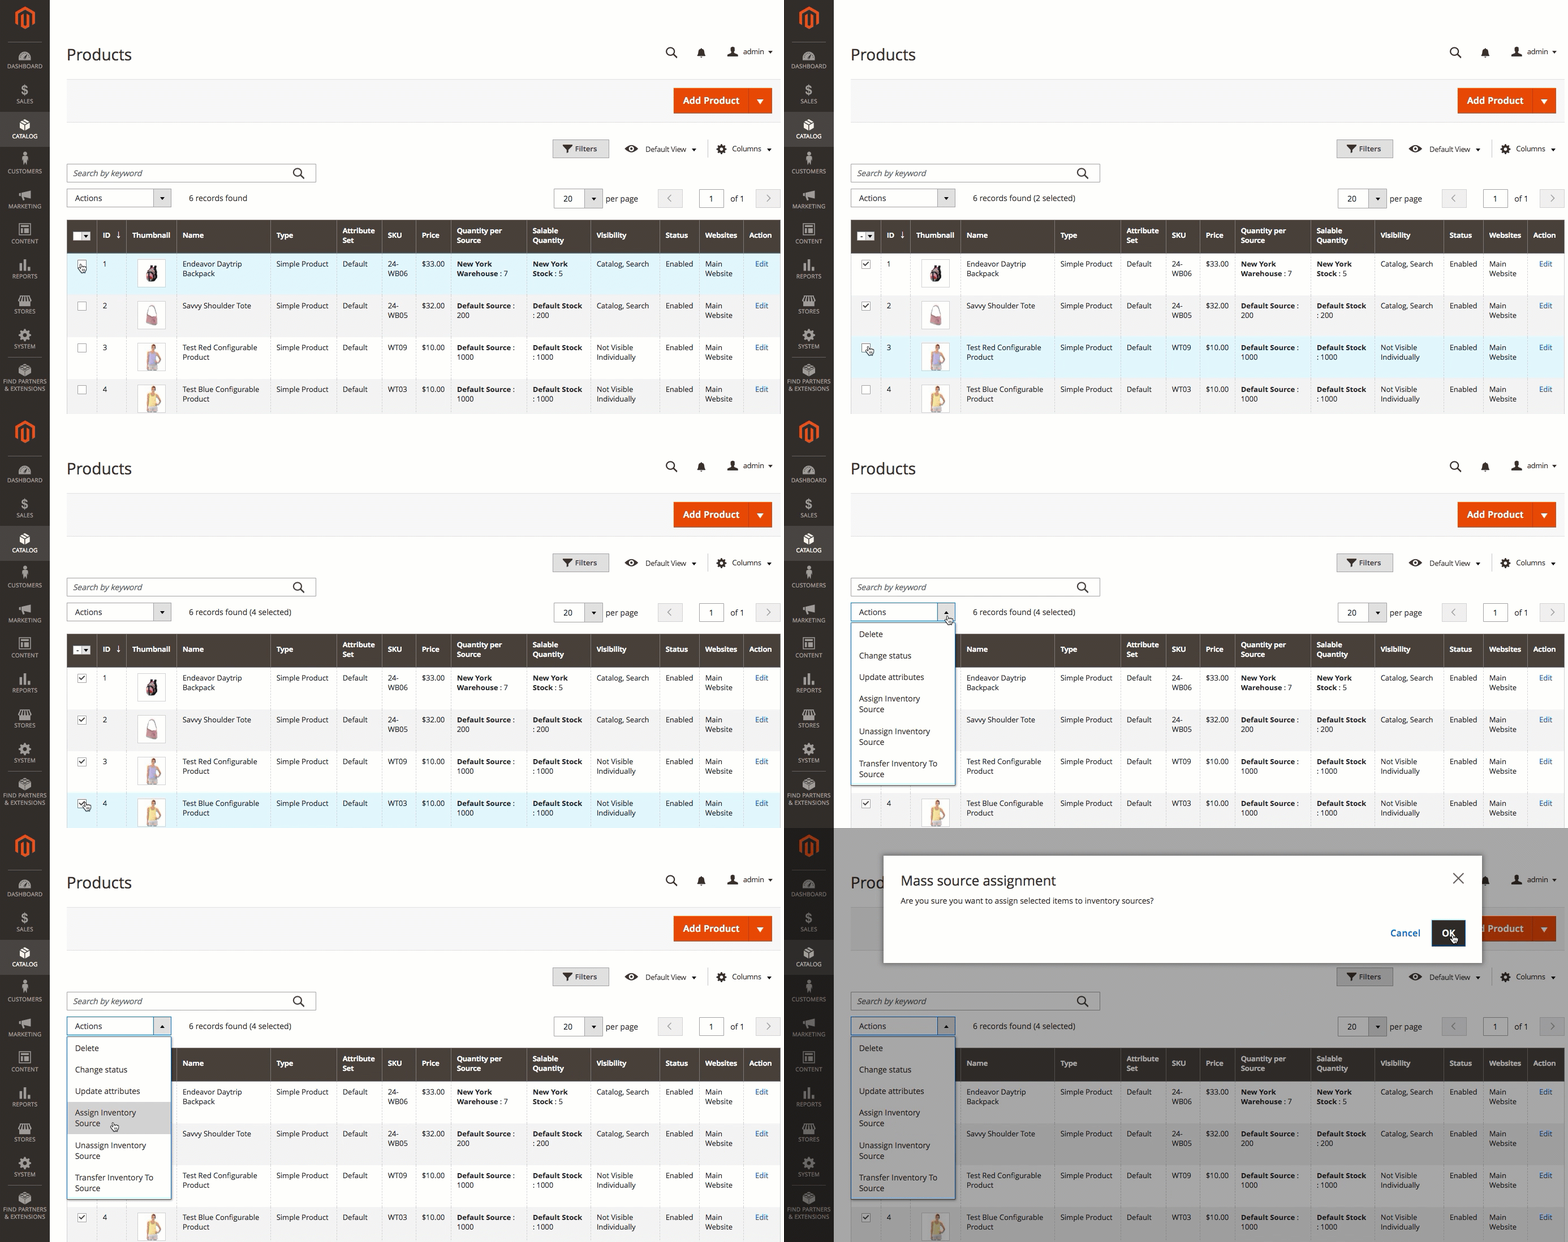
Select products and assign sources -
Select checkboxes for all sources you want to add to the products.
-
Tap Assign Sources.
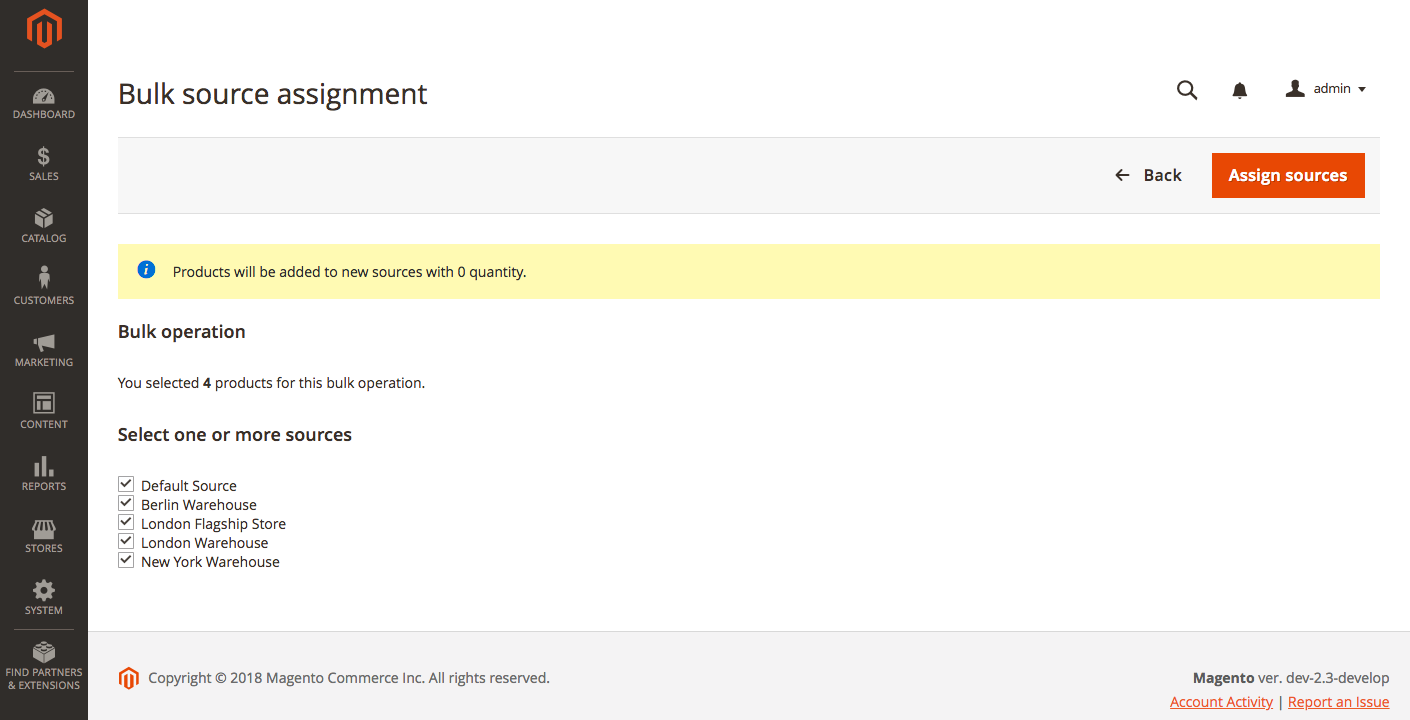
Add sources to selected products
The sources are added to the products with an inventory quantity of 0. You can add inventory amounts as available per source.
Depending on your business needs and status of location, Multi Source merchants may need to transfer product inventory from one source location to another. For example, you may be closing a warehouse location or no longer ship specific products from a location, moving all operations for those products to a new location.
This option allows you to select one or more products, the origin source to transfer inventory, and the destination source to receive quantities:
- Only inventory quantities for the selected source are moved.
- If a product does not have that source, it is skipped.
- All product inventory for the source is moved.
You have an option to also unassign the source when transferring inventory quantities.
To transfer inventory:
-
On the Admin sidebar, tap Catalog. Then choose Products.
-
Select products you want to transfer inventory. Browse or search to find the products and select those checkboxes.
-
Tap the Actions drop-down menu, and choose Transfer Inventory. Tap OK to verify the Mass Action tool.
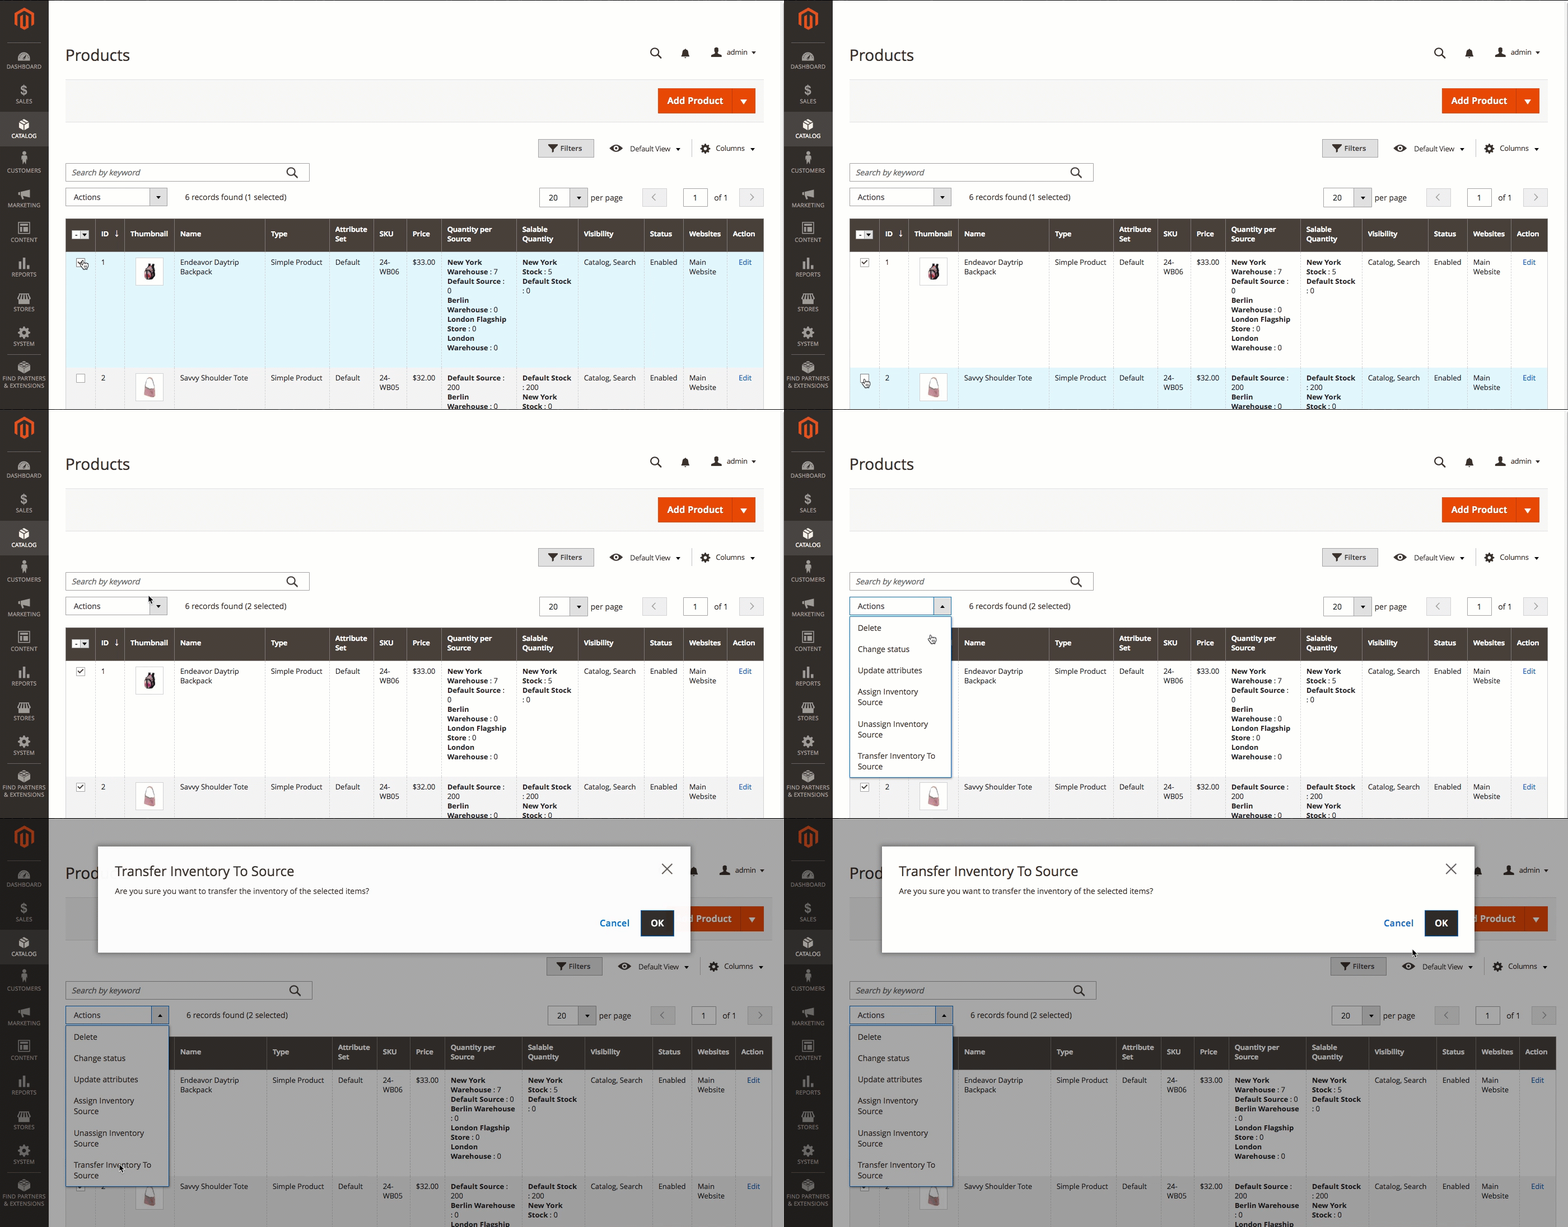
Select products to transfer inventory -
Select the origin source to transfer products to a new destination. Tap Continue.
-
Select the destination source to transfer products to a new destination.
-
To remove the source from the products, select the optional checkbox Unassign from origin source after transfer.
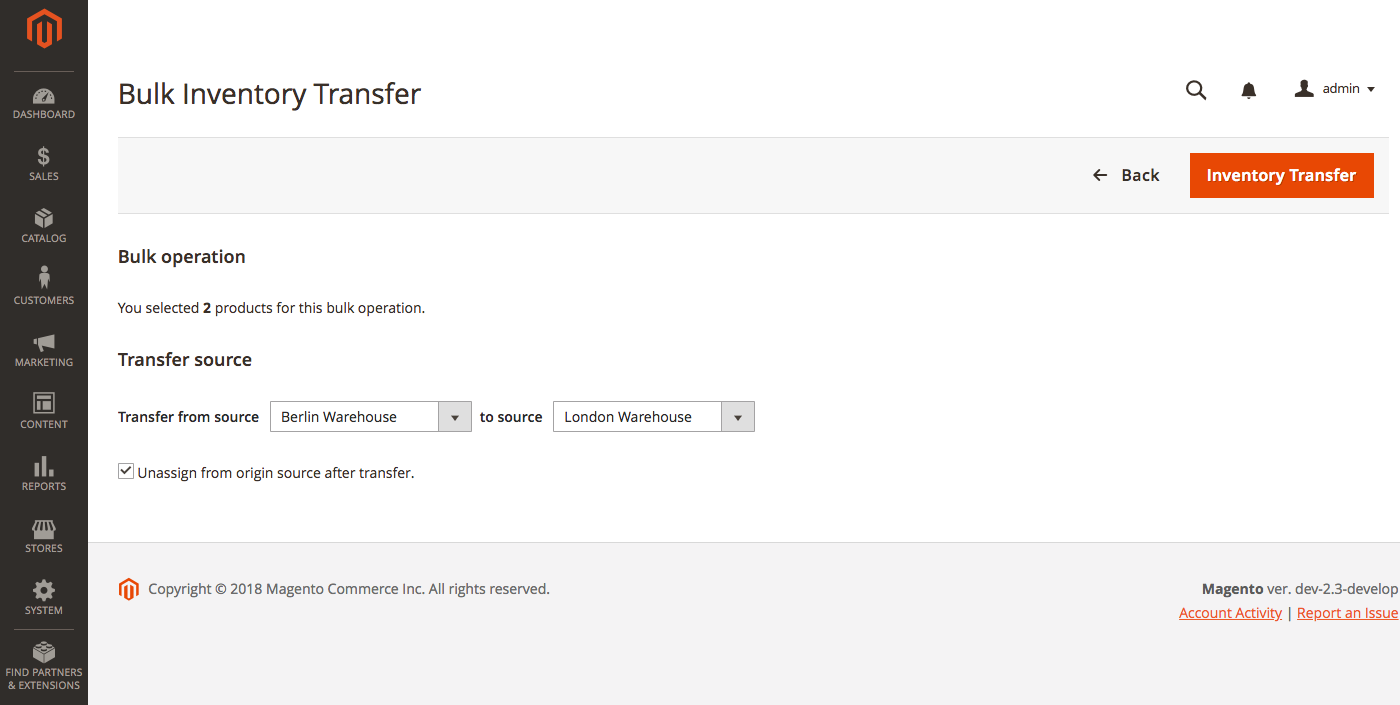
Select sources to transfer inventory -
Tap Inventory Transfer. All product quantities are deducted from the origin source and added to the destination source. The Quantity and Salable Quantity automatically update.
When unassigning a source from a product, you are indicating the product will no longer be stocked at that location. This process will completely clear all inventory data for source currently assigned to the product. If you need to move the existing inventory to a new location, consider using the Transfer inventory option.
Important: When you unassign a source from a product, all source data including inventory amounts is removed from that product. This can affect salable quantities and reservations for unprocessed orders. After checkout and before shipment, all product quantities in the order have associated reservations. If you unassign a source, you can cause issues with reservations and processing orders.
We strongly recommend completing all orders and shipments for those products prior to removing the source.
-
On the Admin sidebar, tap Catalog. Then choose Products.
-
Select the products you want to modify sources. Browse or search to find the products and select those checkboxes.
-
Tap the Actions drop-down menu, and choose Unassign Inventory Source. Tap OK to verify the Mass Action tool.
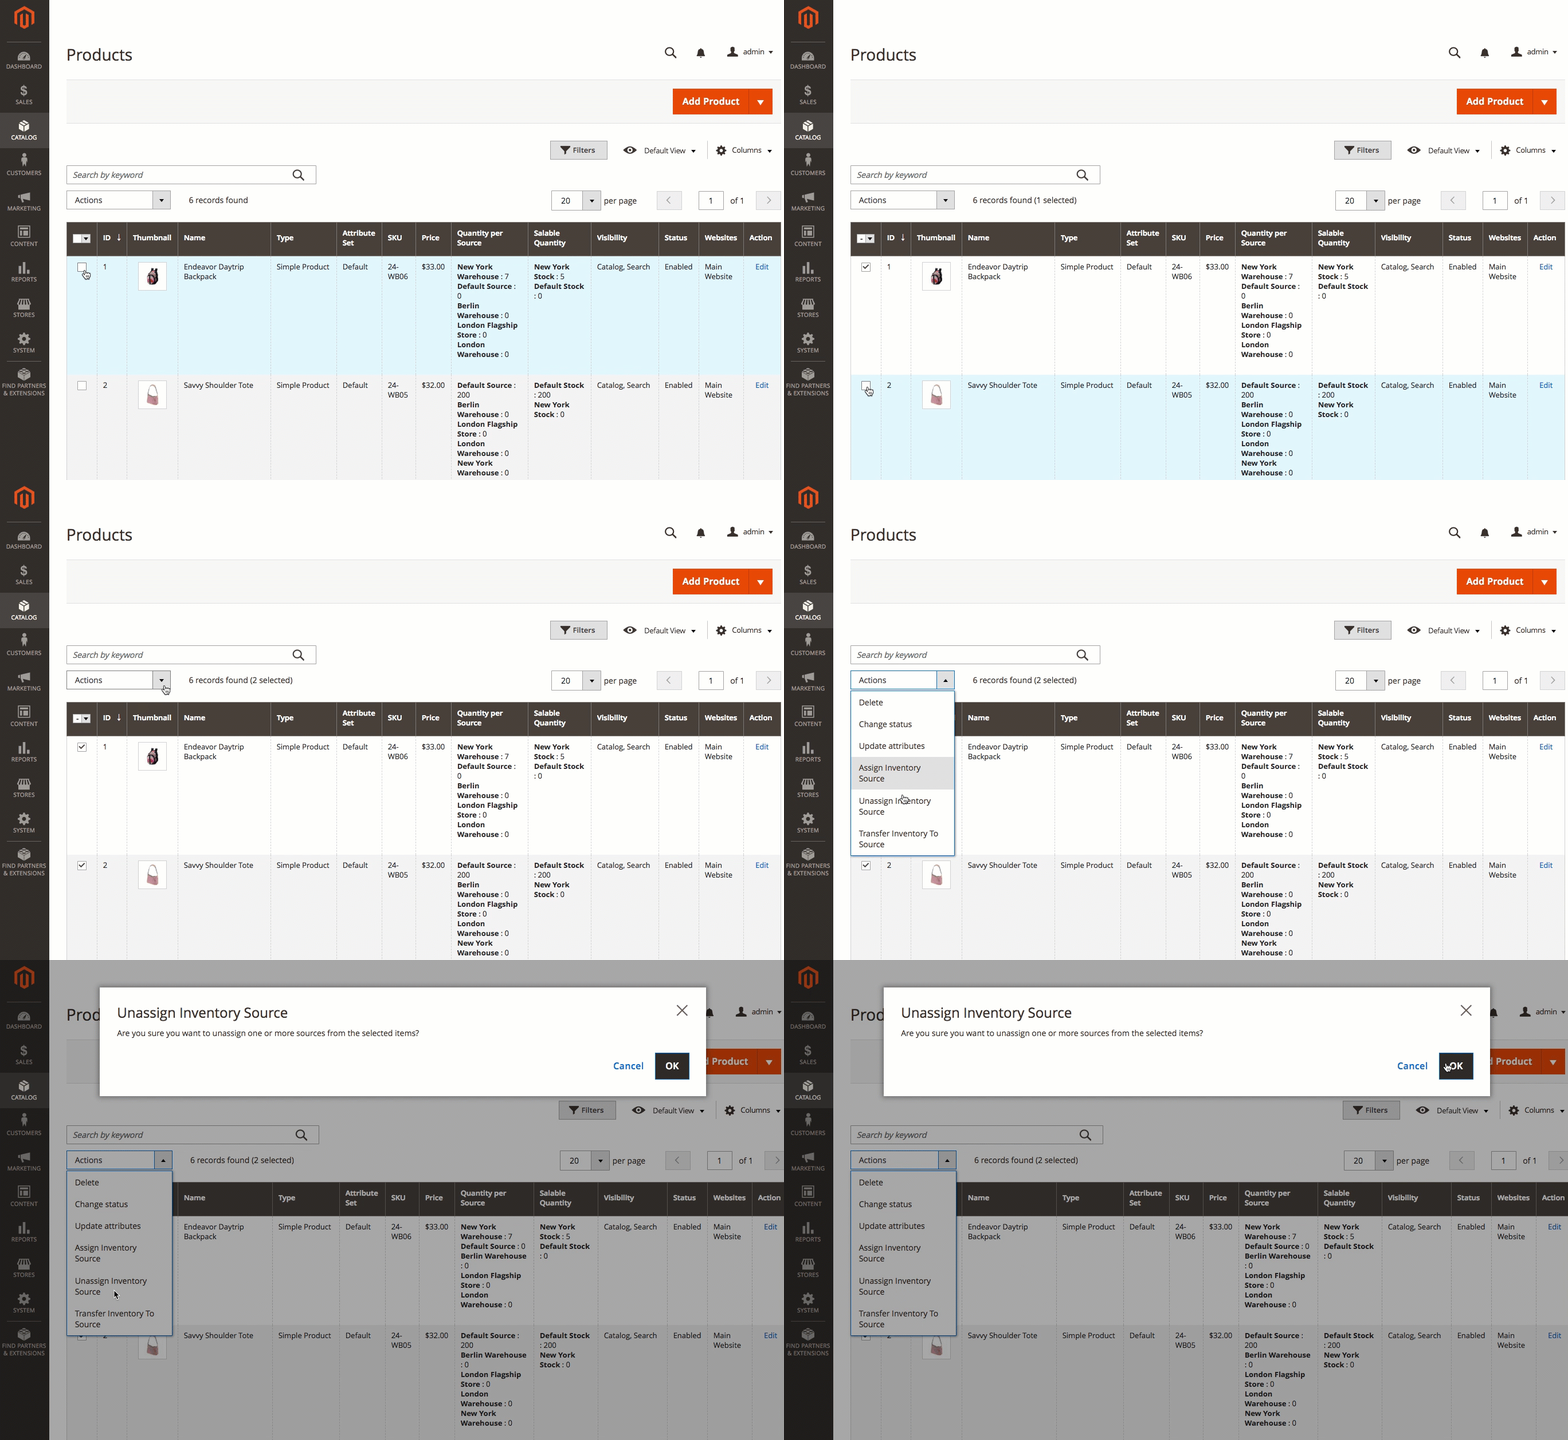
Select products and assign sources -
Select the source you want to remove from the products.
-
Tap Unassign Sources. An alert displays that unassigning will remove all specific source and quantity data from the product.
-
To complete, click Unassign Sources.
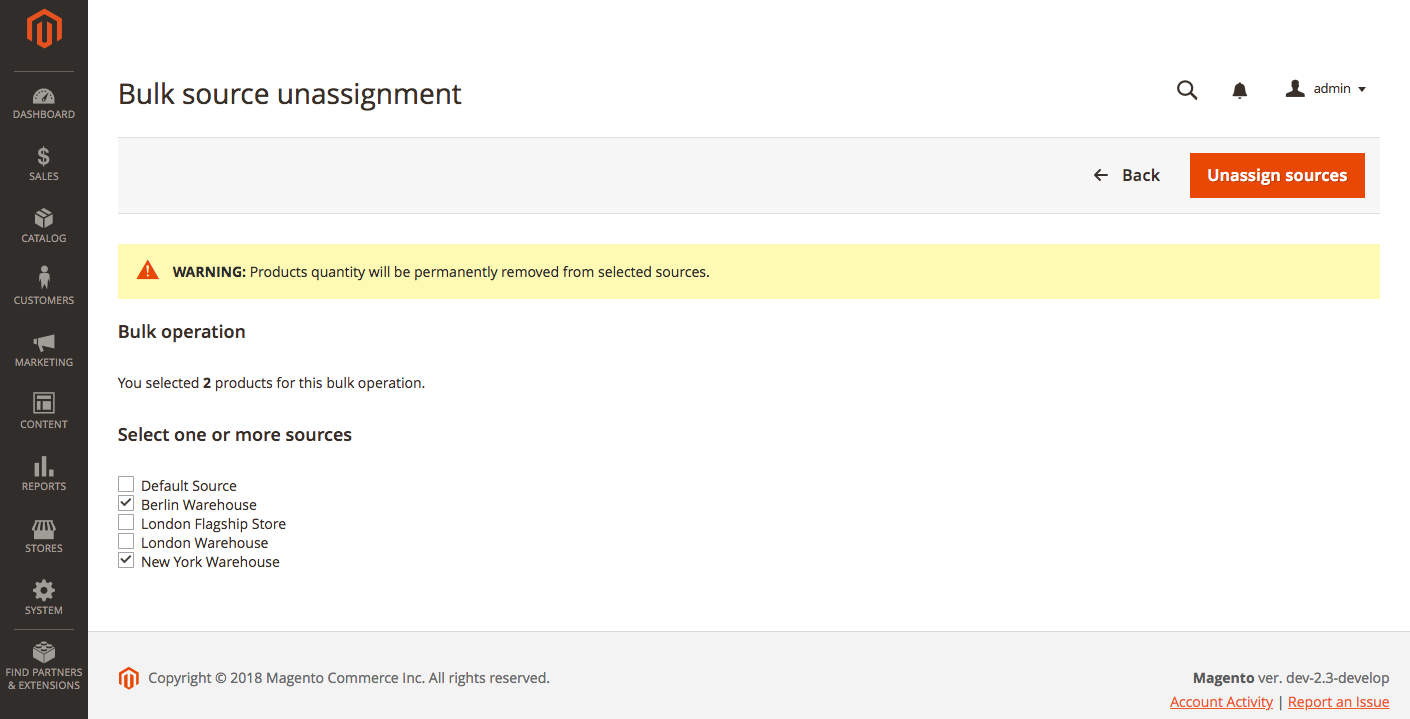
Remove sources from selected products
Multi-Source Inventory developed by Magento 2 Community
- Technical Vision. Catalog Inventory
- Installation Guide
- List of Inventory APIs and their legacy analogs
- MSI Roadmap
- Known Issues in Order Lifecycle
- MSI User Guide
- 2.3 LIVE User Guide
- MSI Release Notes and Installation
- Overview
- Get Started with MSI
- MSI features and processes
- Global and Product Settings
- Configure Source Selection Algorithm
- Create Sources
- Create Stock
- Assign Inventory and Product Notifications
- Configure MSI backorders
- MSI Import and Export Product Data
- Mass Action Tool
- Shipment and Order Management
- CLI reference
- Reports and MSI
- MSI FAQs
- DevDocs Documentation
- Manage Inventory Management Modules (install/upgrade info)
- Inventory Management
- Reservations
- Inventory CLI reference
- Inventory API reference
- Inventory In-Store Pickup API reference
- Order Processing with Inventory Management
- Managing sources
- Managing stocks
- Link and unlink stocks and sources
- Manage source items
- Perform bulk actions
- Manage Low-Quantity Notifications
- Check salable quantities
- Manage source selection algorithms
- User Stories
- Support of Store Pickup for MSI
- Product list assignment per Source
- Source assignment per Product
- Stocks to Sales Channel Mapping
- Adapt Product Import/Export to support multi Sourcing
- Introduce SourceCode attribute for Source and SourceItem entities
- Assign Source Selector for Processing of Returns Credit Memo
- User Scenarios:
- Technical Designs:
- Module Structure in MSI
- When should an interface go into the Model directory and when should it go in the Api directory?
- Source and Stock Item configuration Design and DB structure
- Stock and Source Configuration design
- Open Technical Questions
- Inconsistent saving of Stock Data
- Source API
- Source WebAPI
- Sources to Sales Channels mapping
- Service Contracts MSI
- Salable Quantity Calculation and Mechanism of Reservations
- StockItem indexation
- Web API and How To cover them with Functional Testing
- Source Selection Algorithms
- Validation of Domain Entities
- PHP 7 Syntax usage for Magento contribution
- The first step towards pre generated IDs. And how this will improve your Integration tests
- The Concept of Default Source and Domain Driven Design
- Extension Point of Product Import/Export
- Source Selection Algorithm
- SourceItem Entity Extension
- Design Document for changing SerializerInterface
- Stock Management for Order Cancelation
- Admin UI
- MFTF Extension Tests
- Weekly MSI Demos
- Tutorials