generated from jhudsl/OTTR_Template_Website
-
Notifications
You must be signed in to change notification settings - Fork 1
/
Copy pathcourse_publishing.Rmd
551 lines (338 loc) · 27.8 KB
/
course_publishing.Rmd
1
2
3
4
5
6
7
8
9
10
11
12
13
14
15
16
17
18
19
20
21
22
23
24
25
26
27
28
29
30
31
32
33
34
35
36
37
38
39
40
41
42
43
44
45
46
47
48
49
50
51
52
53
54
55
56
57
58
59
60
61
62
63
64
65
66
67
68
69
70
71
72
73
74
75
76
77
78
79
80
81
82
83
84
85
86
87
88
89
90
91
92
93
94
95
96
97
98
99
100
101
102
103
104
105
106
107
108
109
110
111
112
113
114
115
116
117
118
119
120
121
122
123
124
125
126
127
128
129
130
131
132
133
134
135
136
137
138
139
140
141
142
143
144
145
146
147
148
149
150
151
152
153
154
155
156
157
158
159
160
161
162
163
164
165
166
167
168
169
170
171
172
173
174
175
176
177
178
179
180
181
182
183
184
185
186
187
188
189
190
191
192
193
194
195
196
197
198
199
200
201
202
203
204
205
206
207
208
209
210
211
212
213
214
215
216
217
218
219
220
221
222
223
224
225
226
227
228
229
230
231
232
233
234
235
236
237
238
239
240
241
242
243
244
245
246
247
248
249
250
251
252
253
254
255
256
257
258
259
260
261
262
263
264
265
266
267
268
269
270
271
272
273
274
275
276
277
278
279
280
281
282
283
284
285
286
287
288
289
290
291
292
293
294
295
296
297
298
299
300
301
302
303
304
305
306
307
308
309
310
311
312
313
314
315
316
317
318
319
320
321
322
323
324
325
326
327
328
329
330
331
332
333
334
335
336
337
338
339
340
341
342
343
344
345
346
347
348
349
350
351
352
353
354
355
356
357
358
359
360
361
362
363
364
365
366
367
368
369
370
371
372
373
374
375
376
377
378
379
380
381
382
383
384
385
386
387
388
389
390
391
392
393
394
395
396
397
398
399
400
401
402
403
404
405
406
407
408
409
410
411
412
413
414
415
416
417
418
419
420
421
422
423
424
425
426
427
428
429
430
431
432
433
434
435
436
437
438
439
440
441
442
443
444
445
446
447
448
449
450
451
452
453
454
455
456
457
458
459
460
461
462
463
464
465
466
467
468
469
470
471
472
473
474
475
476
477
478
479
480
481
482
483
484
485
486
487
488
489
490
491
492
493
494
495
496
497
498
499
500
501
502
503
504
505
506
507
508
509
510
511
512
513
514
515
516
517
518
519
520
521
522
523
524
525
526
527
528
529
530
531
532
533
534
535
536
537
538
539
540
541
542
543
544
545
546
547
548
549
550
551
---
title: "Examples of OTTR courses"
output:
html_document:
toc: true
toc_float: true
---
Below are some examples of courses created using the [OTTR Template](https://github.com/jhudsl/OTTR_Template) and published on three platforms: Bookdown, Leanpub and Coursera.
_Introduction to Reproducibility in Cancer Informatics:_
- [GitHub repository and source code](https://github.com/jhudsl/Reproducibility_in_Cancer_Informatics)
- [Bookdown website](https://jhudatascience.org/Reproducibility_in_Cancer_Informatics/introduction.html)
- [Leanpub course](https://leanpub.com/universities/courses/jhu/cancer-informatics-for-research-leaders)
- [Coursera course](https://www.coursera.org/learn/intro-reproducibility-cancer-informatics)
_Computing for Cancer Informatics:_
- [GitHub repository and source code](https://github.com/jhudsl/Computing_for_Cancer_Informatics)
- [Bookdown website](https://jhudatascience.org/Computing_for_Cancer_Informatics/)
- [Leanpub course](https://leanpub.com/universities/courses/jhu/cancer-informatics-computing)
- [Coursera course](https://www.coursera.org/learn/computing-for-cancer-informatics)
# Publishing with Bookdown
To publish your content using Bookdown, you can utilize Github Pages by following the repository setup instructions provided [here](https://github.com/jhudsl/OTTR_Template/wiki/Starting-a-new-course-with-this-template#set-up-github-pages). It's important to note that Bookdown serves as a fundamental component for utilizing other publishing platforms such as Coursera or Leanpub. Therefore, if you intend to use Coursera or Leanpub, you will need to publish your content using Bookdown.
As you modify the names of the chapters of your course and add more chapters (using the `.Rmd` files), you need to update the `_bookdown.yml` file accordingly.
For example let's say that we added another chapter and named the file `03-new_chapter_of_course.Rmd`.
We would update our `_bookdown.yml` to look like this:
```yaml
book_filename: "Course_Name"
chapter_name: "Chapter "
repo: https://github.com/jhudsl/OTTR_Template/ ##Make sure you update this to your GitHub Repo!!
rmd_files: ["index.Rmd",
"01-intro.Rmd",
"02-chapter_of_course.Rmd",
"03-new_chapter_of_course.Rmd", ## This is the only new line!
"about.Rmd"]
new_session: yes
delete_merged_file: true
language:
ui:
chapter_name: "Chapter "
output_dir: "docs"
```
Notice how only a single line is different - the line mentioning `03-chapter_of_course.Rmd",`
Be careful with quotation marks (`""`) and commas (`,`)!
Once this change is made, we can preview the book by typing `bookdown::serve_book()` in the RStudio Console. Note that when you run `bookdown` it will generate an `.rds` file; you can generally ignore this file. You will then see a live version of your book in your RStudio Viewer.
Keep in mind that when a pull request is merged to main, [GitHub Actions](#github-actions) will re-run `bookdown::render_book()` and the results will be added to `main`.
<br>
# Publishing with Leanpub
OTTR contains all the files you need to publish your course to [Leanpub](https://leanpub.com/).
The [`ottrpal` package](https://github.com/jhudsl/ottrpal) takes care of handling and automatically converting the content into a rendered version that is prepared for Leanpub.
These converted files are stored in the `manuscript` folder. As a general rule, don't edit files in the `manuscript` folder. This folder should be auto generated by the `ottrpal` package and should not be edited.
Note that if you wish to keep your quizzes and their answers hidden, there is some additional setup involved with this process and you will need to create a separate private OTTR_Quizzes repository to store these quizzes. Start with [these instructions](https://github.com/jhudsl/OTTR_Template/wiki/Making-quizzes-private) first if you want your quizzes and answers to be hidden.
## Leanpub Rendering
The `ottrpal` package can handle most of the formatting tasks for links and other elements for you, as long as you have followed the formatting instructions provided in the `Setting up images` section of [this Wiki](https://github.com/jhudsl/OTTR_Template/wiki/Setting-up-images-and-graphics).
Github Actions in this repository will attempt to convert Bookdown to Leanpub for you by running `ottrpal::bookdown_to_leanpub()` function at the top of the repository.
### Setting up Leanpub-related GitHub Actions
When you are ready to begin publishing to Leanpub, you will want to turn on a few Github Actions that are included in the template but by default, turned off.
In your [config_automation.yml file](https://github.com/jhudsl/OTTR_Template/wiki/How-to-set-up-and-customize-GitHub-actions-robots), you will need to turn on two Actions in particular:
- `render-leanpub: yes`
- `check-quizzes:yes`
A third option you may consider for Leanpub publishing while you are making edits to the config_automation.yml file is whether you'd like to manually specify the order of your chapters and quizzes by creating the [Book.txt file](https://leanpub.com/lfm/read#leanpub-auto-the-booktxt-file) by hand or whether you'd like this to be [automatically generated based on file and quiz numbering.](https://jhudatascience.org/ottrpal/#about-the-booktxt-file). Read more about this [in the upcoming section](https://www.ottrproject.org/examples.html#Setting_up_quizzes).
By default, `make-book-txt: TRUE` will use the numbering in the names of the documents for chapters and quizzes to order them, but if you'd like to specify the order for the chapters and quizzes to be different on Leanpub, then set this to `make-book-txt: FALSE`, so as not to override the book.txt file that you would make manually.
After you've made your desired changes to the `config_automation.yml` file, file a pull request with these changes and merge these to main.
When you file a pull request, the quiz formatting will be checked automatically and reported in a link on a comment in your pull request.
If you encounter issues with the `ottrpal` package, please file an issue in its [Github repository](https://github.com/jhudsl/ottrpal/issues).
## Hosting your course on Leanpub
_Finalizing your course on Leanpub can be tricky_. We have created a course, [Using Leanpub](https://hutchdatascience.org/Using_Leanpub/index.html), to help guide you.
To host your course on Leanpub, follow these steps:
1) If you do not have an existing account, create a Leanpub account by visiting this link: https://leanpub.com/.
2) Start a course:
- Click on the three-line button positioned at the far right of the top bar.
- Click the "Author" tab on the far left
- Click "Courses" (if you haven't already, verify your email address)
- Click the text that says `create a new course`
- Click "A Course" and provide the "Title" of your course and your "Course URL" will be automatically filled for you.
- Select "Using Git and GitHub" (if you work with us at JHU there is a different protocol and additional settings you need to set which you should follow - [see this document](https://docs.google.com/document/d/18UQicXwf8d25ayKGF2BrinvRgB_R2ToVn5EDOUcxyoc/edit?usp=sharing) )
- Press the `add to plan` button
TODO: Which plan?
3) Preview a new version
- Click on the 3 line menu button
- Click the author tab on the far left
- Click Courses
- Click on your course name/icon
- Click "Preview New Version"
- Click `Create Preview` button
If you have errors in your course (typically from a quiz formatting issue) the render will fail and you will need to fix your quizzes. Also note that occasionally the preview might fail and you should just try again, as it will work the second time. This might be due to a lag in GitHub and Leanpub communicating.
## Setting up quizzes
Quizzes need to be stored in the `quizzes/` directory. Edit and add quizzes to this directory.
See and copy this [template quiz](https://github.com/jhudsl/OTTR_Quizzes/blob/main/quizzes/quiz_ch1.md) to get started.
All quizzes need to be written in the Markua format.
Refer to their [documentation](https://leanpub.com/markua/read#leanpub-auto-quizzes-and-exercises) (note that it is sometimes vague or outdated).
The example question types in the template are ones that are verified to work.
After you add each new quiz to the `quizzes/` directory, its filename needs to be added in the corresponding spot in the `Book.txt` file (do not edit the one in `manuscript` but the one at the top of the repository); this ensures Leanpub incorporates the quiz into the book in the correct order.
If you wanted two quizzes (one called `quiz_1.md` and one called `quiz_2.md`) you could duplicate and modify `quiz_1.md` for your needs and then you could make the `Book.txt` file look like this (assuming you created a chapter called `"03-chapter_of_course.Rmd"` and you wanted quiz_1 to be after `02-chapter-of_course` and quiz_2 to be after `03_chapter_of_course`:
```
01-intro.md
02-chapter_of_course.md
quiz_1.md
03-chapter_of_course.md
quiz_2.md
about.md
```
Note that any `.md` files with an `#` in front of the name in the `Book.txt` file will be ignored by Leanpub. We have included an example of this in the `Book.txt` file.
See an [example quiz here](https://github.com/jhudsl/OTTR_Quizzes/blob/main/quizzes/quiz_ch1.md) Note that you cannot have two quizzes with the same `quiz_id`.
### Leanpub Quizzes
Leanpub has specific formatting requirements for quizzes, and it will not generate a preview if any question or quiz does not adhere to these rules.
Our [GitHub Action for checking quizzes](#setting-up-leanpub-related-github-actions) (located in file `.github/workflows/pull-request.yml` underneath `check-quizzes` section) will print out a list of errors which you can retrieve from a pull request comment that is automatically printed. This check is only run when changes are made to the `quizzes/`. At this time, two types of questions are supported. (Short answers are not yet supported by our checks but will be added in the future).
##### Standard multiple choice:
The answer choices are not randomized and look like:
```
? A question is here
a) A wrong answer
B) A correct answer has a capital letter
c) A wrong answer
d) A wrong answer
```
##### Choose answers
You can use `choose-answers` option which will randomize the multiple choices or you can use a standard quiz question that doesn't randomize.
The notation for the answer choices are: `C)` for correct answers `m)` for mandatory incorrect answers and `o)` for optional incorrect answers.
Note that the number given for the number of answers has to be at least equal to the number of correct and mandatory incorrect answers listed.
Here's an example:
```
{choose-answers: 4}
? A question is here
C) The correct answer is signified with a capital C
m) A mandatory incorrect answer
m) A mandatory incorrect answer
o) An optional incorrect answer
o) An optional incorrect answer
```
Upon merging to the `main` branch, a GitHub Action will automatically run `check-quizzes.yml`, which uses the `ottrpal` package to check that your quiz conforms to these rules. If there are any problems, it will report the quiz formatting errors on your pull request.
### Leanpub Quiz Format Rules
- Quizzes start and end with the {quiz} and {\quiz} tags.
- Don't have exclamation points or colons in answers.
- Make sure there's at least one right answer.
- Check that the question and quiz attributes used are attributes recognized by Leanpub. -
- Make sure all quizzes are listed in Book.txt
- The number of choose answers is at least as big as the number of mandatory and correct answers listed.
- For choose-answers questions, use `C)` for correct answers `m)` for mandatory incorrect answers and `o)` for optional incorrect answers.
- Check that the question and quiz attributes used are attributes recognized by Leanpub.
## Converting Quizzes from Leanpub to Coursera format
[See more instructions on how to port a course made from these templates to Coursera](https://github.com/jhudsl/OTTR_Template/wiki/Publishing-on-Courseraa).
You can convert your quizzes to a nicely upload-able yaml file in this repository by running this command in the docker image
```
ottrpal::convert_quizzes()
```
Note that currently images and links are not supported and if your quizzes contain those, you will have to manually add them at this time.
You can run this same command locally if you wish to test something.
This render the chapters without the table of Contents.
If you do not wish to publish to Coursera and prefer this do not run, you may delete this section (but it shouldn't hurt anything to keep as is -- unless for some reason it causes you some troubles).
Additionally, the [`ottrpal`](https://github.com/jhudsl/ottrpal) package has a `ottrpal::convert_quizzes()` function if you choose to create quizzes and publish on both Leanpub and Coursera.
## Setting up the _Quizzes repository checklist:
- [ ] A [`GH_PAT` has been set in the main Template and the `_Quizzes` repository if you are using a separate `_Quizzes` repository](https://github.com/jhudsl/OTTR_Template/wiki/Setting-up-GitHub-secrets).
- [ ] [Your Leanpub course as been created on Leanpub](#hosting-your-course-on-leanpub)
- [ ] Writing mode in this course is set to `GitHub` and your main OTTR_Template repository is linked.
- [ ] Repository is created and set to `private`.
- [ ] `main` branch has been set up:
- [ ] `Require pull request reviews before merging` box is checked.
- [ ] `Require status checks to pass before merging` box is checked.
- [ ] Underneath that `Require branches to be up to date before merging` box is checked.
- [ ] This repo has been enrolled in [automatic updates from the original template](https://github.com/jhudsl/OTTR_Template/wiki/Receiving-template-updates).
- [ ] Your Book.txt file is up to date.
- [ ] The [`ottrpal::bookdown_to_leanpub()` ran successfully](#leanpub-rendering).
<br>
# Publishing with Coursera
Once your content has been extensively developed, you might consider adding your course to Coursera.
This guide was prepared specifically for those developing courses for the [ITN project](https://www.itcrtraining.org/) at Johns Hopkins University or other Coursera partner institutions. It reflects the needs and goals of ITN course developers. Coursera's Educator Resource Center is the authoritative source of documentation for using the Coursera platform.
## Setting up your Coursera course
_If you are from Johns Hopkins:_
You will need to follow [this document](https://docs.google.com/document/d/1aZeOSFLkK4hZne4Vb1iaP_0H4zyhIwvbnw9sbdCFq1Y/edit?usp=sharing) and send information to Ira Gooding ([email protected]) who will create a course shell for you.
_If you are not from Johns Hopkins:_
You will need to set up your own educator profile and course shell through your institution.
## Converting your files for Coursera
The Github Actions (set up in `render-all.yml`) renders your course material in a format suitable for linking to Coursera.
This Coursera version is identical except that the table of contents bar on the left side has been dropped so as to not confuse Coursera users about navigating the course.
These files can be previewed in the `docs/no_toc` folder and a link to the Coursera version is printed out in a GitHub comment in your pull request by `render-preview.yml`.
If you have written your quizzes in Leanpub format first, the `pull-request.yml` Github Action will convert those quizzes so they are ready to be uploaded to Coursera.
Alternatively, if you do not wish to have a Leanpub version of your course, you can write your quizzes directly on Coursera's website. You can download the quiz you write on their website as a yaml and store it on your repository as well.
## Navigating to your course on Coursera
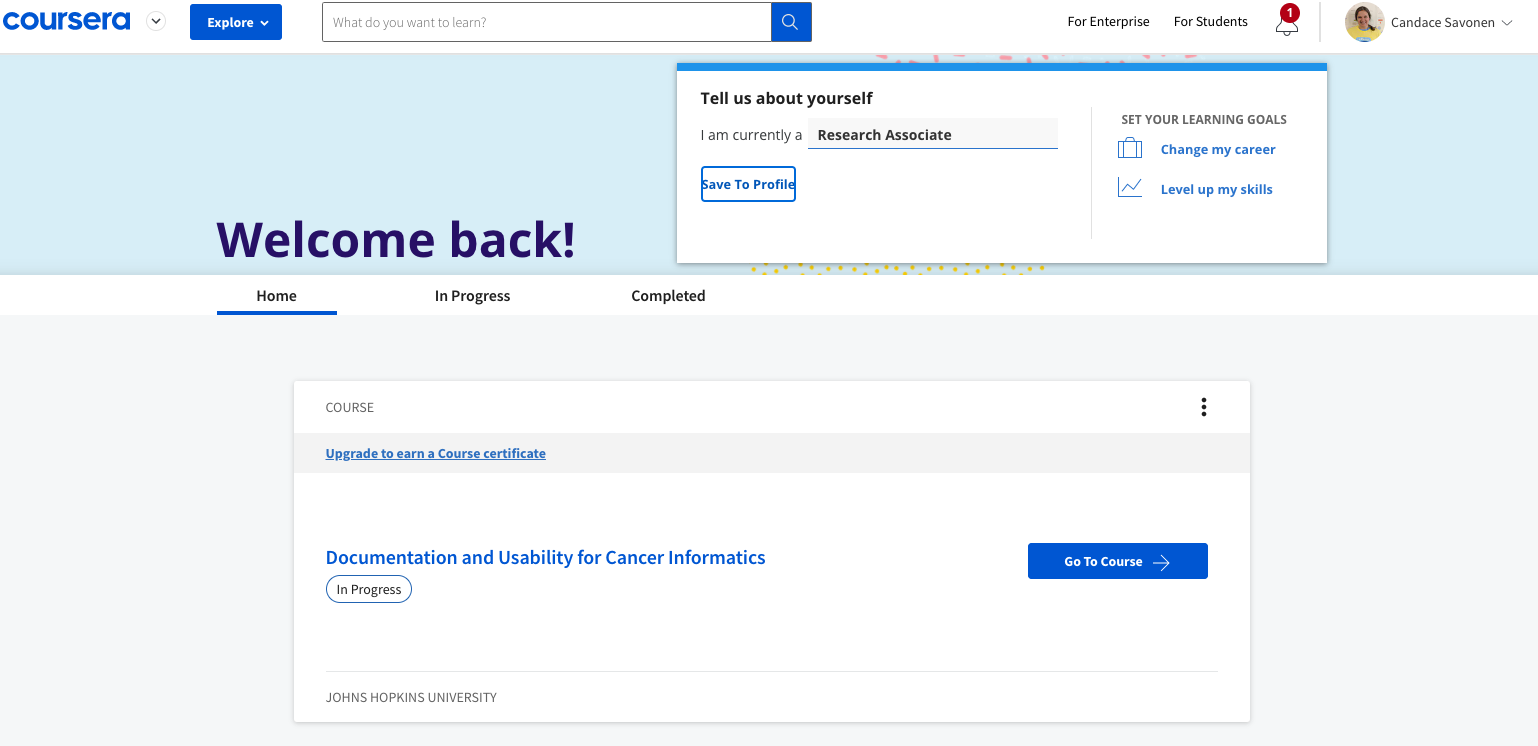
After your [course shell has been added to your account](#setting-up-your-coursera-course) you can navigate to it by going to `My Courses`:

<br>
And you should see it listed:
<br>
Click on `Go to Course` and on your main course page, click `Edit Course` in the right corner.

<br>
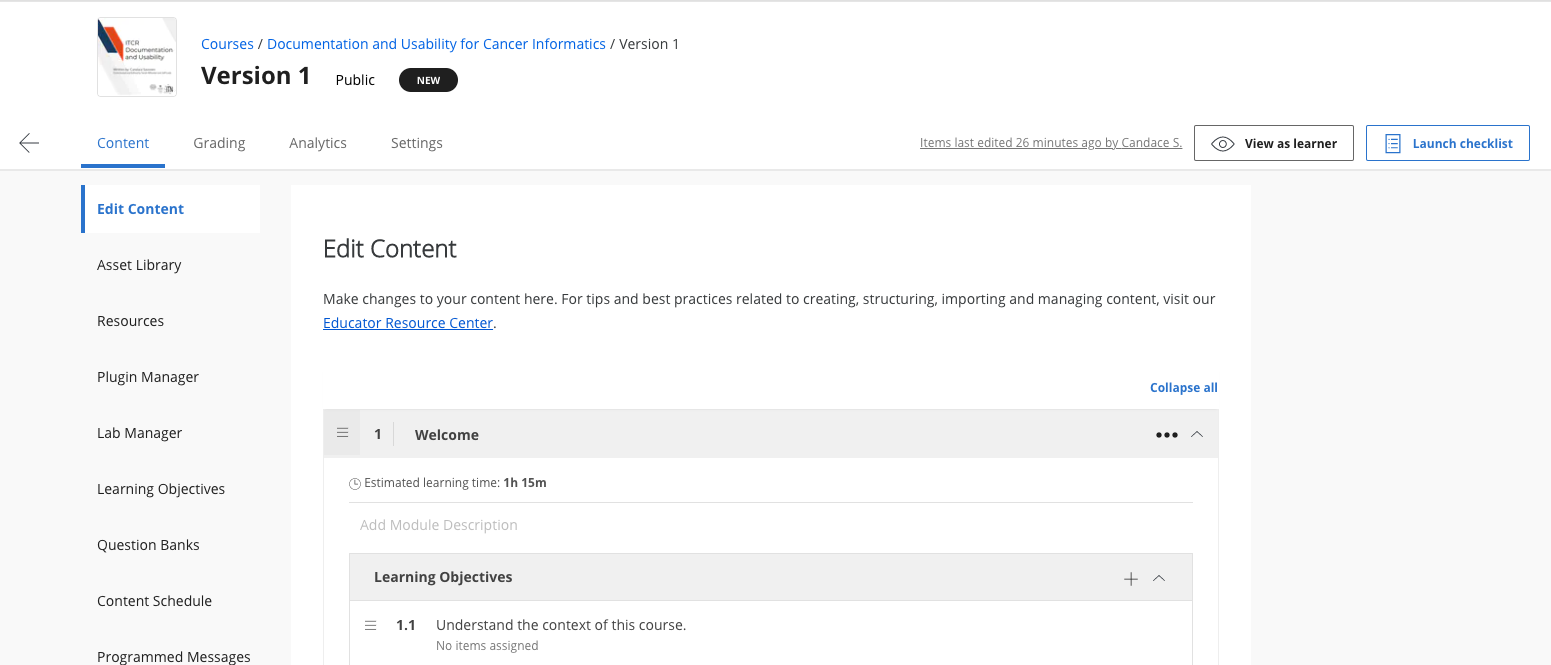
This will bring you to your version page (at this point you should only have a Version 1, so go to that one).

<br>
Now you are on the Edit content page and ready to add lessons, modules and quizzes!
<br>
In general, you will want each lesson to contain at least a chapter and a quiz.
Each module is supposed to take a learner one week, so depending on the length of your chapters and quizzes you may want one or two lessons/chapters/quizzes a module.
To add a new lesson, click the `+ Add Lesson` button:

Now you are ready to add a chapter!
### Adding new chapters to Coursera
You'll need to link out each chapters in Coursera by providing a URL built from your Github Pages for your course.
You can see a preview of these chapters you will link to in Coursera by going to the [Github Pages](https://guides.github.com/features/pages/) for your course, but adding `/no_toc` at the end of your URL before the chapter file name.
So the URLs for each of your chapters which you will supply to Coursera in the next steps will look like this:
```
<main-github-pages-url>/no_toc/<html_filename>
```
If you are unsure what the main URL for your Github pages is, in your github repository, go to `Settings` > `Pages` and you'll see `Your site is published at:`
So for example, the introduction chapter of this template would be linked by using this URL:
```
https://jhudatascience.org/OTTR_Template/no_toc/introduction.html
```
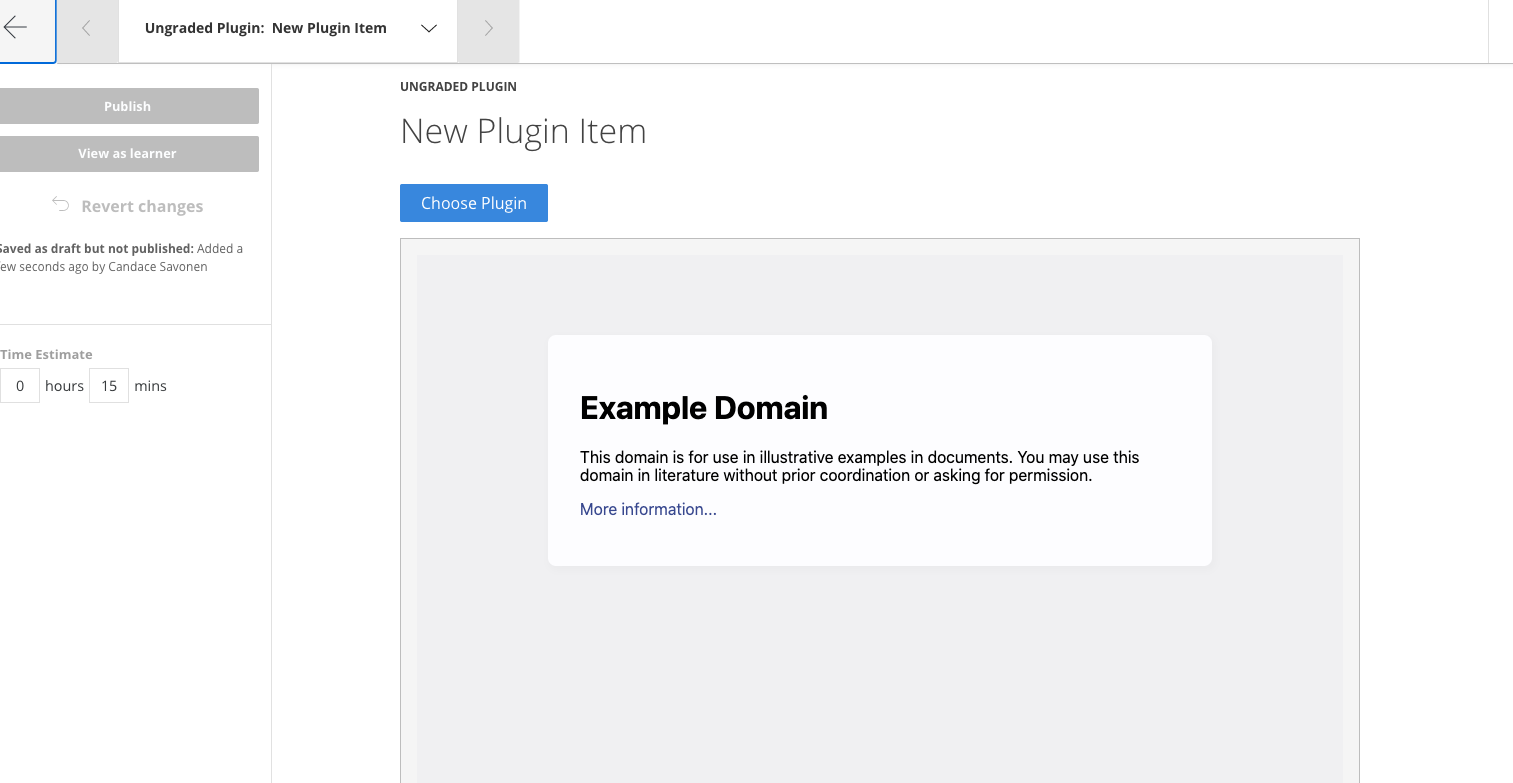
To add this URL to Coursera, add a new lesson, click `+ More` and choose `Ungraded Plugin`.

<br>
This will add an unpublished ungraded plugin to your lesson:

<br>
Now click the edit button on the new `Ungraded Plugin`.

<br>
This will bring you to the standard example plug in page.
<br>
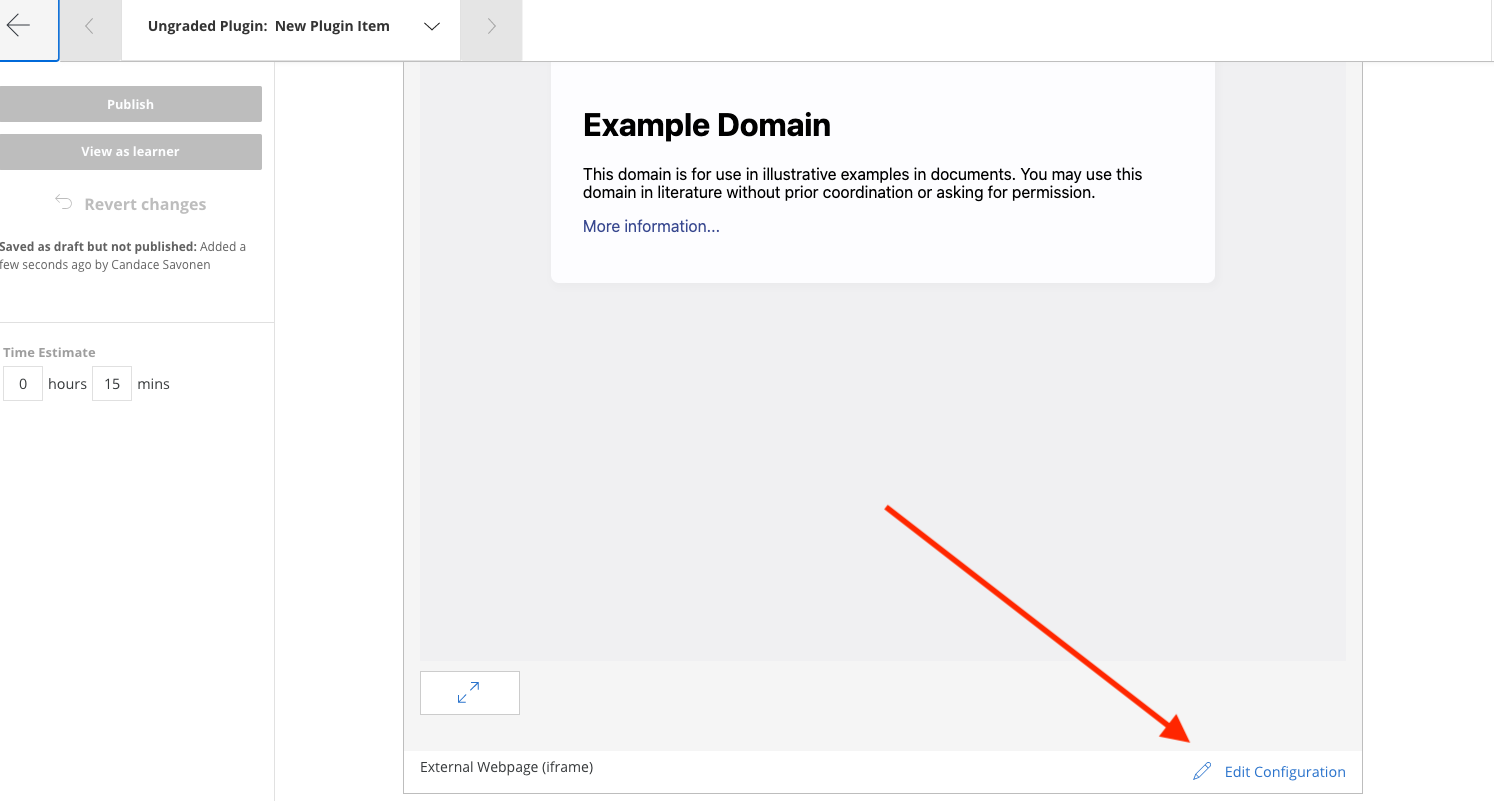
Scroll down and click `Edit Configuration`:
<br>
Replace the example URL with the URL of your individual chapter we discussed above.
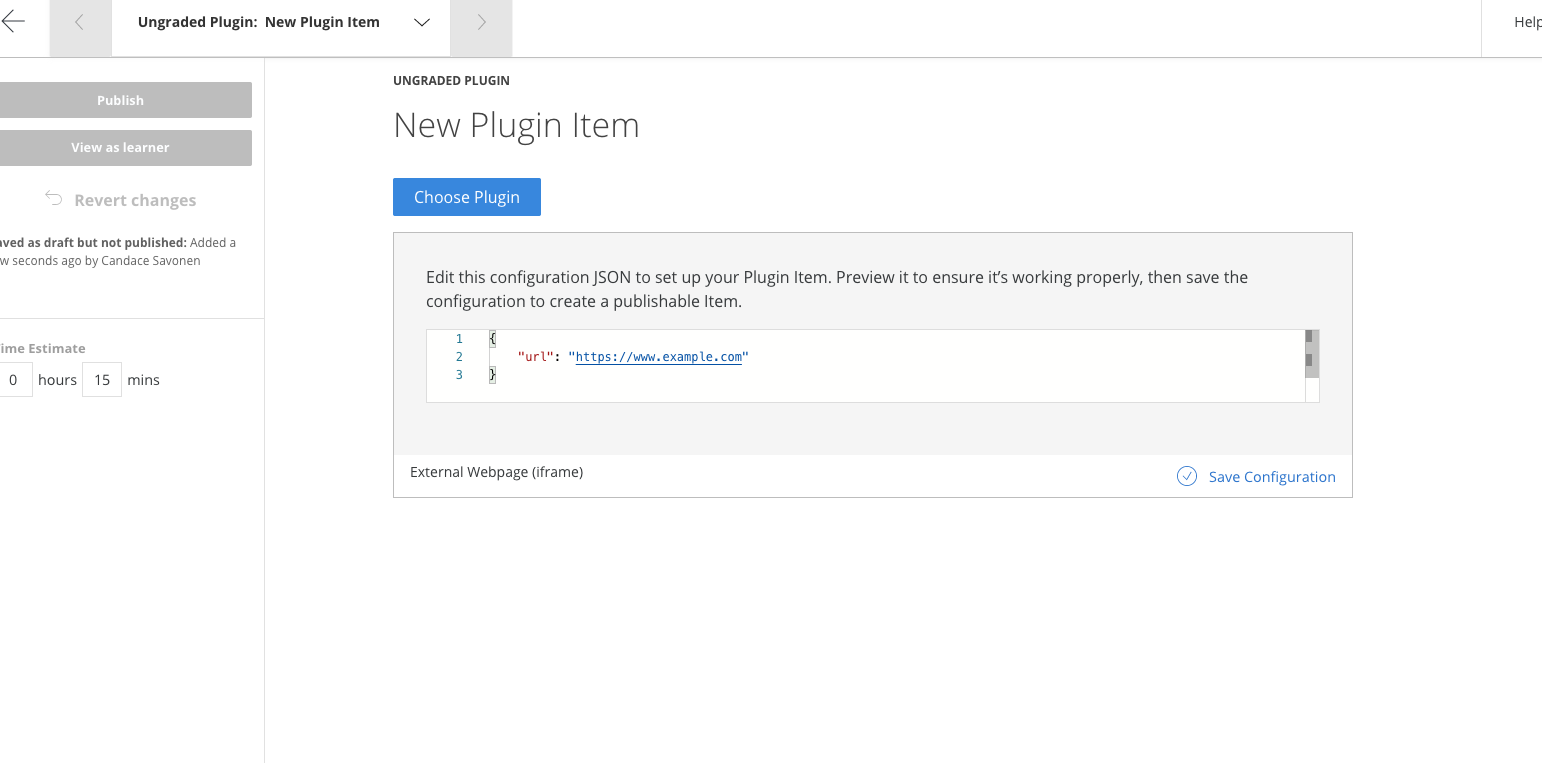
<br>
Then click on `Save Configuration`:
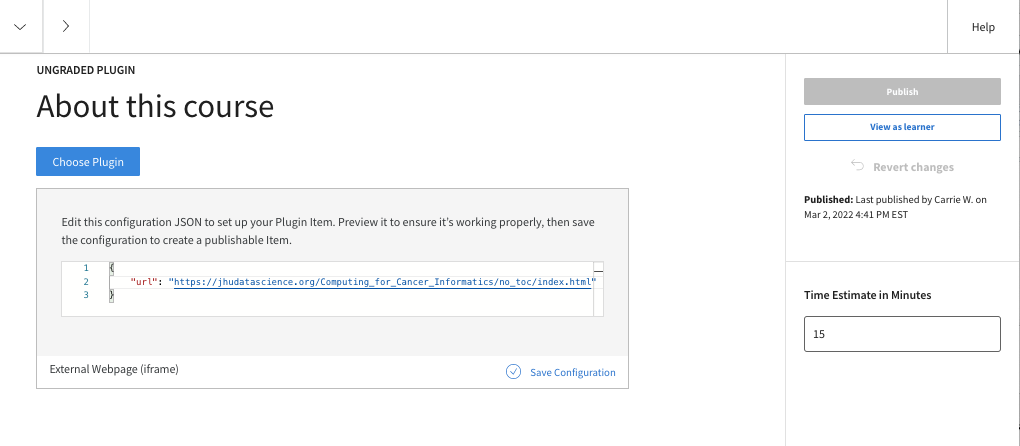
Also be sure to modify the time estimate to be something that you think is appropriate for your content - err on the side of giving students extra time.
If the URL you provided was correct, you should see a preview of your chapter:
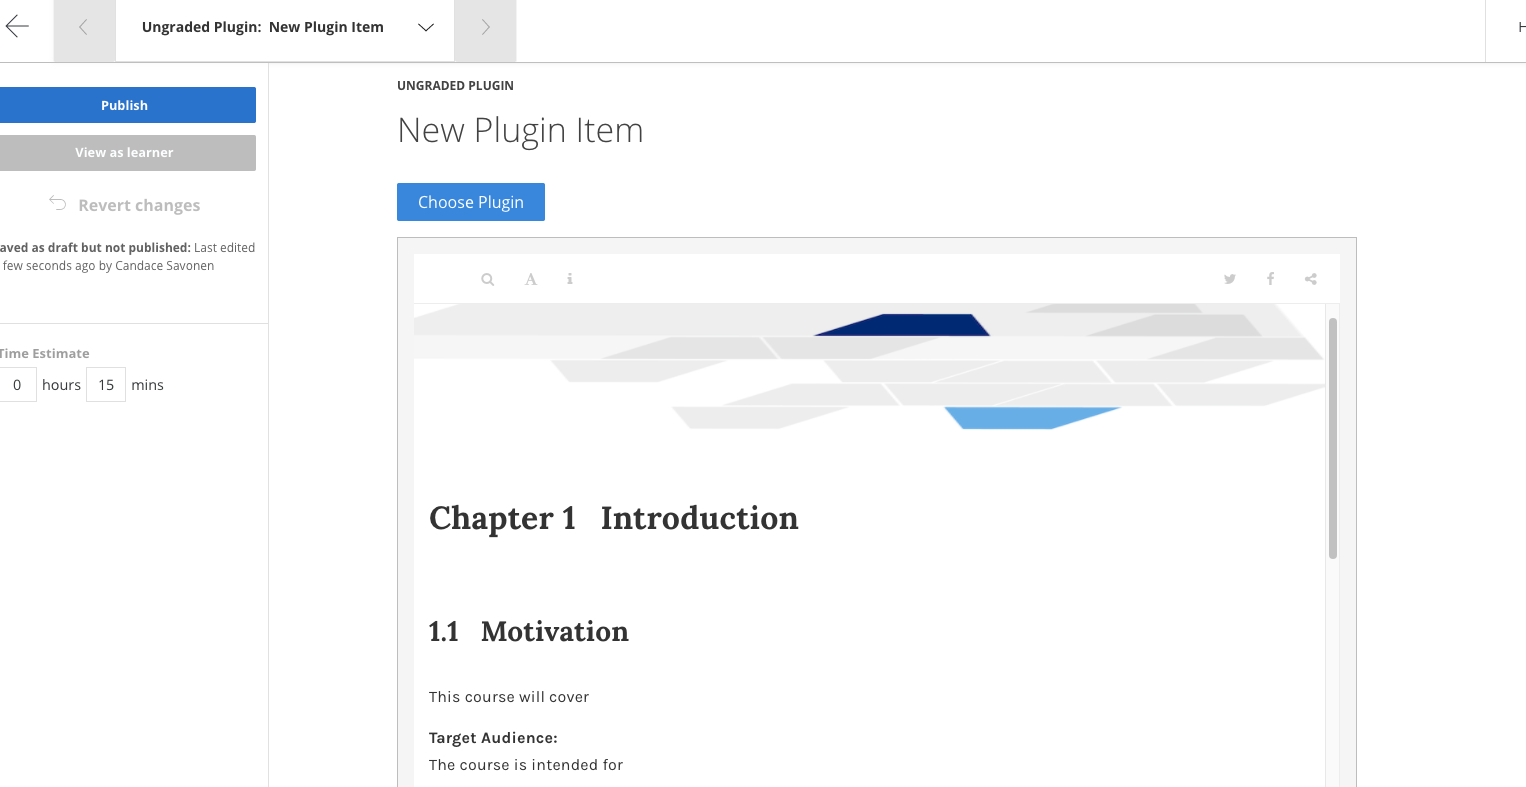
<br>
You may want to edit the title at the top of this page to indicate the material being linked.
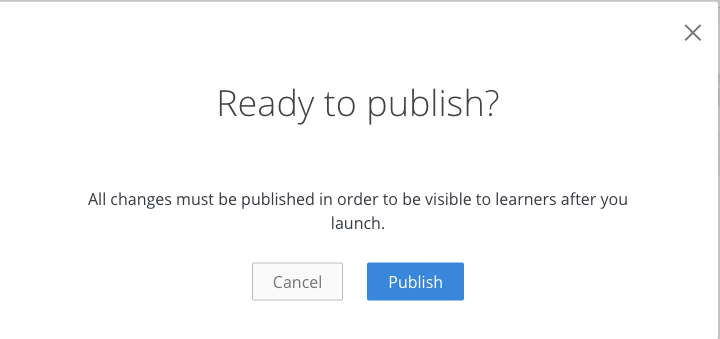
Now click `Publish` in the left upper corner (don't worry it's not actually publishing publicly, it is just saving your changes).
And it will ask you again to really scare you, but yes, click `Publish`.
Congrats you added a chapter to your course! Now do the same thing for all your chapters!
### Adding new quizzes to Coursera
To add a new quiz start from your `Edit content` page and on whatever lesson you would like to add the quiz to and click the `+ Quiz` button.

<br>
Now go to `Edit` on the new quiz.

<br>
If you are choosing to manually enter your quizzes, you can continue to add each question from this page.
If you are importing a Leanpub converted quiz click the `Import Questions` button and choose your converted yml files.
(If you've not yet converted your leanpub quizzes, then [refer to that section](#converting-quizzes-from-leanpub-format).)
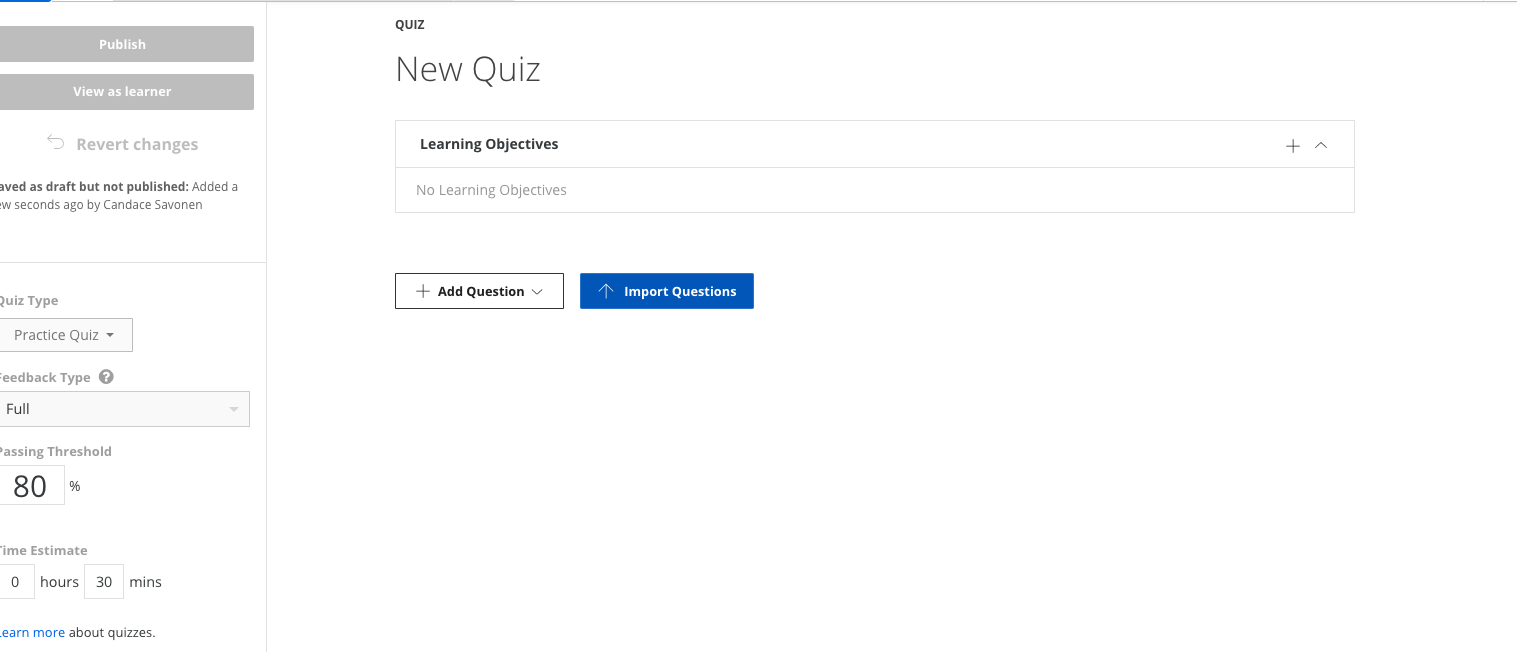
<br>
Upload your Coursera quiz yml file from your device:
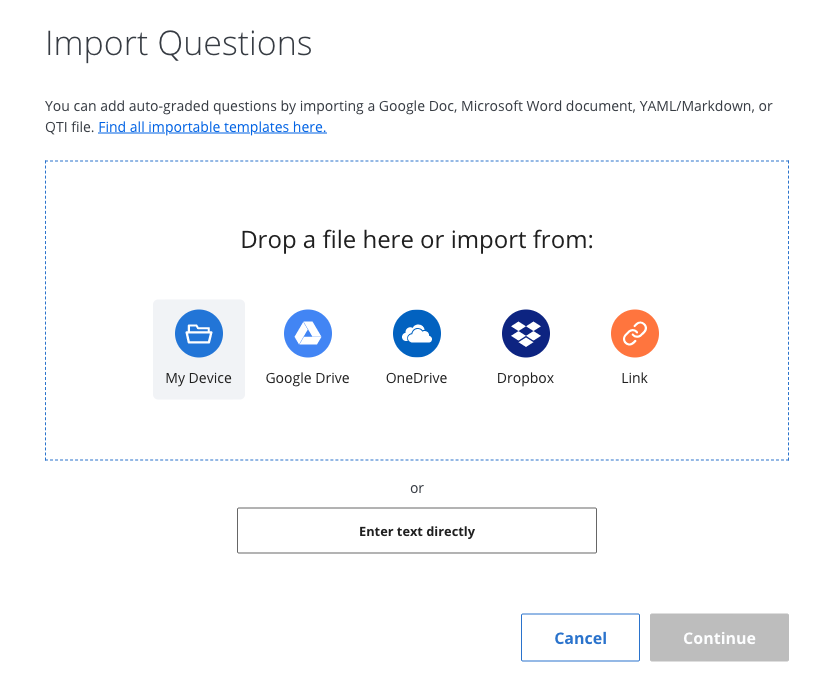
<br>
After you've selected the file click `Upload`:
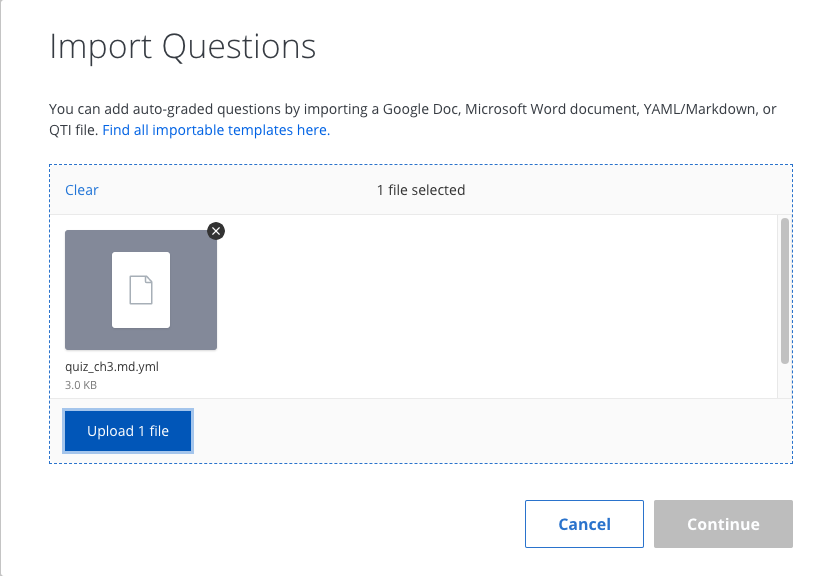
It will let you know if there are any problems uploading the quiz. If the `coursera_quiz_conversion.R` script failed to render something properly, please [file an issue here](https://github.com/jhudsl/OTTR_Quizzes/issues) describing how it failed and including a file that shows the instance it failed to convert.
Note that images and links are not currently supported in that conversion script. You also cannot have `:` in your prompts or answers.
But if the quiz uploads without issue, then click `Continue`.
By default quizzes are set to `Practice Quiz` but you will need at least some of your quizzes to be used for Grading.
On the left side of quiz editing page, there's a drop down menu to select `Graded Quiz`.
Also in this location you can edit the estimated time it should take to complete the quiz (by default it is set to a certain number of minutes).
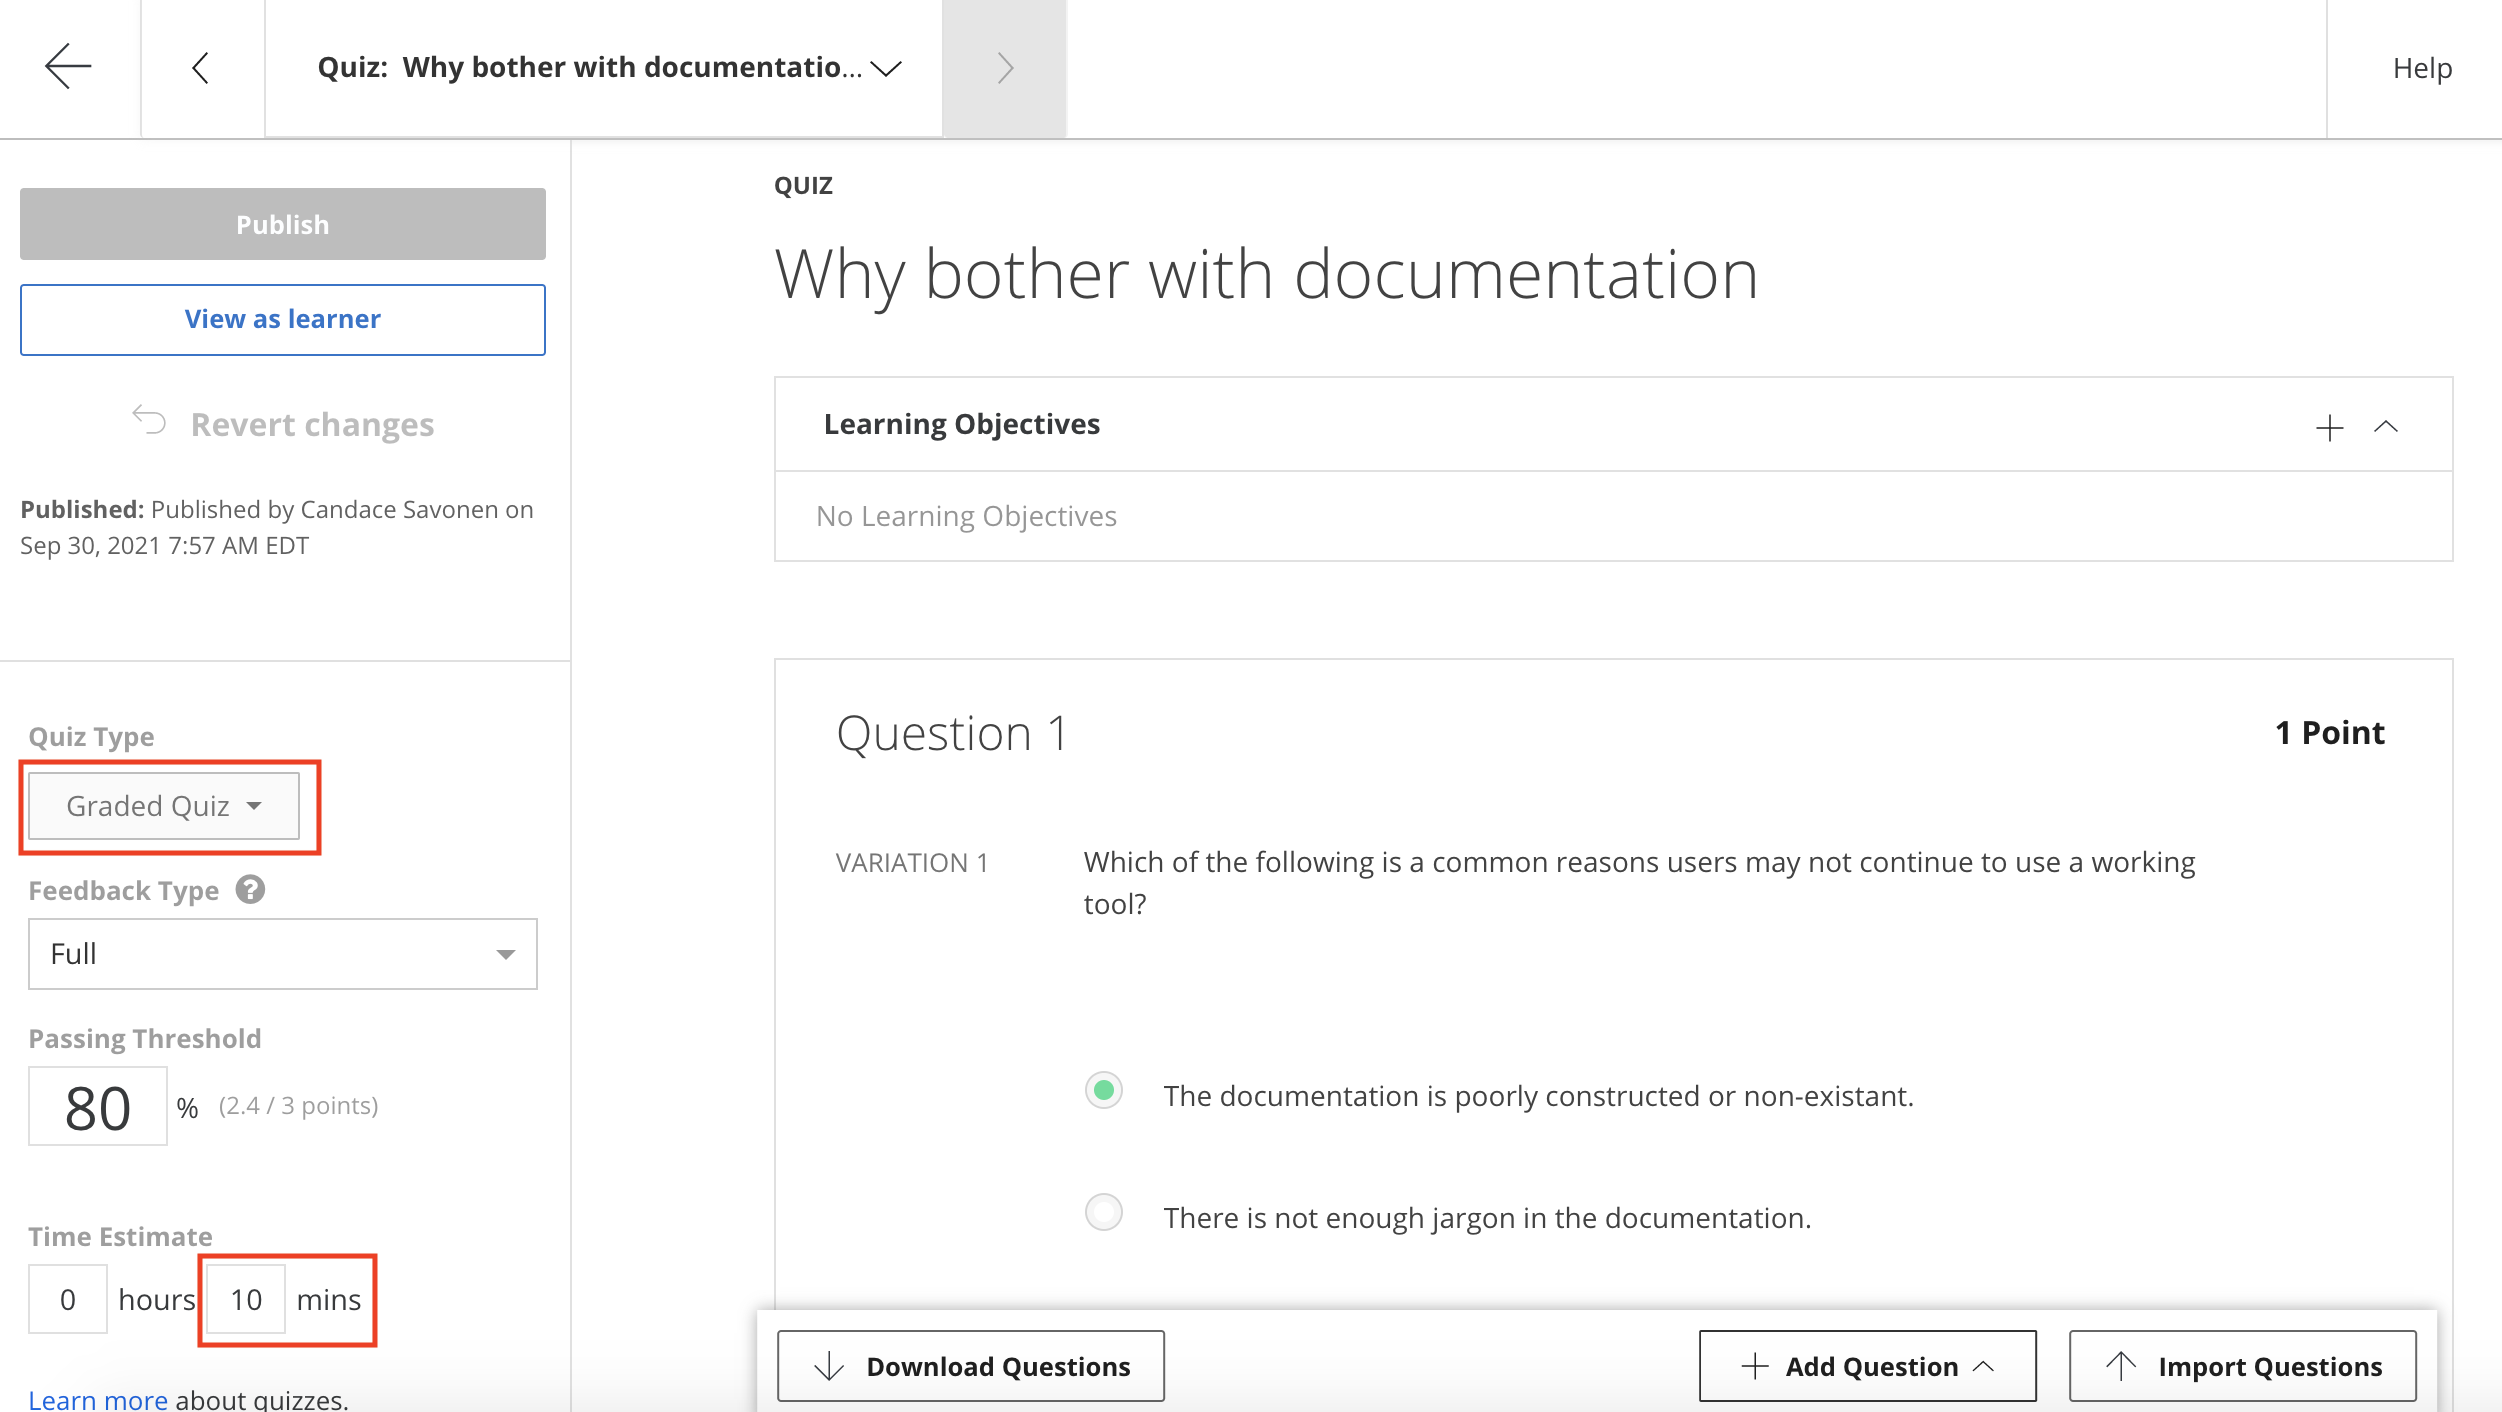
<br>
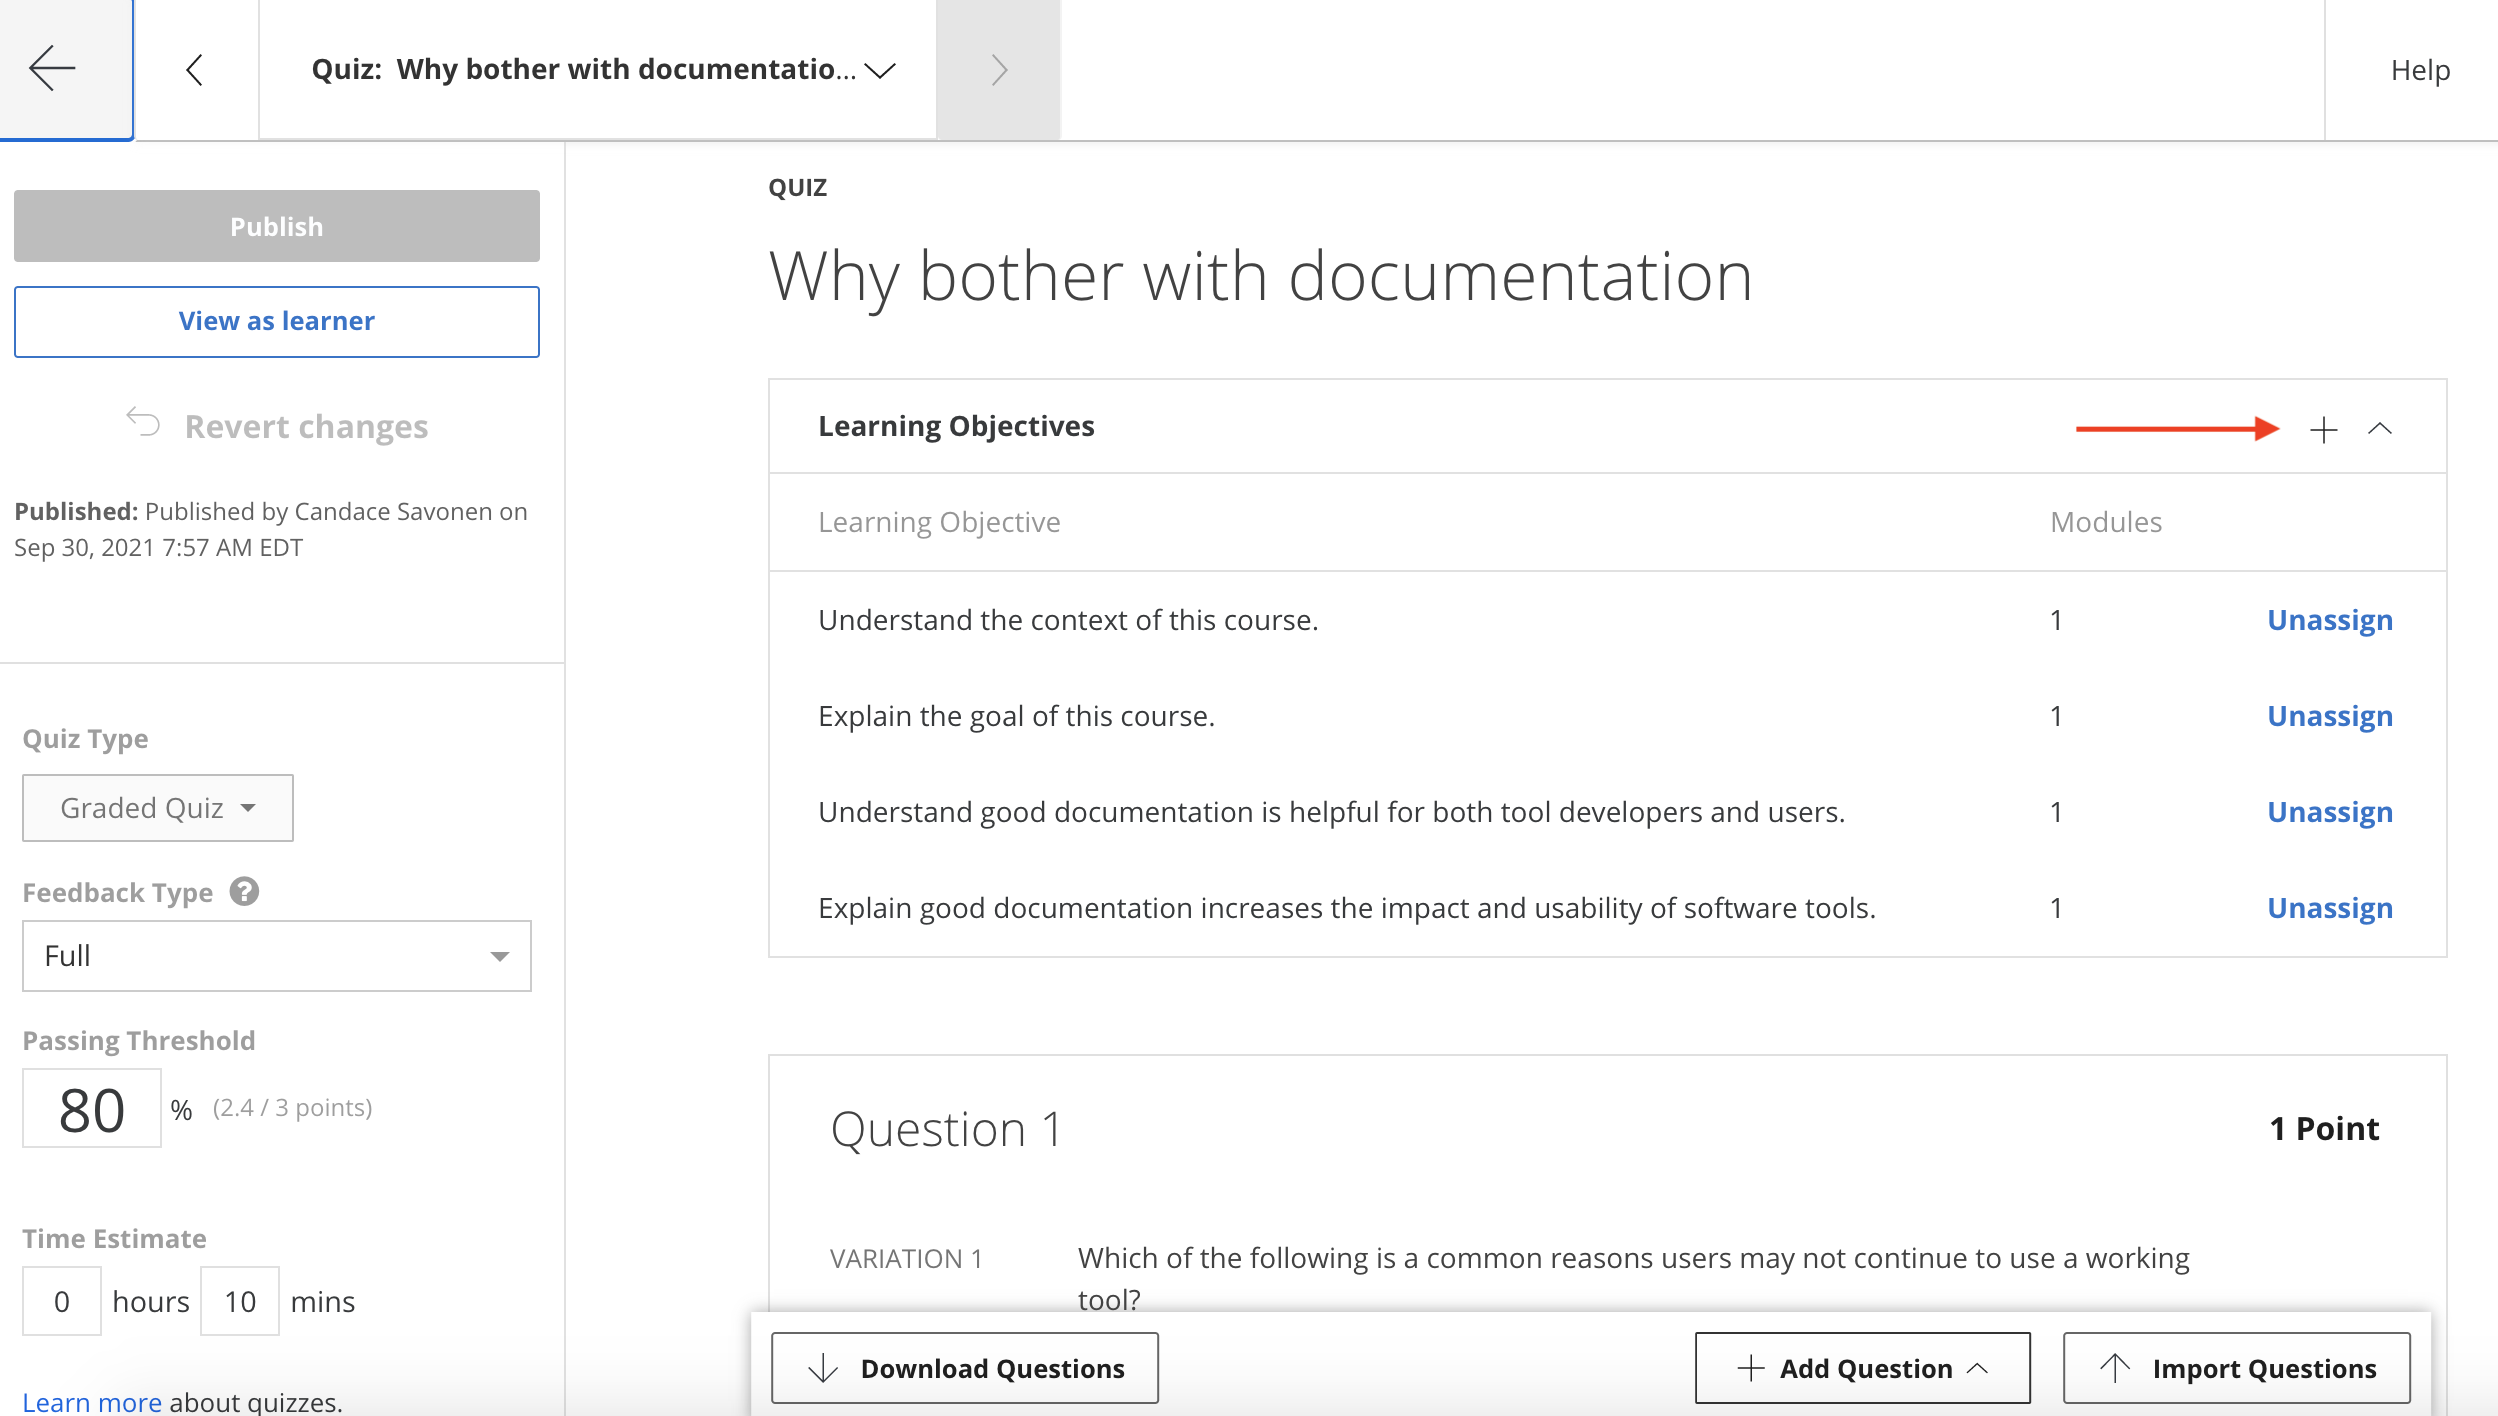
You also will want to assign the learning objectives that apply to this quiz. You can do this by clicking on the plus sign underneath the title.
<br>
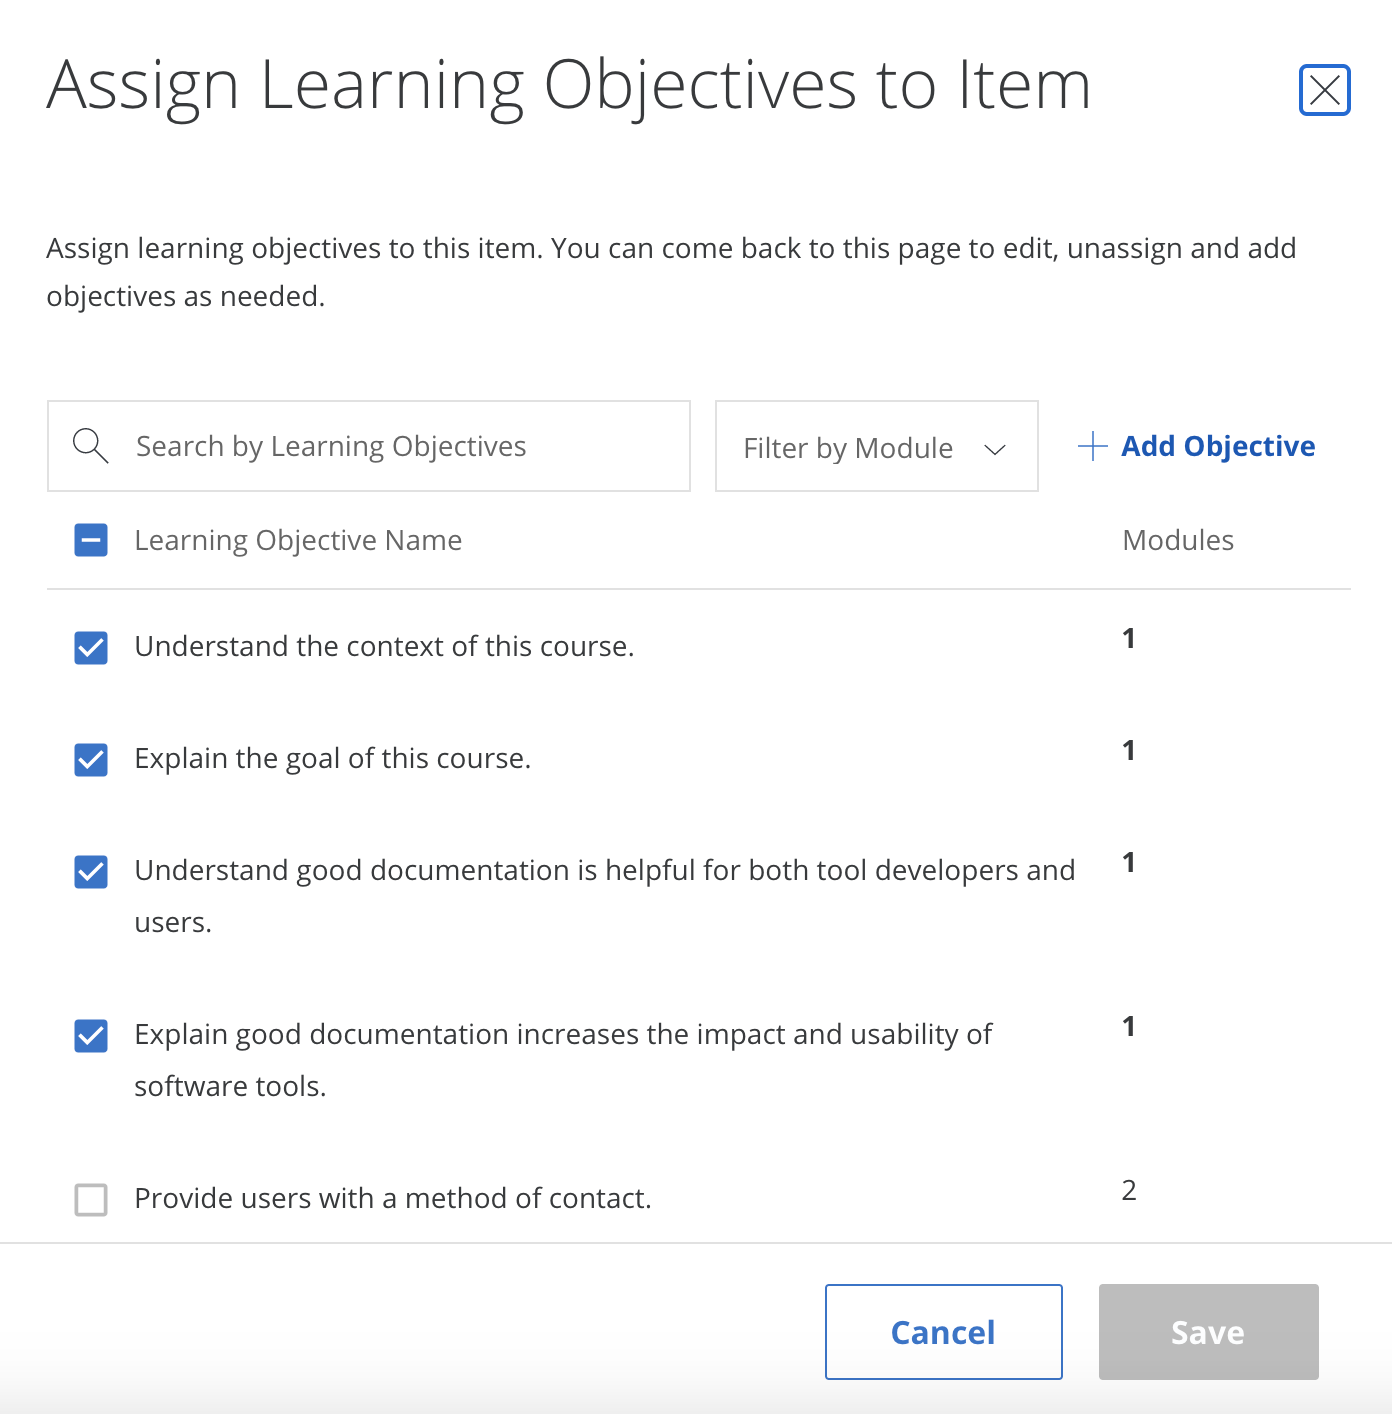
From here it will suggest the module's learning objectives. Click all that apply and then `Save`.
<br>
You can edit the title of your quiz and then click `Publish` (don't worry it's not actually publishing publicly, its just saving your changes).
And it will ask you again to really scare you, but yes, click `Publish`.

Congrats you added a quiz to your course!
## Add programmed messages
You can click on `Go to Course`. And on your main course page click `Edit Course` in the right corner.

<br>
This will bring you to your version page.

<br>
Underneath `Content`, on the left side bar, at the bottom, there is the `Programmed Messages`.

<br>
At the very least you should add a `Welcome to the course` and a `Completion` programmed message.
Click on each of these to edit them. Click `Preview` and then `Publish` to save your edits.
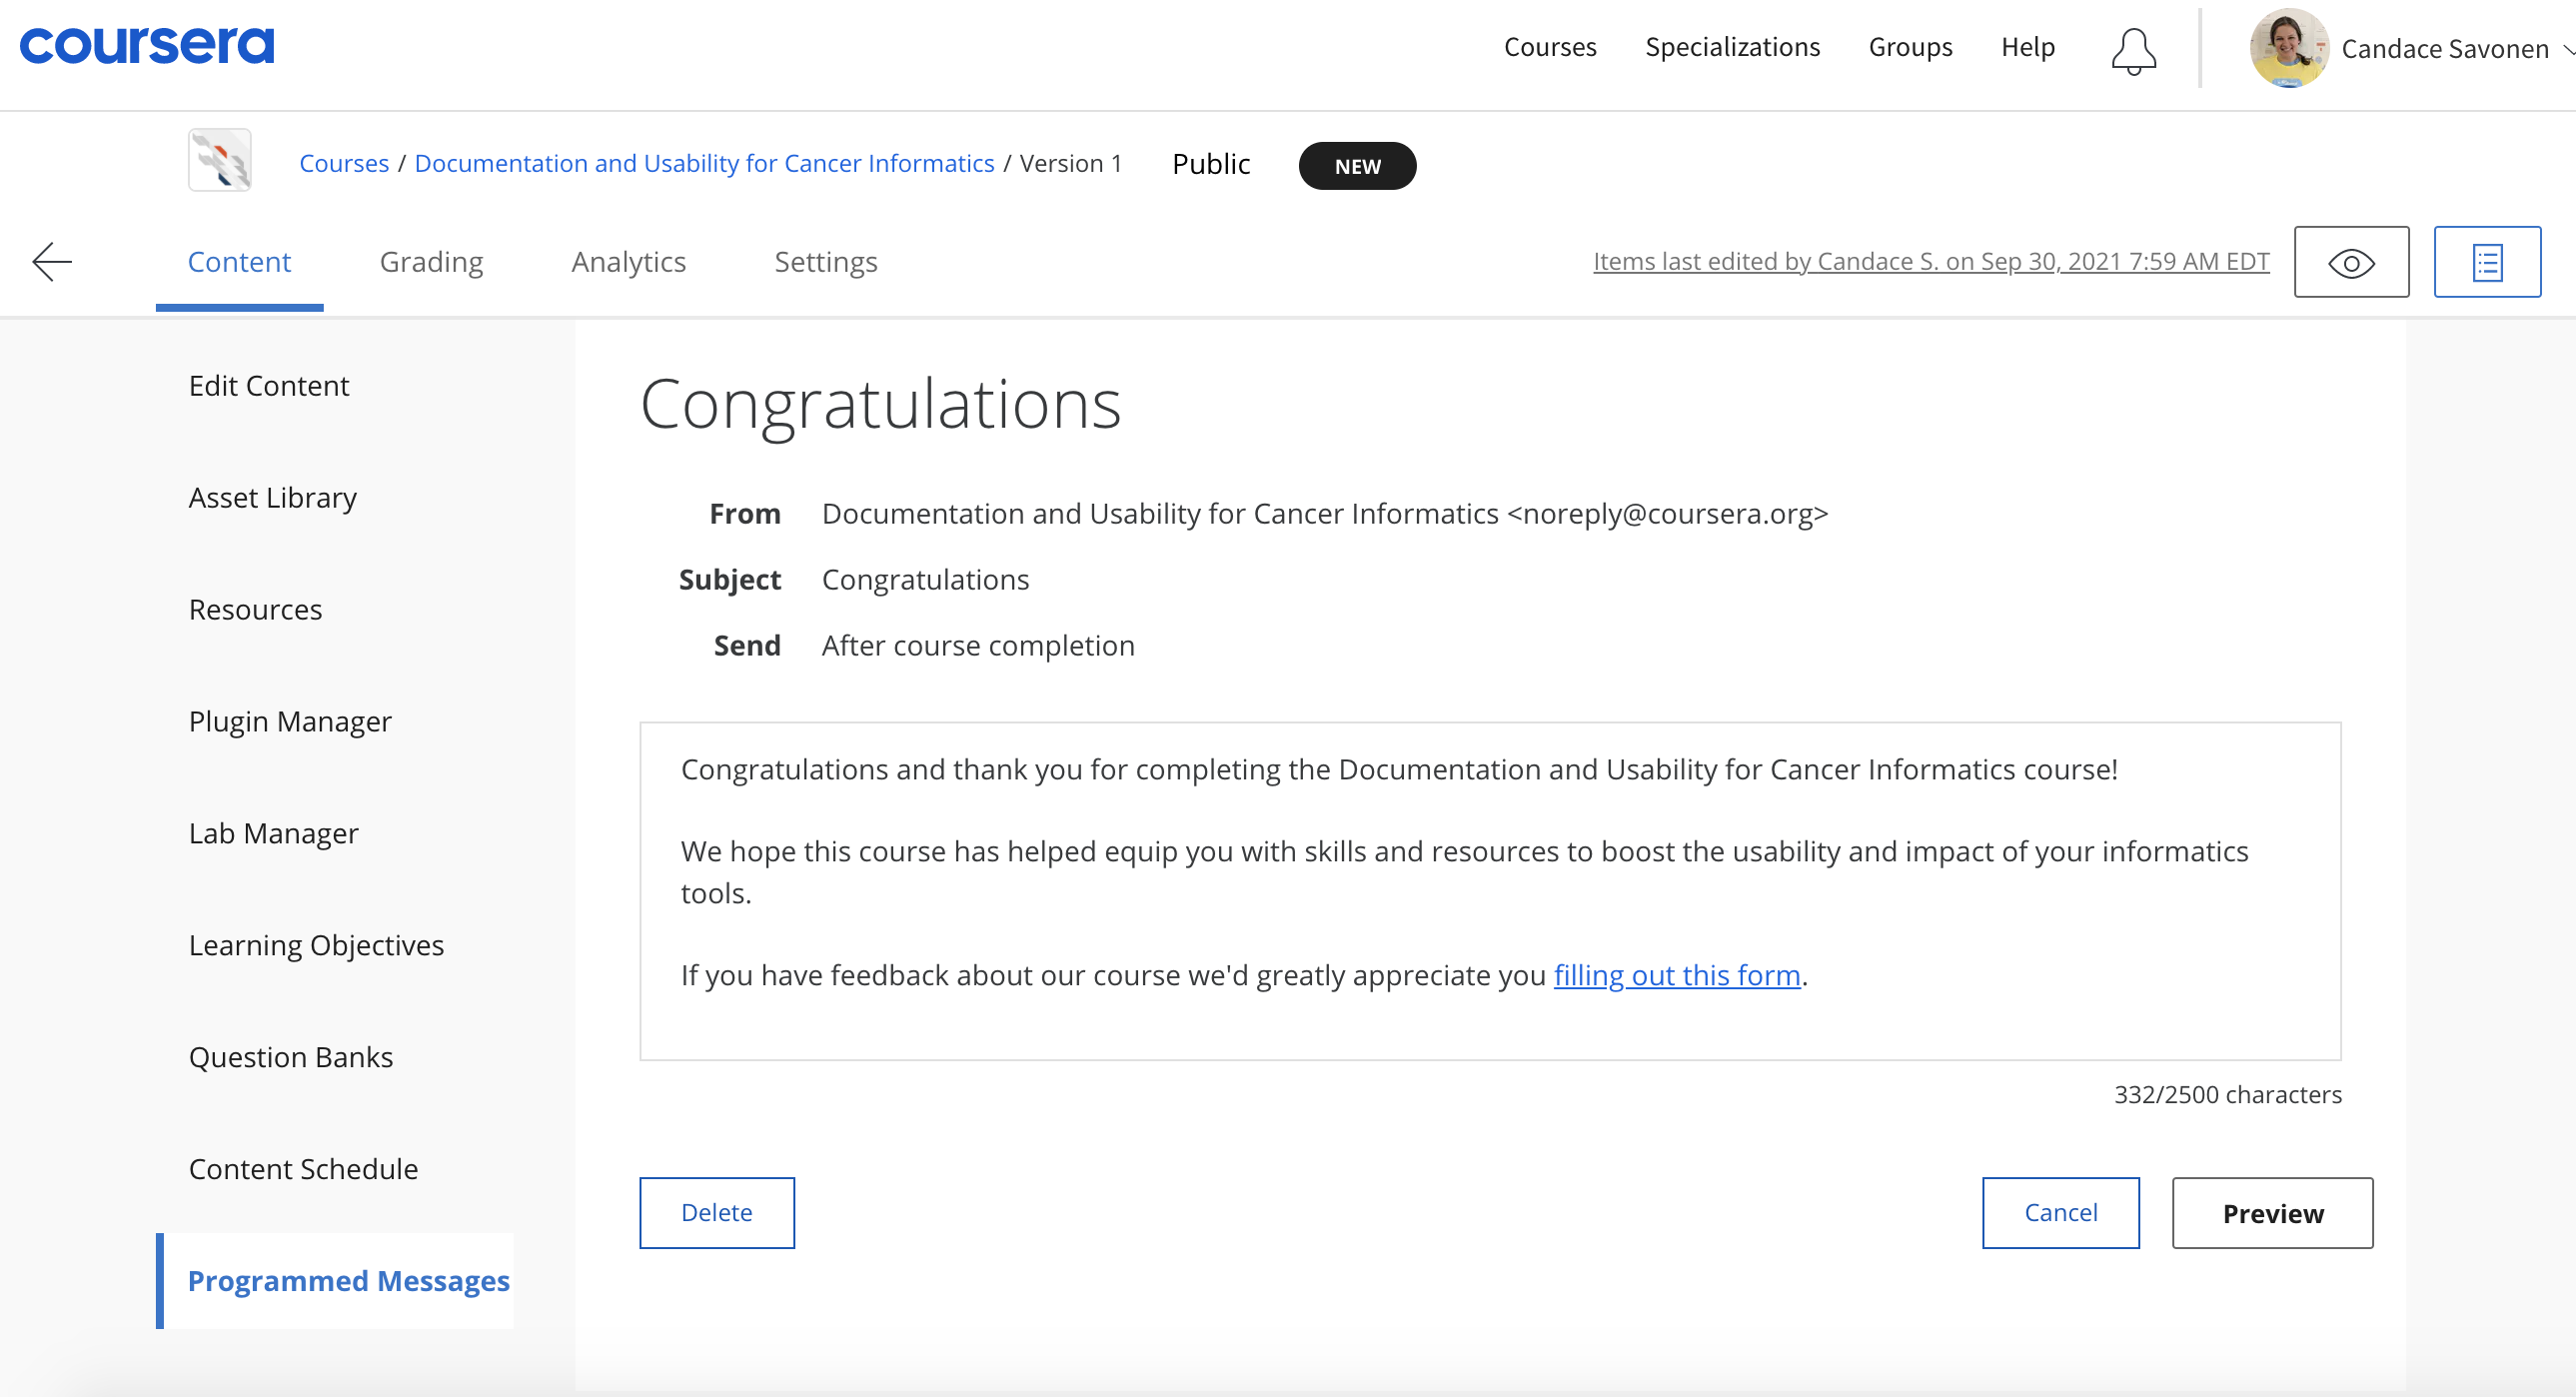
Here are some templated messages to get you started:
#### Welcome template message:
```
Welcome to {Course Name}
We hope this course will {What will they learn?}
To get the most out of the course {What do you advise?}
If you ever encounter any problems with the course, have questions or ideas, please let us know using this feedback form.
```
Add a link to your feedback form by clicking the link icon.
Click `Preview` and then `Publish` to save your edits.
#### Completion template message:
```
Congratulations and thank you for completing {name of course}!
We hope this course has {What do you hope they learned}.
If you have feedback about our course we'd greatly appreciate you filling out this form.
```
Add a link to your feedback form by clicking the link icon.
Click `Preview` and then `Publish` to save your edits.
## Grading Formula
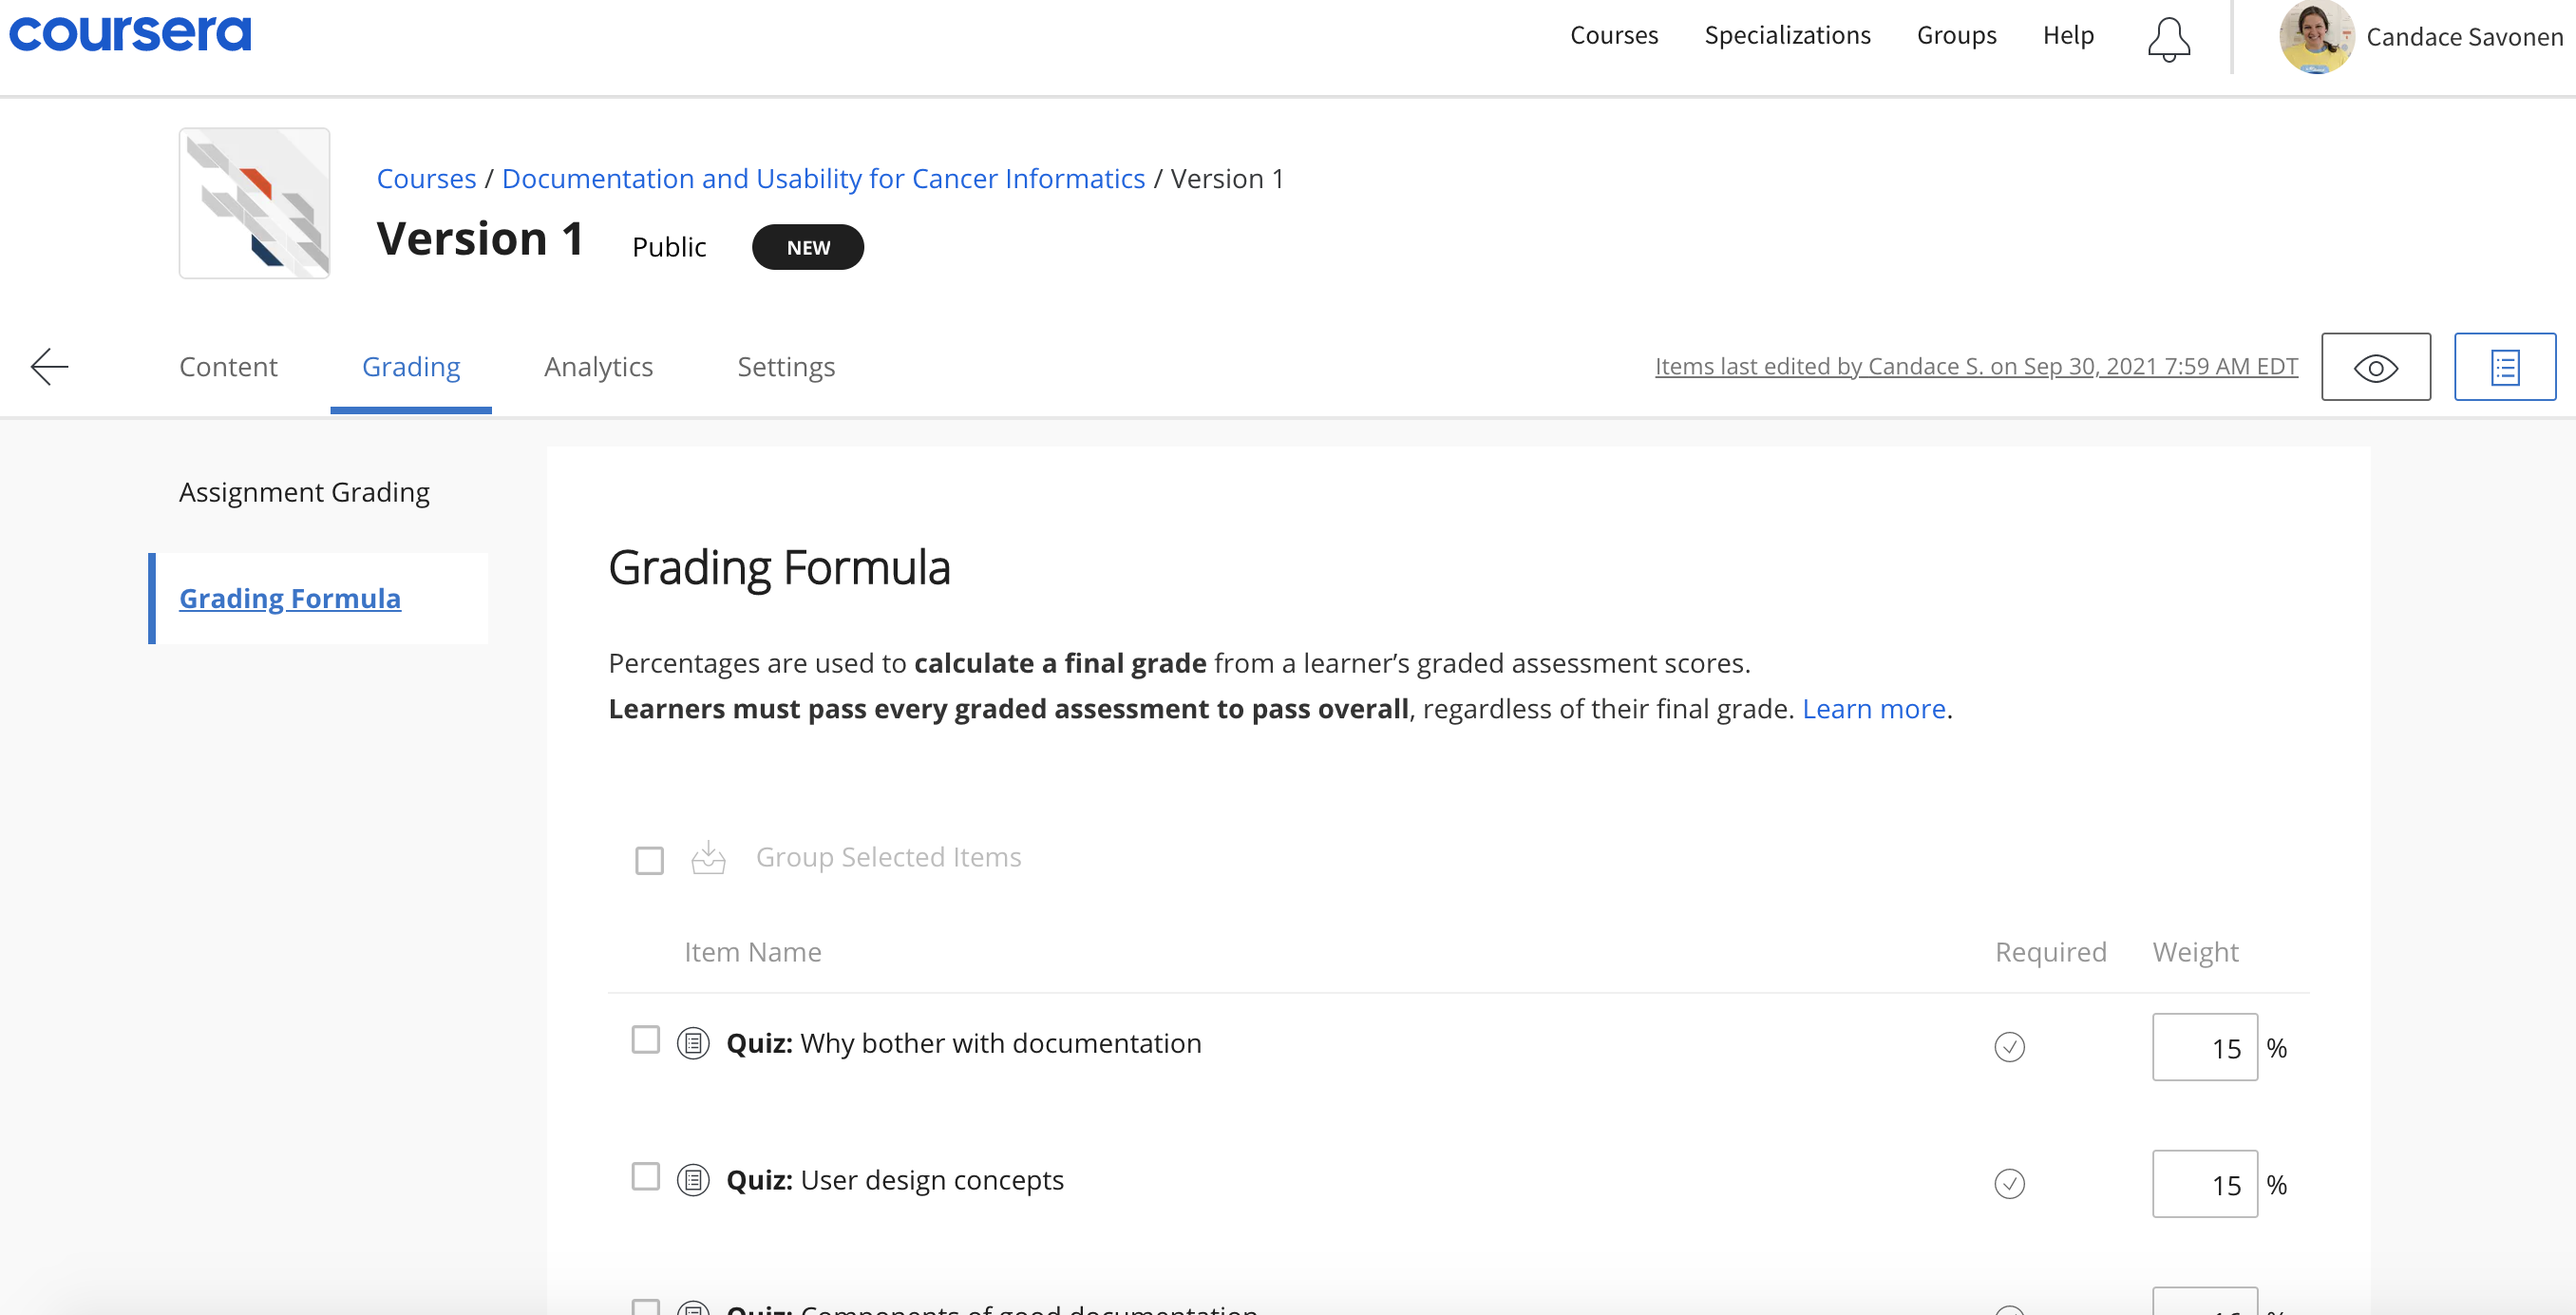
For final grades in the course, you will need to set the Grading Formula.
To get to this page, you can click on `Go to Course`. And on your main course page click `Edit Course` in the right corner.

<br>
This will bring you to your version page.

<br>
Now you can set the percentage that each module's assignments are worth in the course.
## Content Schedule
You can find the settings for this under the `Content` tab. Here you can modify how each of your modules should be assigned to each week of your course.
## Module Descriptions
Module descriptions can be found right before learning objectives when you are editing content. Adding these helps learners know a bit more about what to expect.
## Landing Page
Add an image for your course and consider adding the following to polish your course:
* Estimated workload
* Skills
* Recommended background
* Items students will learn
## Reading about multiple reading formats
Since we are publishing on Coursera using plug-ins and because there are concerns about accessibility with plug-ins, we encourage you to point out that the course material is available elsewhere in a reading at the very beginning of your course so that students can find it right away. To create a reading, you can click the add reading button which is located to the add quiz button. If you need to, you can rearrange elements of the first module and move this reading to the top of the course by clicking and dragging the three horizontal line icon on the far left of the reading section.
Title the reading as:
```
Multiple Lesson Formats
```
Modify the following based on your course and publishing plans and paste into the reading:
```
Like many of our other courses, the content of this course is available in multiple formats.
You can also find the lessons for this course at [insert Bookdown link here]. This format might be most appropriate for you if you rely on screen-reader technology.
Our courses are open source, so you can also find all the source material on GitHub by visiting [insert GitHub link here].
These resources are used throughout this Coursera course in the form of ungraded plug-ins. You are welcome to use those plug-ins here on Coursera or connect to the content in other formats through the links above. Please select the format that most suits your needs.
Note about links in the plug-ins: The plug-ins used throughout the course feature links to other resources. To follow these links, right-click on them and open in a new tab or window.
Regardless of the format you choose for the instructional content, you must take and pass the quizzes here on Coursera if you want to earn a Coursera certificate.
```