-
Notifications
You must be signed in to change notification settings - Fork 409
Miscellaneous Features
Most of the low level phone functionality is accessible in the Display class. Think of it as a global central class covering your access to the "system".
Codename One supports sending SMS messages but not receiving them as this functionality isn’t portable. You can send an SMS using:
Display.getInstance().setSMS("+999999999", "My SMS Message");Android/Blackberry support sending SMS’s in the background without showing the user anything. iOS & Windows Phone just don’t have that ability, the best they can offer is to launch the native SMS app with your message already in that app. Android supports that capability as well (launching the OS native SMS app).
The default sendSMS API ignores that difference and simply works interactively on iOS/Windows Phone while sending
in the background for the other platforms.
The getSMSSupport API returns one of the following options:
-
SMS_NOT_SUPPORTED - for desktop, tablet etc.
-
SMS_SEAMLESS -
sendSMSwill not show a UI and will just send in the background -
SMS_INTERACTIVE -
sendSMSwill show an SMS sending UI -
SMS_BOTH -
sendSMScan support both seamless and interactive mode, this currently only works on Android
The sendSMS can accept an interactive argument: sendSMS(String phoneNumber, String message, boolean interactive)
The last argument will be ignored unless SMS_BOTH is returned from getSMSSupport at which point you
would be able to choose one way or the other. The default behavior (when not using that flag) is the background
sending which is the current behavior on Android.
A typical use of this API would be something like this:
switch(Display.getInstance().getSMSSupport()) {
    case Display.SMS_NOT_SUPPORTED:
        return;
    case Display.SMS_SEAMLESS:
        showUIDialogToEditMessageData();
        Display.getInstance().sendSMS(phone, data);
        return;
    default:
        Display.getInstance().sendSMS(phone, data);
        return;
}Dialog the phone is pretty trivial, this should open the dialer UI without physically dialing the phone as that is discouraged by device vendors.
You can dial the phone by using:
Display.getInstance().dial("+999999999");You can send an email via the platforms native email client with code such as this:
Message m = new Message("Body of message");
Display.getInstance().sendMessage(new String[] {"[email protected]"}, "Subject of message", m);
You can add one attachment by using setAttachment and setAttachmentMimeType.
|
Note
|
You need to use files from FileSystemStorage and NOT Storage files!
|
You can add more than one attachment by putting them directly into the attachment map e.g.:
Message m = new Message("Body of message");
m.getAttachments().put(textAttachmentUri, "text/plain");
m.getAttachments().put(imageAttachmentUri, "image/png");
Display.getInstance().sendMessage(new String[] {"[email protected]"}, "Subject of message", m);|
Note
|
Some features such as attachments etc. don’t work correctly in the simulator but should work on iOS/Android |
The email messaging API has an additional ability within the Message class. The sendMessageViaCloud
method allows you to use the Codename One cloud to send an email without end user interaction. This feature is available to pro users only since it makes use of the Codename One cloud:
Message m = new Message("<html><body>Check out <a href=\"https://www.codenameone.com/\">Codename One</a></body></html>");
m.setMimeType(Message.MIME_HTML);

// notice that we provide a plain text alternative as well in the send method
boolean success = m.sendMessageViaCloudSync("Codename One", "[email protected]", "Name Of User", "Message Subject",
"Check out Codename One at https://www.codenameone.com/");The contacts API provides us with the means to query the phone’s address book, delete elements from it and create new entries into it. To get the platform specific list of contacts you can use
String[] contacts = ContactsManager.getAllContacts();
Notice that on some platforms this will prompt the user for permissions and the user might choose not to grant that permission. To detect whether this is the case you can invoke isContactsPermissionGranted() after invoking getAllContacts(). This can help you adapt your error message to the user.
Once you have a Contact you can use the getContactById method, however the default method is a bit slow if you want to pull a large batch of contacts. The solution for this is to only extract the data that you need via
getContactById(String id, boolean includesFullName,
            boolean includesPicture, boolean includesNumbers, boolean includesEmail,
            boolean includeAddress)
Here you can specify true only for the attributes that actually matter to you.
Another capability of the contacts API is the ability to extract all of the contacts very quickly. This isn’t supported on all platforms but platforms such as Android can really get a boost from this API as extracting the contacts one by one is remarkably slow on Android.
You can check if a platform supports the extraction of all the contacts quickly thru ContactsManager.isGetAllContactsFast().
|
Important
|
When retrieving all the contacts, notice that you should probably not retrieve all the data and should set some fields to false to perform a more efficient query |
You can then extract all the contacts using code that looks a bit like this, notice that we use a thread so the UI won’t be blocked!
Form hi = new Form("Contacts", new BoxLayout(BoxLayout.Y_AXIS));
hi.add(new InfiniteProgress());
Display.getInstance().scheduleBackgroundTask(() -> {
    Contact[] contacts = ContactsManager.getAllContacts(true, true, false, true, false, false);
    Display.getInstance().callSerially(() -> {
        hi.removeAll();
        for(Contact c : contacts) {
            MultiButton mb = new MultiButton(c.getDisplayName());
            mb.setTextLine2(c.getPrimaryPhoneNumber());
            hi.add(mb);
            mb.putClientProperty("id", c.getId());
        }
        hi.getContentPane().animateLayout(150);
    });
});
hi.show();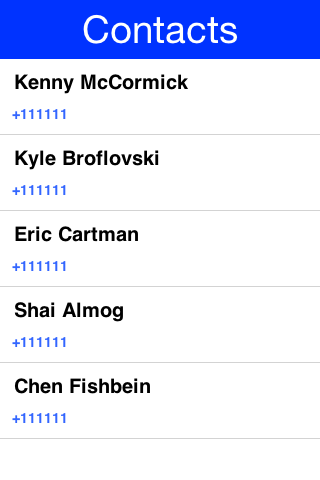
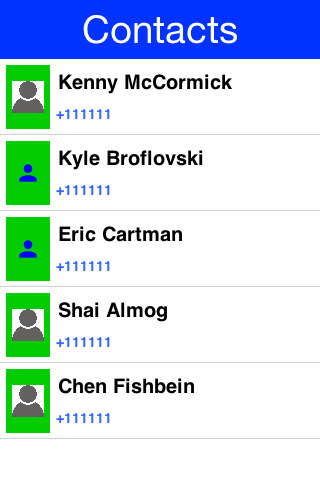
Notice that we didn’t fetch the image of the contact as the performance of loading these images might be prohibitive. We can enhance the code above to include images by using slightly more complex code such as this:
|
Tip
|
The scheduleBackgroundTask method is similar to new Thread() in some regards. It places elements in a queue instead of opening too many threads so it can be good for non-urgent tasks
|
Form hi = new Form("Contacts", new BoxLayout(BoxLayout.Y_AXIS));
hi.add(new InfiniteProgress());
int size = Display.getInstance().convertToPixels(5, true);
FontImage fi = FontImage.createFixed("" + FontImage.MATERIAL_PERSON, FontImage.getMaterialDesignFont(), 0xff, size, size);

Display.getInstance().scheduleBackgroundTask(() -> {
    Contact[] contacts = ContactsManager.getContacts(true, true, false, true, false, false);
    Display.getInstance().callSerially(() -> {
        hi.removeAll();
        for(Contact c : contacts) {
            MultiButton mb = new MultiButton(c.getDisplayName());
            mb.setIcon(fi);
            mb.setTextLine2(c.getPrimaryPhoneNumber());
            hi.add(mb);
            mb.putClientProperty("id", c.getId());
            Display.getInstance().scheduleBackgroundTask(() -> {
                Contact cc = ContactsManager.getContactById(c.getId(), false, true, false, false, false);
                Display.getInstance().callSerially(() -> {
                    Image photo = cc.getPhoto();
                    if(photo != null) {
                        mb.setIcon(photo.fill(size, size));
                        mb.revalidate();
                    }
                });
            });
        }
        hi.getContentPane().animateLayout(150);
    });
});
|
Tip
|
Notice that the code above uses callSerially & scheduleBackgroundTask in a liberal nested way. This is important to avoid an EDT violation
|
You can use createContact(String firstName, String familyName, String officePhone, String homePhone, String cellPhone, String email) to add a new contact and deleteContact(String id) to delete a contact.
Localization (l10n) means adapting to a locale which is more than just translating to a specific language but also to a specific language within environment e.g. en_US != en_UK.
Internationalization (i18n) is the process of creating one application that adapts to all locales and regional requirements.
Codename One supports automatic localization and seamless internationalization of an application using the Codename One design tool.
|
Important
|
Although localization is performed in the design tool most features apply to hand coded applications as well. The only exception is the tool that automatically extracts localizable strings from the GUI. |
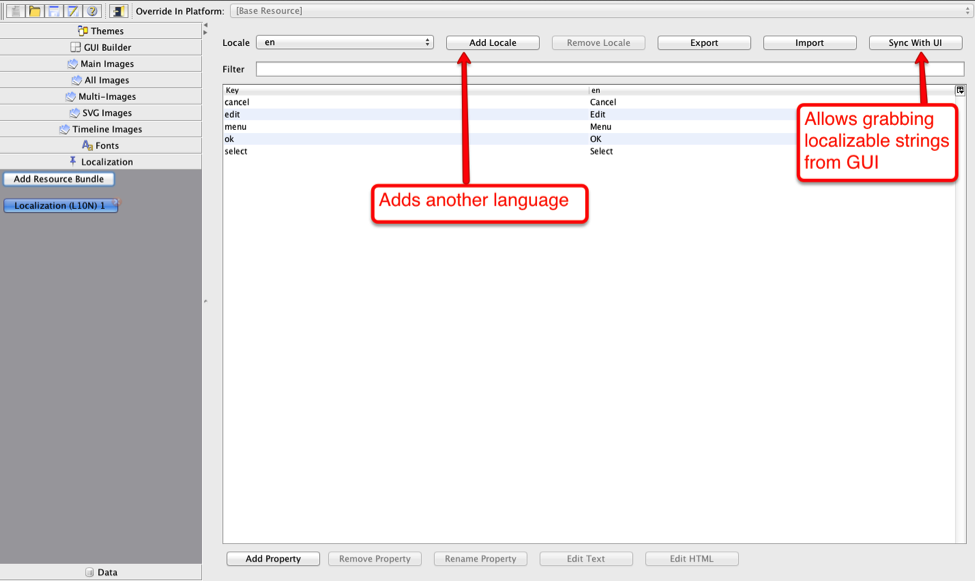
To translate an application you need to use the localization section of the Codename One Designer. This section features a handy tool to extract localization called Sync With UI, it’s a great tool to get you started assuming you used the old GUI builder.
Some fields on some components (e.g. Commands) are not added when using "Sync With UI" button. But you can add them manually on the localization bundle and they will be automatically localized. You can just use the Property Key used in the localization bundle in the Command name of the form.
You can add additional languages by pressing the Add Locale button.
This generates “bundles” in the resource file which are really just key/value pairs mapping a string in one language to another language. You can install the bundle using code like this:
UIManager.getInstance().setBundle(res.getL10N("l10n", local));The device language (as an ISO 639 two letter code) could be retrieved with this:
String local = L10NManager.getInstance().getLanguage();Once installed a resource bundle takes over the UI and every string set to a label (and label like components) will be automatically localized based on the bundle. You can also use the localize method of UIManager to perform localization on your own:
UIManager.getInstance().localize( "KeyInBundle", "DefaultValue");The list of available languages in the resource bundle could be retrieved like this. Notice that this a list that was set by you and doesn’t need to confirm to the ISO language code standards:
Resources res = fetchResourceFile();
Enumeration locales = res.listL10NLocales( "l10n" );
An exception for localization is the TextField/TextArea components both of which contain user data, in those cases the text will not be localized to avoid accidental localization of user input.
You can preview localization in the theme mode within the Codename One designer by selecting Advanced, picking your locale then clicking the theme again.
|
Tip
|
You can export and import resource bundles as standard Java properties files, CSV and XML. The formats are pretty standard for most localization shops, the XML format Codename One supports is the one used by Android’s string bundles which means most localization specialists should easily localize it |
The resource bundle is just a map between keys and values e.g. the code below displays "This Label is localized" on the Label with the hardcoded resource bundle. It would work the same with a resource bundle loaded from a resource file:
Form hi = new Form("L10N", new BoxLayout(BoxLayout.Y_AXIS));
HashMap<String, String> resourceBudle = new HashMap<String, String>();
resourceBudle.put("Localize", "This Label is localized");
UIManager.getInstance().setBundle(resourceBudle);
hi.add(new Label("Localize"));
hi.show();
The L10NManager class includes a multitude of features useful for common localization tasks.
It allows formatting numbers/dates & time based on platform locale. It also provides a great deal of the information you need such as the language/locale information you need to pick the proper resource bundle.
Form hi = new Form("L10N", new TableLayout(16, 2));
L10NManager l10n = L10NManager.getInstance();
hi.add("format(double)").add(l10n.format(11.11)).
    add("format(int)").add(l10n.format(33)).
    add("formatCurrency").add(l10n.formatCurrency(53.267)).
    add("formatDateLongStyle").add(l10n.formatDateLongStyle(new Date())).
    add("formatDateShortStyle").add(l10n.formatDateShortStyle(new Date())).
    add("formatDateTime").add(l10n.formatDateTime(new Date())).
    add("formatDateTimeMedium").add(l10n.formatDateTimeMedium(new Date())).
    add("formatDateTimeShort").add(l10n.formatDateTimeShort(new Date())).
    add("getCurrencySymbol").add(l10n.getCurrencySymbol()).
    add("getLanguage").add(l10n.getLanguage()).
    add("getLocale").add(l10n.getLocale()).
    add("isRTLLocale").add("" + l10n.isRTLLocale()).
    add("parseCurrency").add(l10n.formatCurrency(l10n.parseCurrency("33.77$"))).
    add("parseDouble").add(l10n.format(l10n.parseDouble("34.35"))).
    add("parseInt").add(l10n.format(l10n.parseInt("56"))).
    add("parseLong").add("" + l10n.parseLong("4444444"));
hi.show();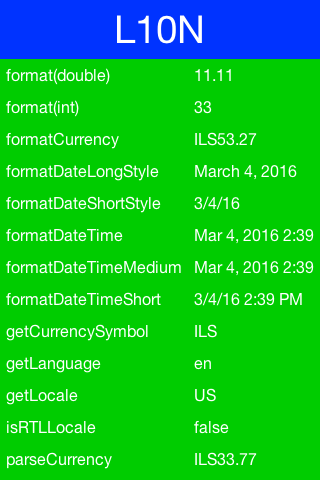
RTL stands for right to left, in the world of internationalization it refers to languages that are written from right to left (Arabic, Hebrew, Syriac, Thaana).
Most western languages are written from left to right (LTR), however some languages are written from right to left (RTL) speakers of these languages expect the UI to flow in the opposite direction otherwise it seems weird just like reading this word would be to most English speakers: "drieW".
The problem posed by RTL languages is known as BiDi (Bi-directional) and not as RTL since the "true" problem isn’t the reversal of the writing/UI but rather the mixing of RTL and LTR together. E.g. numbers are always written from left to right (just like in English) so in an RTL language the direction is from right to left and once we reach a number or English text embedded in the middle of the sentence (such as a name) the direction switches for a duration and is later restored.
The main issue in the Codename One world is in the layouts, which need to reverse on the fly. Codename One supports this via an RTL flag on all components that is derived from the global RTL flag in UIManager.
Resource bundles can also include special case constant @rtl, which indicates if a language is written from right to left. This allows everything to automatically reverse.
When in RTL mode the UI will be the exact mirror so WEST will become EAST, RIGHT will become LEFT and this would be true for paddings/margins as well.
If you have a special case where you don’t want this behavior you will need to wrap it with an isRTL check. You can also use setRTL on a per Component basis to disable RTL behavior for a specific Component.
|
Note
|
Most UI API’s have special cases for BiDi instead of applying it globally e.g. AWT introduced constants such as LEADING instead of making WEST mean the opposite direction. We think that was a mistake since the cases where you wouldn’t want the behavior of automatic reversal are quite rare.
|
Codename One’s support for bidi includes the following components:
-
Bidi algorithm - allows converting between logical to visual representation for rendering
-
Global RTL flag - default flag for the entire application indicating the UI should flow from right to left
-
Individual RTL flag - flag indicating that the specific component/container should be presented as an RTL/LTR component (e.g. for displaying English elements within a RTL UI).
-
RTL text field input
Most of Codename One’s RTL support is under the hood, the LookAndFeel global RTL flag can be enabled using:
UIManager.getInstance().getLookAndFeel().setRTL(true);
Once RTL is activated all positions in Codename One become reversed and the UI becomes a mirror of itself. E.g. Adding a Toolbar command to the left will actually make it appear on the right. Padding on the left becomes padding on the right. The scroll moves to the left etc.
This applies to the layout managers (except for group layout) and most components. Bidi is mostly seamless in Codename One but a developer still needs to be aware that his UI might be mirrored for these cases.
Some strings in iOS need to be localized using iOS’s native mechanisms - namely providing *.lproj directories with .strings files. For example, if you want the app to have a different bundle display name for each language, or you want to translate the "UsageDescription" strings of your Info.plist into multiple languages, you would need to use iOS' native localization facilities.
The app name, as it is displayed to the user, is defined in using the CFBundleDisplayName key of the app’s Info.plist file. Normally, this will be automatically set to your app’s display name, as defined in your codenameone_settings.properties file. This works fine if your app will have the same name in every locale, but suppose you want your app to take on a different name in French than in English. E.g. You want your app to be called "Hello App" for English-speaking users, and "Bonjour App" for French-speaking users.
In this case, you need to add iOS localization bundles "en.lproj" and "fr.lproj", each with a file named "InfoPlist.strings". If you are using Maven, then you can add these directly inside the ios/src/main/strings directory of your project.
|
Tip
|
You will need to create the strings directory manually, if it doesn’t exist yet. |
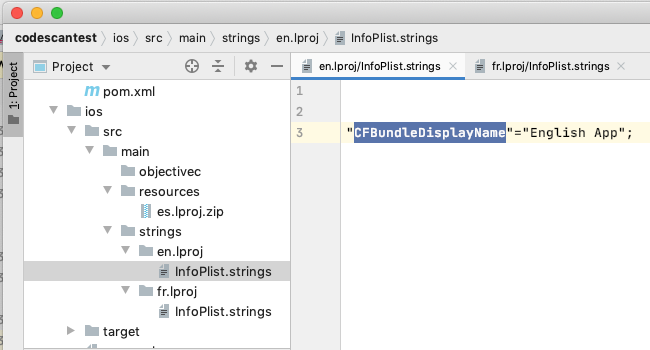
"CFBundleDisplayName"="Hello App";"CFBundleDisplayName"="Bonjour App";|
Note
|
The strings format is similar to the properties file format, except that both the "key" and the "value" must be wrapped in quotes. And if there are multiple strings, then they must be delimited by a semi-colon |
Ant projects have a different directory structure. They have no equivalent location to the maven ios/src/main/strings directory, but its equivalent of ios/src/main/resources can be found at native/ios. To include native iOS localizations in Ant projects, you should place zipped versions of your .lproj directories inside the native/ios directory of your project. E.g. en.lproj.zip, fr.lproj.zip, etc.
iOS requires you to supply usage descriptions for many features that will be displayed to the user when the app requests permission to use the feature. For example, the NSCameraUsageDescription string must be provided if your app needs to use the camera. You can specify these values as build hints using the pattern ios.NSXXXUsageDescription=This feature is needed blah blah blah. In the NSCameraUsageDescription case, you might include the build hint:
ios.NSCameraUsageDescription=This app needs to use your camera to scan bar codesUltimately these descriptions are embedded in your app’s Info.plist file, so they can be localized the same way you localize other Info.plist values - in the localized InfoPlist.strings file.
See the above example for instructions on localizing values in the Info.plist file. Then simply add translations to the InfoPlist.strings file for your usage descriptions.
"CFBundleDisplayName"="Hello App";
"NSCameraUsageDescription"="This app needs to use your camera to scan bar codes";"CFBundleDisplayName"="Bonjour App";
"NSCameraUsageDescription"="Cette application doit utiliser votre appareil photo pour scanner les codes à barres";The Location API allows us to track changes in device location or the current user position.
|
Tip
|
The Simulator includes a Location Simulation tool that you can launch to determine the current position of the simulator and debug location events |
The most basic usage for the API allows us to just fetch a device Location, notice that this API is blocking and can take a while to return:
Location position = LocationManager.getLocationManager().getCurrentLocationSync();|
Important
|
In order for location to work on iOS you MUST define the build hint ios.locationUsageDescription and describe why your application needs access to location. Otherwise you won’t get location updates!
|
The getCurrentLocationSync() method is very good for cases where you only need to fetch a current location once and not repeatedly query location. It activates the GPS then turns it off to avoid excessive battery usage. However, if an application needs to track motion or position over time it should use the location listener API to track location as such:
|
Tip
|
Notice that there is a method called getCurrentLocation() which will return the current state immediately and might not be accurate for some cases.
|
public MyListener implements LocationListener {
    public void locationUpdated(Location location) {
        // update UI etc.
    }

    public void providerStateChanged(int newState) {
        // handle status changes/errors appropriately
    }
}
LocationManager.getLocationManager().setLocationListener(new MyListener());|
Important
|
On Android location maps to low level API’s if you disable the usage of Google Play Services. By default location should perform well if you leave the Google Play Services on |
Polling location is generally expensive and requires a special permission on iOS. Its also implemented rather differently both in iOS and Android. Both platforms place restrictions on the location API usage in the background.
Because of the nature of background location the API is non-trivial. It starts with the venerable LocationManager but instead of using the standard API you need to use setBackgroundLocationListener.
Instead of passing a LocationListener instance you need to pass a Class object instance. This is important because background location might be invoked when the app isn’t running and an object would need to be allocated.
Notice that you should NOT perform long operations in the background listener callback. IOS wake-up time is limited to approximately 10 seconds and the app could get killed if it exceeds that time slice.
Notice that the listener can also send events when the app is in the foreground, therefore it is recommended to check the app state before deciding how to process this event. You can use Display.isMinimized() to determine if the app is currently running or in the background.
When implementing this make sure that:
-
The class passed to the API is a public class in the global scope. Not an inner class or anything like that!
-
The class has a public no-argument constructor
-
You need to pass it as a class literal e.g.
MyClassName.class. Don’t useClass.forName("my.package.MyClassName")!
Class names are problematic since device builds are obfuscated, you should only use literals which the obfuscator detects and handles correctly.
The following code demonstrates usage of the GeoFence API:
Geofence gf = new Geofence("test", loc, 100, 100000);

LocationManager.getLocationManager()
        .addGeoFencing(GeofenceListenerImpl.class, gf);
public class GeofenceListenerImpl implements GeofenceListener {
@Override
public void onExit(String id) {
}
@Override
public void onEntered(String id) {
if(Display.getInstance().isMinimized()) {
Display.getInstance().callSerially(() -> {
Dialog.show("Welcome", "Thanks for arriving", "OK", null);
});
} else {
LocalNotification ln = new LocalNotification();
ln.setAlertTitle("Welcome");
ln.setAlertBody("Thanks for arriving!");
Display.getInstance().scheduleLocalNotification(ln, 10, false);
}
}
}Codename One supports playing music in the background (e.g. when the app is minimized) which is quite useful for developers building a music player style application.
This support isn’t totally portable since the Android and iOS approaches for background music playback differ a great deal. To get this to work on Android you need to use the API: MediaManager.createBackgroundMedia().
You should use that API when you want to create a media stream that will work even when your app is minimized.
For iOS you will need to use a special build hint: ios.background_modes=music.
Which should allow background playback of music on iOS and would work with the createBackgroundMedia() method.
The capture API allows us to use the camera to capture photographs or the microphone to capture audio. It even includes an API for video capture.
The API itself couldn’t be simpler:
String filePath = Capture.capturePhoto();Just captures and returns a path to a photo you can either open it using the Image class or save it somewhere.
|
Important
|
The returned file is a temporary file, you shouldn’t store a reference to it and instead copy it locally or work with the Image object
|
E.g. you can copy the Image to Storage using:
String filePath = Capture.capturePhoto();
if(filePath != null) {
    Util.copy(FileSystemStorage.getInstance().openInputStream(filePath), Storage.getInstance().createOutputStream(myImageFileName));
}|
Tip
|
When running on the simulator the Capture API opens a file chooser API instead of physically capturing the data. This makes debugging device or situation specific issues simpler
|
We can capture an image from the camera using an API like this:
Form hi = new Form("Capture", new BorderLayout());
hi.setToolbar(new Toolbar());
Style s = UIManager.getInstance().getComponentStyle("Title");
FontImage icon = FontImage.createMaterial(FontImage.MATERIAL_CAMERA, s);

ImageViewer iv = new ImageViewer(icon);

hi.getToolbar().addCommandToRightBar("", icon, (ev) -> {
    String filePath = Capture.capturePhoto();
    if(filePath != null) {
        try {
            DefaultListModel<Image> m = (DefaultListModel<Image>)iv.getImageList();
            Image img = Image.createImage(filePath);
            if(m == null) {
                m = new DefaultListModel<>(img);
                iv.setImageList(m);
                iv.setImage(img);
            } else {
                m.addItem(img);
            }
            m.setSelectedIndex(m.getSize() - 1);
        } catch(IOException err) {
            Log.e(err);
        }
    }
});

hi.add(BorderLayout.CENTER, iv);
hi.show();
We demonstrate video capture in the MediaManager section.
The sample below captures audio recordings (using the 'Capture' API) and copies them locally under unique names. It also demonstrates the storage and organization of captured audio:
Form hi = new Form("Capture", BoxLayout.y());
hi.setToolbar(new Toolbar());
Style s = UIManager.getInstance().getComponentStyle("Title");
FontImage icon = FontImage.createMaterial(FontImage.MATERIAL_MIC, s);

FileSystemStorage fs = FileSystemStorage.getInstance();
String recordingsDir = fs.getAppHomePath() + "recordings/";
fs.mkdir(recordingsDir);
try {
    for(String file : fs.listFiles(recordingsDir)) {
        MultiButton mb = new MultiButton(file.substring(file.lastIndexOf("/") + 1));
        mb.addActionListener((e) -> {
            try {
                Media m = MediaManager.createMedia(recordingsDir + file, false);
                m.play();
            } catch(IOException err) {
                Log.e(err);
            }
        });
        hi.add(mb);
    }

    hi.getToolbar().addCommandToRightBar("", icon, (ev) -> {
        try {
            String file = Capture.captureAudio();
            if(file != null) {
                SimpleDateFormat sd = new SimpleDateFormat("yyyy-MMM-dd-kk-mm");
                String fileName =sd.format(new Date());
                String filePath = recordingsDir + fileName;
                Util.copy(fs.openInputStream(file), fs.openOutputStream(filePath));
                MultiButton mb = new MultiButton(fileName);
                mb.addActionListener((e) -> {
                    try {
                        Media m = MediaManager.createMedia(filePath, false);
                        m.play();
                    } catch(IOException err) {
                        Log.e(err);
                    }
                });
                hi.add(mb);
                hi.revalidate();
            }
        } catch(IOException err) {
            Log.e(err);
        }
    });
} catch(IOException err) {
    Log.e(err);
}
hi.show();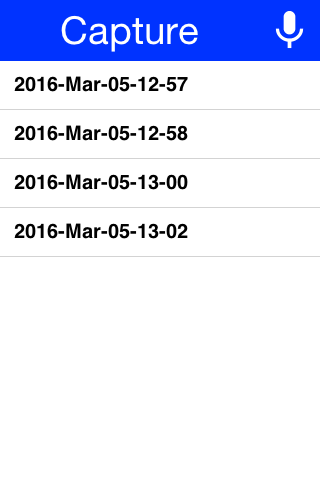
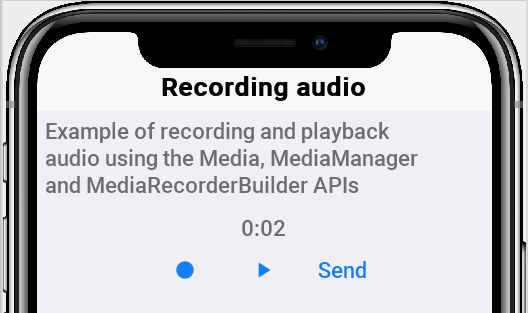
Alternatively, you can use the Media, MediaManager and MediaRecorderBuilder APIs to capture audio, as a more customizable approach than using the Capture API:
    private static final EasyThread countTime = EasyThread.start("countTime");

    public void start() {
        if (current != null) {
            current.show();
            return;
        }
        Form hi = new Form("Recording audio", BoxLayout.y());
        hi.add(new SpanLabel("Example of recording and playback audio using the Media, MediaManager and MediaRecorderBuilder APIs"));
        hi.add(recordAudio((String filePath) -> {
            ToastBar.showInfoMessage("Do something with the recorded audio file: " + filePath);
        }));
        hi.show();
    }

    public static Component recordAudio(OnComplete<String> callback) {
        try {
            // mime types supported by Android: audio/amr, audio/aac, audio/mp4
            // mime types supported by iOS: audio/mp4, audio/aac, audio/m4a
            // mime type supported by Simulator: audio/wav
            // more info: https://www.iana.org/assignments/media-types/media-types.xhtml

            List<String> availableMimetypes = Arrays.asList(MediaManager.getAvailableRecordingMimeTypes());
            String mimetype;
            if (availableMimetypes.contains("audio/aac")) {
                // Android and iOS
                mimetype = "audio/aac";
            } else if (availableMimetypes.contains("audio/wav")) {
                // Simulator
                mimetype = "audio/wav";
            } else {
                // others
                mimetype = availableMimetypes.get(0);
            }
            String fileName = "audioExample." + mimetype.substring(mimetype.indexOf("/") + 1);
            String output = FileSystemStorage.getInstance().getAppHomePath() + "/" + fileName;
            // https://tritondigitalcommunity.force.com/s/article/Choosing-Audio-Bitrate-Settings
            MediaRecorderBuilder options = new MediaRecorderBuilder()
                    .mimeType(mimetype)
                    .path(output)
                    .bitRate(64000)
                    .samplingRate(44100);
            Media[] microphone = {MediaManager.createMediaRecorder(options)};
            Media[] speaker = {null};

            Container recordingUI = new Container(BoxLayout.y());
            Label time = new Label("0:00");
            Button recordBtn = new Button("", FontImage.MATERIAL_FIBER_MANUAL_RECORD, "Button");
            Button playBtn = new Button("", FontImage.MATERIAL_PLAY_ARROW, "Button");
            Button stopBtn = new Button("", FontImage.MATERIAL_STOP, "Button");
            Button sendBtn = new Button("Send");
            sendBtn.setEnabled(false);
            Container buttons = GridLayout.encloseIn(3, recordBtn, stopBtn, sendBtn);
            recordingUI.addAll(FlowLayout.encloseCenter(time), FlowLayout.encloseCenter(buttons));

            recordBtn.addActionListener(l -> {
                try {
                    // every time we have to create a new instance of Media to make it working correctly (as reported in the Javadoc)
                    microphone[0] = MediaManager.createMediaRecorder(options);
                    if (speaker[0] != null && speaker[0].isPlaying()) {
                        return; // do nothing if the audio is currently recorded or played
                    }
                    recordBtn.setEnabled(false);
                    sendBtn.setEnabled(true);
                    Log.p("Audio recording started", Log.DEBUG);
                    if (buttons.contains(playBtn)) {
                        buttons.replace(playBtn, stopBtn, CommonTransitions.createEmpty());
                        buttons.revalidateWithAnimationSafety();
                    }
                    if (speaker[0] != null) {
                        speaker[0].pause();
                    }

                    microphone[0].play();
                    startWatch(time);
                } catch (IOException ex) {
                    Log.p("ERROR recording audio", Log.ERROR);
                    Log.e(ex);
                }
            });

            stopBtn.addActionListener(l -> {
                if (!microphone[0].isPlaying() && (speaker[0] == null || !speaker[0].isPlaying())) {
                    return; // do nothing if the audio is NOT currently recorded or played
                }
                recordBtn.setEnabled(true);
                sendBtn.setEnabled(true);
                Log.p("Audio recording stopped");
                if (microphone[0].isPlaying()) {
                    microphone[0].pause();
                } else if (speaker[0] != null) {
                    speaker[0].pause();
                } else {
                    return;
                }
                stopWatch(time);
                if (buttons.contains(stopBtn)) {
                    buttons.replace(stopBtn, playBtn, CommonTransitions.createEmpty());
                    buttons.revalidateWithAnimationSafety();
                }
                if (FileSystemStorage.getInstance().exists(output)) {
                    Log.p("Audio saved to: " + output);
                } else {
                    ToastBar.showErrorMessage("Error recording audio", 5000);
                    Log.p("ERROR SAVING AUDIO");
                }
            });

            playBtn.addActionListener(l -> {
                // every time we have to create a new instance of Media to make it working correctly (as reported in the Javadoc)
                if (microphone[0].isPlaying() || (speaker[0] != null && speaker[0].isPlaying())) {
                    return; // do nothing if the audio is currently recorded or played
                }
                recordBtn.setEnabled(false);
                sendBtn.setEnabled(true);
                if (buttons.contains(playBtn)) {
                    buttons.replace(playBtn, stopBtn, CommonTransitions.createEmpty());
                    buttons.revalidateWithAnimationSafety();
                }
                if (FileSystemStorage.getInstance().exists(output)) {
                    try {
                        speaker[0] = MediaManager.createMedia(output, false, () -> {
                            // callback on completation
                            recordBtn.setEnabled(true);
                            if (speaker[0].isPlaying()) {
                                speaker[0].pause();
                            }
                            stopWatch(time);
                            if (buttons.contains(stopBtn)) {
                                buttons.replace(stopBtn, playBtn, CommonTransitions.createEmpty());
                                buttons.revalidateWithAnimationSafety();
                            }
                        });
                        speaker[0].play();
                        startWatch(time);
                    } catch (IOException ex) {
                        Log.p("ERROR playing audio", Log.ERROR);
                        Log.e(ex);
                    }
                }
            });

            sendBtn.addActionListener(l -> {
                if (microphone[0].isPlaying()) {
                    microphone[0].pause();
                }
                if (speaker[0] != null && speaker[0].isPlaying()) {
                    speaker[0].pause();
                }
                if (buttons.contains(stopBtn)) {
                    buttons.replace(stopBtn, playBtn, CommonTransitions.createEmpty());
                    buttons.revalidateWithAnimationSafety();
                }
                stopWatch(time);
                recordBtn.setEnabled(true);

                callback.completed(output);
            });

            return FlowLayout.encloseCenter(recordingUI);

        } catch (IOException ex) {
            Log.p("ERROR recording audio", Log.ERROR);
            Log.e(ex);
            return new Label("Error recording audio");
        }

    }

    private static void startWatch(Label label) {
        label.putClientProperty("stopTime", Boolean.FALSE);
        countTime.run(() -> {
            long startTime = System.currentTimeMillis();
            while (label.getClientProperty("stopTime") == Boolean.FALSE) {
                // the sleep is every 200ms instead of 1000ms to make the app more reactive when stop is tapped
                Util.sleep(200);
                int seconds = (int) ((System.currentTimeMillis() - startTime) / 1000);
                String min = (seconds / 60) + "";
                String sec = (seconds % 60) + "";
                if (sec.length() == 1) {
                    sec = "0" + sec;
                }
                String newTime = min + ":" + sec;
                if (!label.getText().equals(newTime)) {
                    CN.callSerially(() -> {
                        label.setText(newTime);
                        if (label.getParent() != null) {
                            label.getParent().revalidateWithAnimationSafety();
                        }
                    });
                }
            }
        });
    }

    private static void stopWatch(Label label) {
        label.putClientProperty("stopTime", Boolean.TRUE);
    }
The Capture API also includes a callback based API that uses the ActionListener interface to implement capture. E.g. we can adapt the previous sample to use this API as such:
hi.getToolbar().addCommandToRightBar("", icon, (ev) -> {
    Capture.capturePhoto((e) -> {
        if(e != null && e.getSource() != null) {
            try {
                DefaultListModel<Image> m = (DefaultListModel<Image>)iv.getImageList();
                Image img = Image.createImage((String)e.getSource());
                if(m == null) {
                    m = new DefaultListModel<>(img);
                    iv.setImageList(m);
                    iv.setImage(img);
                } else {
                    m.addItem(img);
                }
                m.setSelectedIndex(m.getSize() - 1);
            } catch(IOException err) {
                Log.e(err);
            }
        }
    });
});The gallery API allows picking an image and/or video from the cameras gallery (camera roll).
|
Important
|
Like the Capture API the image returned is a temporary image that should be copied locally, this is due to device restrictions that don’t allow direct modifications of the gallery
|
We can adapt the Capture sample above to use the gallery as such:
Form hi = new Form("Capture", new BorderLayout());
hi.setToolbar(new Toolbar());
Style s = UIManager.getInstance().getComponentStyle("Title");
FontImage icon = FontImage.createMaterial(FontImage.MATERIAL_CAMERA, s);

ImageViewer iv = new ImageViewer(icon);

hi.getToolbar().addCommandToRightBar("", icon, (ev) -> {
    Display.getInstance().openGallery((e) -> {
        if(e != null && e.getSource() != null) {
            try {
                DefaultListModel<Image> m = (DefaultListModel<Image>)iv.getImageList();
                Image img = Image.createImage((String)e.getSource());
                if(m == null) {
                    m = new DefaultListModel<>(img);
                    iv.setImageList(m);
                    iv.setImage(img);
                } else {
                    m.addItem(img);
                }
                m.setSelectedIndex(m.getSize() - 1);
            } catch(IOException err) {
                Log.e(err);
            }
        }
    }, Display.GALLERY_IMAGE);
});

hi.add(BorderLayout.CENTER, iv);|
Tip
|
There is no need for a screenshot as it will look identical to the capture image screenshot above |
The last value is the type of content picked which can be one of:
Display.GALLERY_ALL, Display.GALLERY_VIDEO or Display.GALLERY_IMAGE.
One of the features in Codename One is builtin support for analytic instrumentation. Currently Codename One has builtin support for Google Analytics, which provides reasonable enough statistics of application usage.
Analytics is pretty seamless for the old GUI builder since navigation occurs via the Codename One API and can be logged without developer interaction. However, to begin the instrumentation one needs to add the line:
AnalyticsService.setAppsMode(true);
AnalyticsService.init(agent, domain);
To get the value for the agent value just create a Google Analytics account and add a domain, then copy and paste the string that looks something like UA-99999999-8 from the console to the agent string. Once this is in place you should start receiving statistic events for the application.
If your application is not a GUI builder application or you would like to send more detailed data you can use the Analytics.visit() method to indicate that you are entering a specific page.
In 2013 Google introduced an improved application level analytics API that is specifically built for mobile apps. However, it requires a slightly different API usage. You can activate this specific mode by invoking setAppsMode(true).
When using this mode you can also report errors and crashes to the Google analytics server using the sendCrashReport(Throwable, String message, boolean fatal) method.
We generally recommend using this mode and setting up an apps analytics account as the results are more refined.
The Analytics API can also be enhanced to support any other form of analytics solution of your own choosing by deriving the AnalyticsService class.
This allows you to integrate with any 3rd party via native or otherwise by overriding methods in the AnalyticsService class then invoking:
AnalyticsService.init(new MyAnalyticsServiceSubclass());Notice that this removes the need to invoke the other init method or setAppsMode(boolean).
|
Tip
|
Check out the ShareButton section it might be enough for most of your needs. |
Codename One supports Facebooks Oauth2 login and Facebooks single sign on for iOS and Android.
To get started first you will need to create a facebook app on the Facebook developer portal at https://developers.facebook.com/apps/

You need to repeat the process for web, Android & iOS (web is used by the simulator):
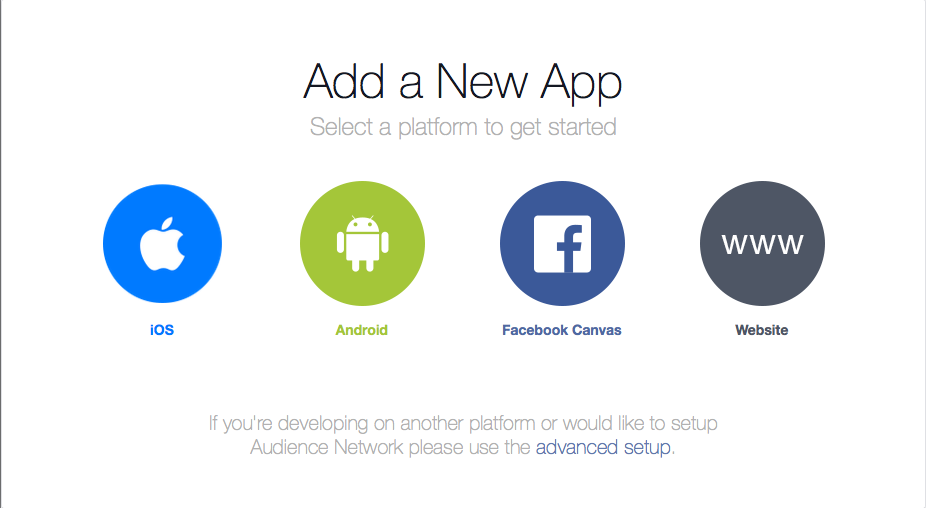
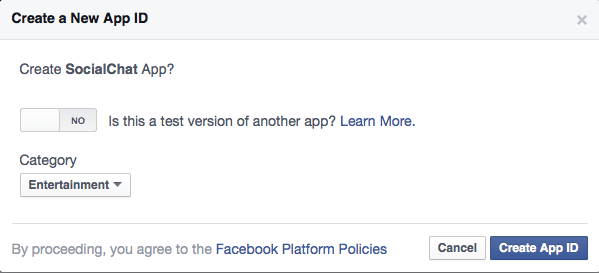
For the first platform you need to enter the app name:

And provide some basic details:
For iOS we need the bundle ID which is the exact same thing we used in the Google+ login to identify the iOS app its effectively your package name:

You should end up with something that looks like this:
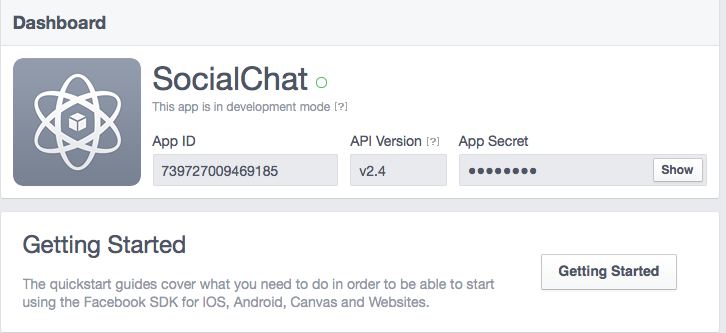
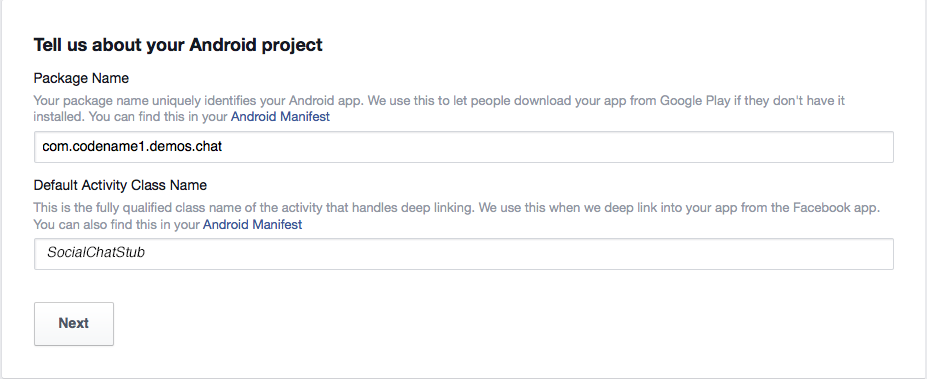
The Android process is pretty similar but in this case we need the activity name too.
|
Important
|
The activity name should match the main class name followed by the word Stub (uppercase s). E.g. for the main class SociallChat we would use SocialChatStub as the activity name
|
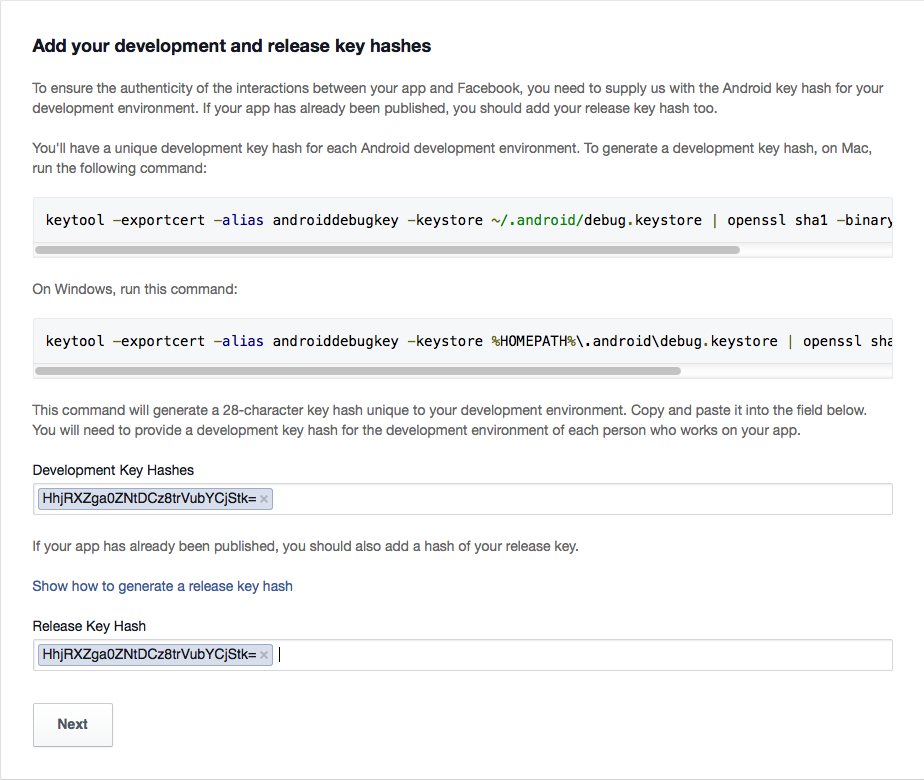
To build the native Android app we must make sure that we setup the keystore correctly for our application. If you don’t have an Android certificate you can use the visual wizard (in the Android section in the project preferences the button labeled Generate) or use the command line:
keytool -genkey -keystore Keystore.ks -alias [alias_name] -keyalg RSA -keysize 2048 -validity 15000 -dname "CN=[full name], OU=[ou], O=[comp], L=[City], S=[State], C=[Country Code]" -storepass [password] -keypass [password]|
Important
|
You can reuse the certificate in all your apps, some developers like having a different certificate for every app. This is like having one master key for all your doors, or a huge keyring filled with keys. |
With the certificate we need an SHA1 key to further authenticate us to Facebook and we do this using the keytool command line on Linux/Mac:
keytool -exportcert -alias (your_keystore_alias) -keystore (path_to_your_keystore) | openssl sha1 -binary | openssl base64And on Windows:
keytool -exportcert -alias androiddebugkey -keystore %HOMEPATH%\.android\debug.keystore | openssl sha1 -binary | openssl base64
You can read more about it on the Facebook guide here.
Lastly you need to publish the Facebook app by flipping the switch in the apps "Status & Review" page as such:

We now need to set some important build hints in the project so it will work correctly. To set the build hints just right click the project select project properties and in the Codename One section pick the second tab. Add this entry into the table:
facebook.appId=...The app ID will be visible in your Facebook app page in the top left position.
To bind your mobile app into the Facebook app you can use the following code:
Login fb = FacebookConnect.getInstance();

fb.setClientId("9999999");
fb.setRedirectURI("http://www.youruri.com/");
fb.setClientSecret("-------");

// Sets a LoginCallback listener
fb.setCallback(new LoginCallback() {
    public void loginSuccessful() {
        // we can now start fetching stuff from Facebook!
    }

    public void loginFailed(String errorMessage) {}
});

// trigger the login if not already logged in
if(!fb.isUserLoggedIn()){
    fb.doLogin();
} else {
    // get the token and now you can query the Facebook API
    String token = fb.getAccessToken().getToken();
    // ...
}|
Important
|
All of these values are from the web version of the app! They are only used in the simulator and on "unsupported" platforms as a fallback. Android and iOS will use the native login |
In order to post something to Facebook you need to request a write permission, you can only do write operations within the callback which is invoked when the user approves the permission.
You can prompt the user for publish permissions by using this code on a logged in FacebookConnect:
FacebookConnect.getInstance()askPublishPermissions(new LoginCallback() {
    public void loginSuccessful() {
         // do something...
    }
    public void loginFailed(String errorMessage) {
        // show error or just ignore
    }
});|
Tip
|
Notice that this won’t always prompt the user, but its required to verify that your token is valid for writing. |
Google Login is a bit of a moving target, as they are regularly creating new APIs and deprecating old ones. Codename One 3.7 and earlier used the Google+ API for sign-in, which is now deprecated. While this API still works, it is no longer useful on iOS as it redirects to Safari to perform login, and Apple no longer allows this practice.
The new, approved API is called Google Sign-In. Rather than using Safari to handle login (on iOS), it uses an embedded web view, which is permitted by Apple.
The process involves four parts:
OAuth Setup is required for using Google Sign-In in the simulator, and for accessing other Google APIs in Android.
Short Version
Go to the Google Developer Portal, follow the steps to create an App, and enable Google Sign-In, and download the GoogleService-Info.plist file. Then copy this file into your project’s native/ios directory.
Long Version
Point your browser to this page.
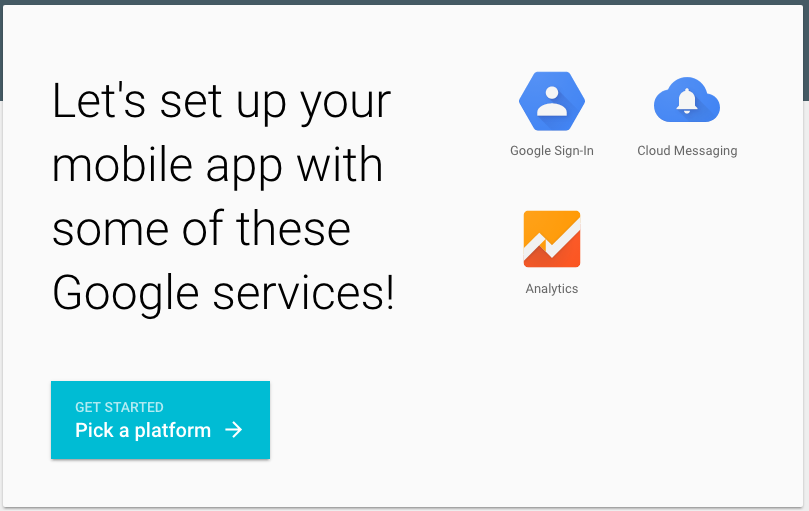
Click on the "Getting Started" button.

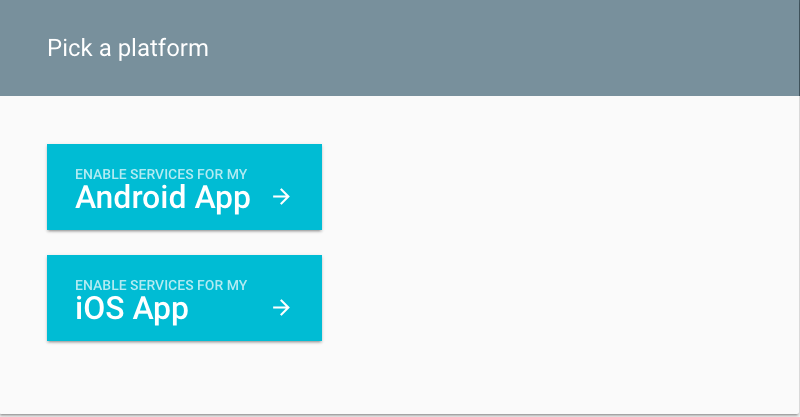
Then click "iOS App"
Now enter an app name and the bundle ID for your app on the form below. The app name doesn’t necessary need to match your app’s name, but the bundle ID should match the package name of your app.
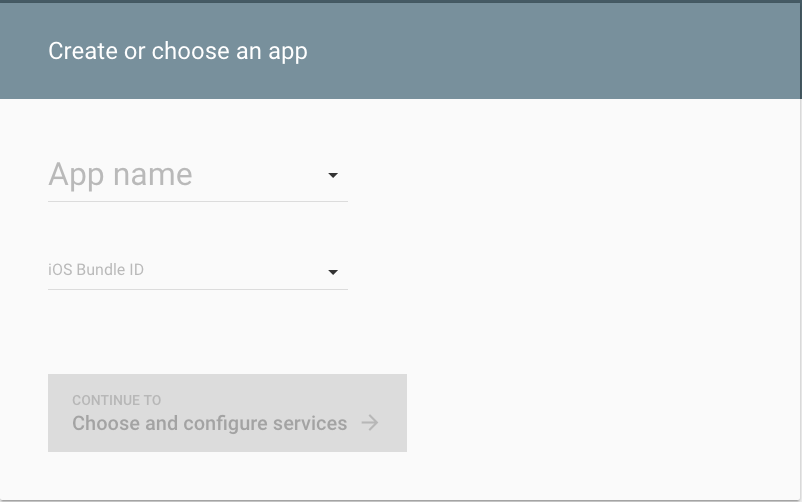
Select your country, and then click the "Choose and Configure Services" button.

You’ll be presented with the following screen
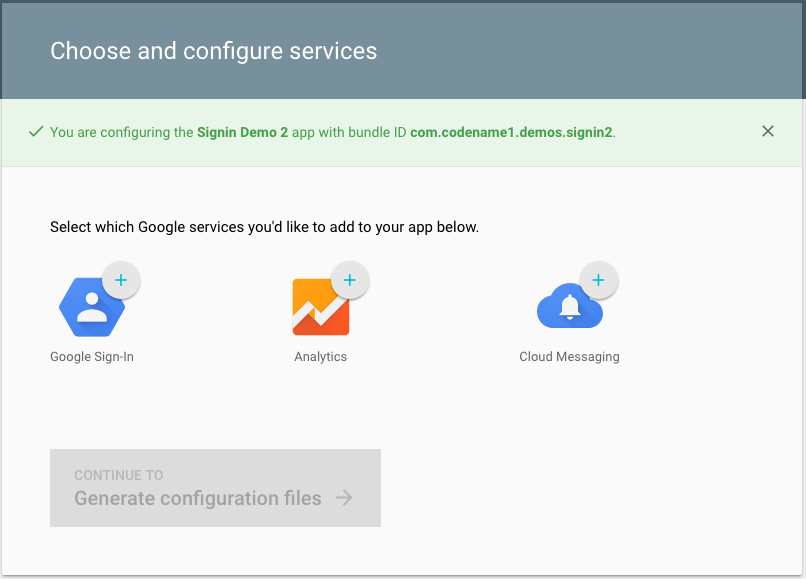
Click on "Google Sign-In".
Then press the "Enable Google Sign-In" button that appears.

You should then be presented with another button to "Generate Configuration Files" as shown below

Finally you will be presented with a button to "Download GoogleServices-Info.plist".

Press this button to download the GoogleService-Info.plist file. Then copy this into the "native/ios" directory of your Codename One project.
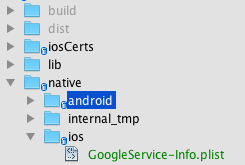
At this point, your app should be able to use Google Sign-In. Notice that we don’t require any build hints. Only that the GoogleService-Info.plist file is added to the project’s native/ios directory.
Short Version
Go to the Google Developer Portal, follow the steps to create an App, and enable Google Sign-In, and download the google-services.json file. Then copy this file into your project’s native/android directory.
Long Version
Point your browser to this page.

Click on the "Getting Started" button.

Then click "Android App"

Now enter an app name and the platform for your app on the form below. The app name doesn’t necessary need to match your app’s name, but the package name should match the package name of your app.
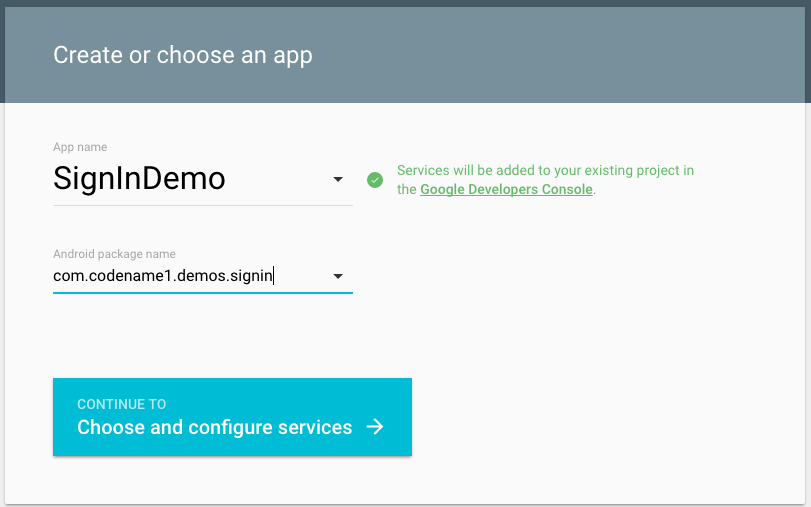
Select your country, and then click the "Choose and Configure Services" button.
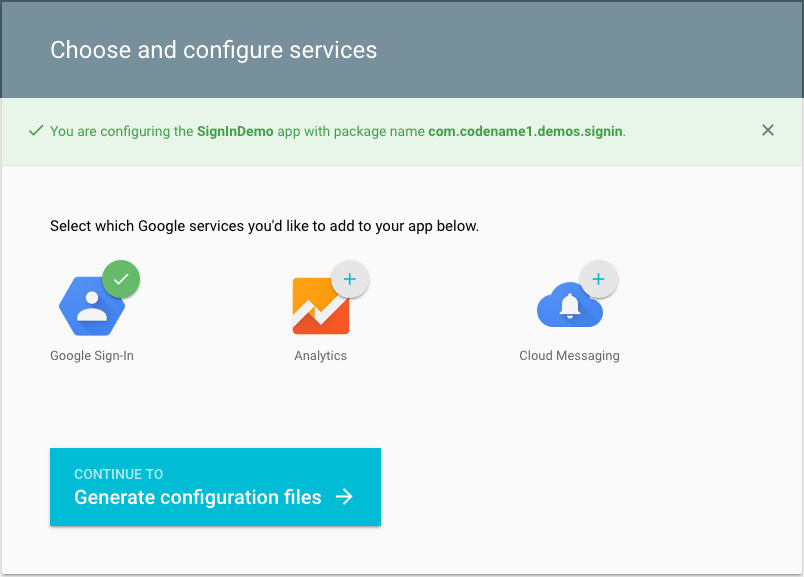
Click on "Google Sign-In"
Then you’ll be presented with a field to enter the Android Signing Certificate SHA-1.
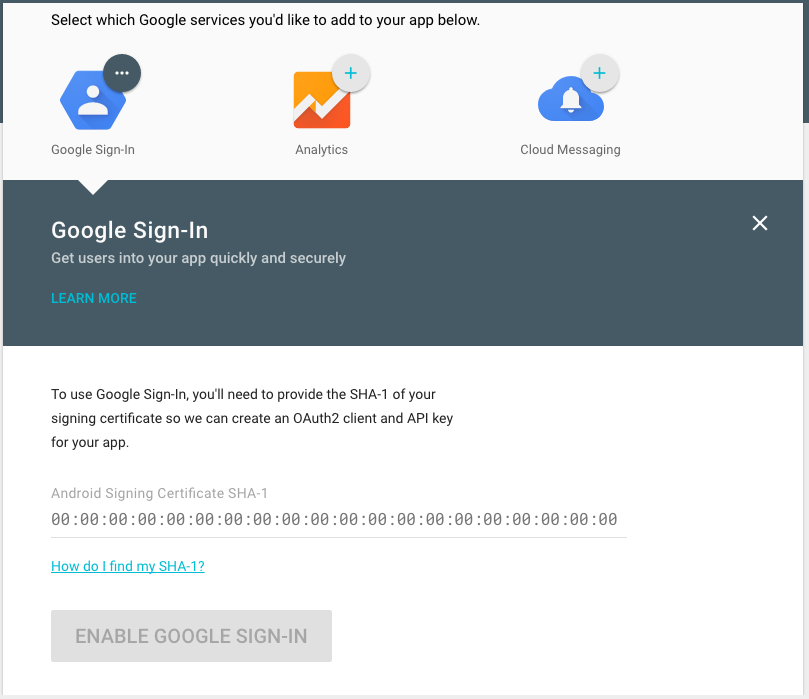
The value that you enter here should be obtained from the certificate that you are using to build your app. You an use the keytool app that is distributed with the JDK to extract this value
$ keytool -exportcert -alias myAlias -keystore /path/to/my-keystore.keystore -list -vThe snippet above assumes that your keystore is located at /path/to/my-keystore.keystore, and the certificate alias is "myAlias". You’ll be prompted to enter the password for your keystore, then the output will look something like:
Alias name: myAlias
Creation date: 22-Jan-2014
Entry type: PrivateKeyEntry
Certificate chain length: 1
Certificate[1]:
Owner: CN=My Own Company Corp., OU=, O=, L=Vancouver, ST=British Columbia, C=CA
Issuer: CN=My Own Company Corp., OU=, O=, L=Vancouver, ST=British Columbia, C=CA
Serial number: 56b2fd42
Valid from: Wed Jan 22 12:23:50 PST 2014 until: Tue Feb 16 12:23:50 PST 2055
Certificate fingerprints:
	 MD5:  98:F9:34:5B:B5:1A:14:2D:3C:5D:F4:92:D2:73:30:6B
	 SHA1: 76:BA:AA:11:A9:22:42:24:93:82:6D:33:7E:48:BC:AF:45:4D:79:B0
	 SHA256: 3D:04:33:67:6A:13:FF:4F:EE:E8:C9:7D:D2:CC:DF:70:33:E1:90:44:BF:22:B6:96:11:C7:00:67:8D:CD:53:BC
	 Signature algorithm name: SHA256withRSA
	 Version: 3

Extensions:

#1: ObjectId: 2.5.29.14 Criticality=false
SubjectKeyIdentifier [
KeyIdentifier [
0000: C2 A0 48 AA 60 BA DD E3   0C 3F 00 B4 2C D5 92 A5  ..H.`.......D...
0010: 31 16 EF A2                                        1...
]
]
You will be interested in SHA1 fingerprint. In the snippet above, the SHA1 fingerprint is:
76:BA:AA:11:A9:22:42:24:93:82:6D:33:7E:48:BC:AF:45:4D:79:B0
You would paste this value into the "Android Signing Certificate SHA-1" field in the web form.
After pasting that in, you’ll see a new button with label "Enable Google Sign-in"

Press this button and you’ll be presented with another button to "Generate Configuration Files" as shown below

Finally you will be presented with a button to "Download google-services.json".

Press this button to download the google-services.json file. Then copy this into the "native/android" directory of your Codename One project.
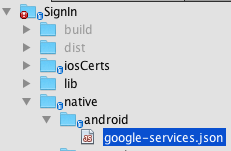
At this point, your app should be able to use Google Sign-In. Notice that we don’t require any build hints. Only that the google-services.json file is added to the project’s native/android directory.
|
Important
|
If you want to access additional information about the logged in user using Google’s REST APIs, you will require an OAuth2.0 client ID of type Web Application for this project as well. See OAuth Setup (Simulator and REST API Access) for details. |
Getting Google Sign-In to work in the Codename One simulator requires an additional step after you’ve set up iOS and/or Android apps. The Simulator can’t use the native Google Sign-In APIs, so it uses the standard Web Application OAuth2.0 API. In addition, the Android App requires a Web Application OAuth2.0 client ID to access additional Google REST APIs.
If you’ve set up the Google Sign-In API for either Android or iOS, then Google will have already automatically generated a Web Application OAuth2.0 client ID for you. You just need to provide the ClientID and ClientSecret to the GoogleConnect instance (in your java code).
-
Log into the Google Cloud Platform API console.
-
Select your app from the drop-down-menu in the top bar
-
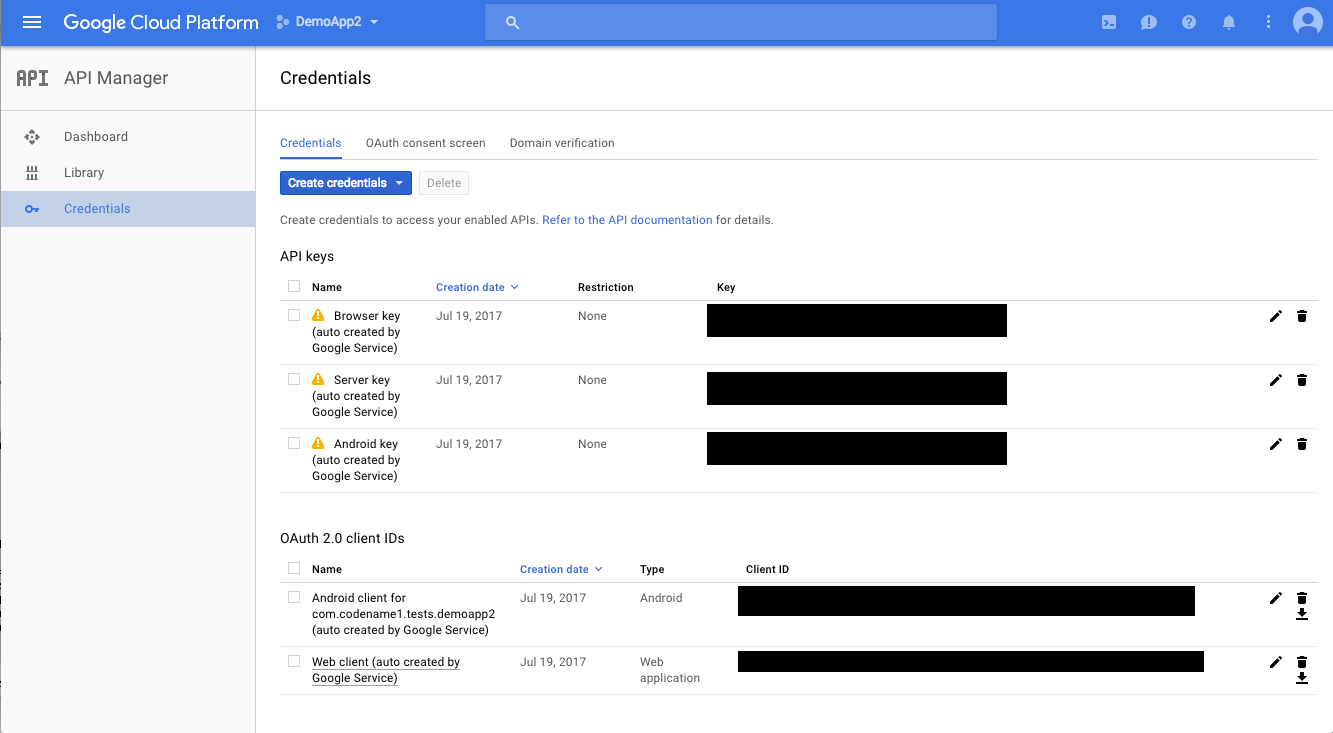
Click on "Credentials" in the left menu. You’ll see a screen like this
-
Under the "OAuth2.0 Client IDs", find the row with "Web application" listed in the type column
-
Click the "Edit icon for that row.
-
Make note of the "Client ID" and "Client Secret" on this page, as you’ll need to add them to your Java source in the next step.
-
In the "Authorized redirect URIs" section, you will need to enter the URL to the page that the user will be sent to after a successful login. This page will only appear in the simulator for a split second, as Codename One’s BrowserComponent will intercept this request to obtain the access token upon successful login. You can use any URL you like here, but it must match the value you give to
GoogleConnect.setRedirectURL()in The Code.
The Javascript port can use the same OAuth2.0 credentials as the simulator does. It doesn’t require your Client Secret or redirect URL. It only requires your Client ID, which you can specify using the GoogleConnect.setClientID() method.
Login gc = GoogleConnect.getInstance();
gc.setClientId("*****************.apps.googleusercontent.com");
gc.setRedirectURI("https://yourURL.com/");
gc.setClientSecret("-------------------");

// Sets a LoginCallback listener
gc.setCallback(new LoginCallback() {
    public void loginSuccessful() {
        // we can now start fetching stuff from Google+!
    }

    public void loginFailed(String errorMessage) {}
});

// trigger the login if not already logged in
if(!gc.isUserLoggedIn()){
    gc.doLogin();
} else {
    // get the token and now you can query the Google API
    String token = gc.getAccessToken().getToken();
      // NOTE: On Android, this token will be null unless you provide valid
      // client ID and secrets.
}|
Note
|
The client ID and client secret values here are the ones from your OAuth2.0 Web Application. |
|
Important
|
The Client ID and Client Secret values are used on both the Simulator and on Android. On simulator these values are required for login to work at all. On Android these values are required to obtain an access token to query the Google API further using its various REST APIs. If you do not include these values on Android, login will still work, but gc.getAccessToken().getToken() will return null.
|
Codename One has two basic ways to create new components:
-
Subclass a
Componentoverridepaint, implement event callbacks etc. -
Compose multiple components into a new component, usually by subclassing a
Container.
Components such as Tabs subclass Container which make a lot of sense for that component since it is physically a Container.
However,
components like MultiButton, SpanButton & SpanLabel don’t necessarily seem like the right candidate for compositing but they are all Container subclasses.
Using a Container provides us a lot of flexibility in terms of layout & functionality for a specific component. MultiButton
is a great example of that. It’s a Container internally that is composed of 5 labels and a Button.
Codename One makes the MultiButton "feel" like a single button thru the use of setLeadComponent(Component) which
turns the button into the "leader" of the component.
When a Container hierarchy is placed under a leader all events within the hierarchy are sent to the leader, so if a label within the lead component receives a pointer pressed event this event will really be sent to the leader.
E.g. in the case of the MultiButton the internal button will receive that event and send the action performed event, change the state etc.
This creates some potential issues for instance in MultiButton:
myMultiButton.addActionListener((e) -> {
    if(e.getComponent() == myMultiButton) {
        // this won't occur since the source component is really a button!
    }
    if(e.getActualComponent() == myMultiButton) {
        // this will happen...
    }
});
The leader also determines the style state, so all the elements being lead are in the same state. E.g. if the the button is pressed all elements will display their pressed states, notice that they will do so with their own styles but
they will each pick the pressed version of that style so a Label UIID within a lead component in the pressed state
would return the Pressed state for a Label not for the Button.
This is very convenient when you need to construct more elaborate UI’s and the cool thing about it is that you can do this entirely in the designer which allows assembling containers and defining the lead component inside the hierarchy.
E.g. the SpanButton class is very similar to this code:
public class SpanButton extends Container {
    private Button actualButton;
    private TextArea text;

    public SpanButton(String txt) {
        setUIID("Button");
        setLayout(new BorderLayout());
        text = new TextArea(getUIManager().localize(txt, txt));
        text.setUIID("Button");
        text.setEditable(false);
        text.setFocusable(false);
        actualButton = new Button();
        addComponent(BorderLayout.WEST, actualButton);
        addComponent(BorderLayout.CENTER, text);
        setLeadComponent(actualButton);
    }


    public void setText(String t) {
        text.setText(getUIManager().localize(t, t));
    }

    public void setIcon(Image i) {
        actualButton.setIcon(i);
    }

    public String getText() {
        return text.getText();
    }

    public Image getIcon() {
        return actualButton.getIcon();
    }

    public void addActionListener(ActionListener l) {
        actualButton.addActionListener(l);
    }

    public void removeActionListener(ActionListener l) {
        actualButton.removeActionListener(l);
    }

}The Component class has two methods that allow us to exclude a component from lead behavior: setBlockLead(boolean) & isBlockLead().
Effectively when you have a Component within the lead hierarchy that you would like to treat differently from the rest you can use this method to exclude it from the lead component behavior while keeping the rest in line…
This should have no effect if the component isn’t a part of a lead component.
The sample below is based on the Accordion component which uses a lead component internally.
Form f = new Form("Accordion", new BorderLayout());
Accordion accr = new Accordion();
f.getToolbar().addMaterialCommandToRightBar("", FontImage.MATERIAL_ADD, e -> addEntry(accr));
addEntry(accr);
f.add(BorderLayout.CENTER, accr);
f.show();

void addEntry(Accordion accr) {
    TextArea t = new TextArea("New Entry");
    Button delete = new Button();
    FontImage.setMaterialIcon(delete, FontImage.MATERIAL_DELETE);
    Label title = new Label(t.getText());
    t.addActionListener(ee -> title.setText(t.getText()));
    delete.addActionListener(ee -> {
        accr.removeContent(t);
        accr.animateLayout(200);
    });
    delete.setBlockLead(true);
    delete.setUIID("Label");
    Container header = BorderLayout.center(title).
            add(BorderLayout.EAST, delete);
    accr.addContent(header, t);
    accr.animateLayout(200);
}
This allows us to add/edit entries but it also allows the delete button above to actually work separately. Without a call to setBlockLead(true) the delete button would cat as the rest of the accordion title.
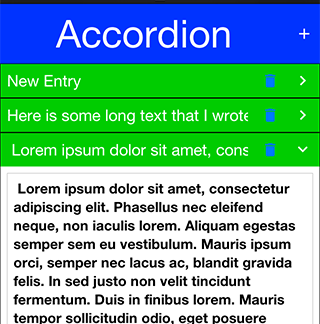
Pull to refresh is the common UI paradigm that Twitter popularized where the user can pull down the form/container to receive an update. Adding this to Codename One couldn’t be simpler!
Just invoke addPullToRefresh(Runnable) on a scrollable container (or form) and the runnable method will be invoked when the refresh operation occurs.
|
Tip
|
Pull to refresh is implicitly implements in the InifiniteContainer
|
Form hi = new Form("Pull To Refresh", BoxLayout.y());
hi.getContentPane().addPullToRefresh(() -> {
    hi.add("Pulled at " + L10NManager.getInstance().formatDateTimeShort(new Date()));
});
hi.show();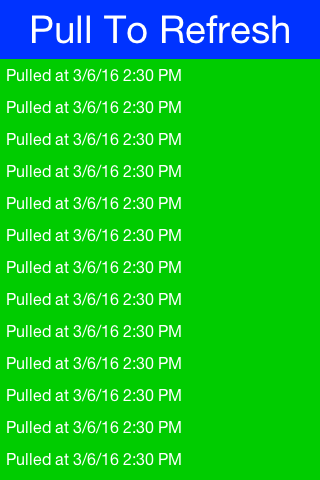
The Display class’s execute method allows us to invoke a URL which is bound to a particular application.
This works rather well assuming the application is installed. E.g. this list contains a set of valid URL’s that can be used on iOS to run common applications and use builtin functionality.
Some URL’s might not be supported if an app isn’t installed, on Android there isn’t much that can be done but iOS has a canOpenURL method for Objective-C.
On iOS you can use the Display.canExecute() method which returns a Boolean instead of a boolean which
allows us to support 3 result states:
-
Boolean.TRUE- the URL can be executed -
Boolean.FALSE- the URL isn’t supported or the app is missing -
null- we have no idea whether the URL will work on this platform.
The sample below launches a "godfather" search on IMDB only when this is sure to work (only on iOS currently). We can actually try to search in the case of null as well but this sample plays it safe by using the http link which is sure to work:
Boolean can = Display.getInstance().canExecute("imdb:///find?q=godfather");
if(can != null && can) {
    Display.getInstance().execute("imdb:///find?q=godfather");
} else {
    Display.getInstance().execute("http://www.imdb.com");
}We try to make Codename One "seamless", this expresses itself in small details such as the automatic detection of permissions on Android etc. The build servers go a long way in setting up the environment as intuitive. But it’s not enough, build hints are often confusing and obscure. It’s hard to abstract the mess that is native mobile OS’s and the odd policies from Apple/Google…
A good example for a common problem developers face is location code that doesn’t work in iOS. This is due to the ios.locationUsageDescription build hint that’s required. The reason that build hint was added is a requirement by Apple to provide a description for every app that uses the location service.
To solve this sort of used case we have two API’s in Display:
/**
 * Returns the build hints for the simulator, this will only work in the debug environment and it's
 * designed to allow extensions/API's to verify user settings/build hints exist
 * @return map of the build hints that isn't modified without the codename1.arg. prefix
 */
public Map<String, String> getProjectBuildHints() {}

/**
 * Sets a build hint into the settings while overwriting any previous value. This will only work in the
 * debug environment and it's designed to allow extensions/API's to verify user settings/build hints exist.
 * Important: this will throw an exception outside of the simulator!
 * @param key the build hint without the codename1.arg. prefix
 * @param value the value for the hint
 */
public void setProjectBuildHint(String key, String value) {}
Both of these allow you to detect if a build hint is set and if not (or if it’s set incorrectly) set its value…
So if you will use the location API from the simulator and you didn’t define ios.locationUsageDescription Codename One will implicitly define a string there. The cool thing is that you will now see that string in your settings and you would be able to customize it easily.
However, this gets way better than just that trivial example!
The real value is for 3rd party cn1lib authors. E.g. Google Maps or Parse. They can inspect the build hints in the simulator and show an error in case of a misconfiguration. They can even show a setup UI. Demos that need special keys in place can force the developer to set them up properly before continuing.
Working with threads is usually ranked as one of the least intuitive and painful tasks in programming. This is such an error prone task that some platforms/languages took the route of avoiding threads entirely. I needed to convert some code to work on a separate thread but I still wanted the ability to communicate and transfer data from that thread.
This is possible in Java but non-trivial, the thing is that this is relatively easy to do in Codename One with tools such as callSerially I can let arbitrary code run on the EDT. Why not offer that to any random thread?
That’s why I created EasyThread which takes some of the concepts of Codeame One’s threading and makes them more accessible to an arbitrary thread. This way you can move things like resource loading into a separate thread and easily synchronize the data back into the EDT as needed…
Easy thread can be created like this:
EasyThread e = EasyThread.start("ThreadName");You can just send a task to the thread using:
e.run(() -> doThisOnTheThread());But it gets better, say you want to return a value:
e.run((success) -> success.onSuccess(doThisOnTheThread()), (myResult) -> onEDTGotResult(myRsult));Lets break that down… We ran the thread with the success callback on the new thread then the callback got invoked on the EDT as a result. So this code (success) → success.onSuccess(doThisOnTheThread()) ran off the EDT in the thread and when we invoked the onSuccess callback it sent it asynchronously to the EDT here: (myResult) → onEDTGotResult(myRsult).
These asynchronous calls make things a bit painful to wade thru so instead I chose to wrap them in a simplified synchronous version:
EasyThread e = EasyThread.start("Hi");
int result = e.run(() -> {
    System.out.println("This is a thread");
    return 3;
});
There are a few other variants like runAndWait and there is a kill() method which stops a thread and releases its resources.
Codename one can change the mouse cursor when hovering over specific areas to indicate resizability, movability etc. For obvious reasons this feature is only available in the desktop and JavaScript ports as the other ports rely mostly on touch interaction. The feature is off by default and needs to be enabled on a Form by using Form.setEnableCursors(true);. If you are writing a custom component that can use cursors such as SplitPane you can use:
@Override
protected void initComponent() {
    super.initComponent();
    getComponentForm().setEnableCursors(true);
}
Once this is enabled you can set the cursor over a specific region using cmp.setCursor() which accepts one of the cursor constants defined in Component.
Working with GIT for storing Codename One projects isn’t exactly a feature but since it is so ubiquitous we think it’s important to have a common guideline.
When we first started committing to git we used something like this for netbeans projects:
*.jar
nbproject/private/
build/
dist/
lib/CodenameOne_SRC.zip
Removing the jars, build, private folder etc. makes a lot of sense but there are a few nuances that are missing here…
You will notice we excluded the jars which are stored under lib and we exclude the Codename One source zip. But I didn’t exclude cn1libs… That was an omission since the original project we committed didn’t have cn1libs. But should we commit a binary file to git?
I don’t know. Generally git isn’t very good with binaries but cn1libs make sense. In another project that did have a cn1lib I did this:
*.jar
nbproject/private/
build/
dist/
lib/CodenameOne_SRC.zip
lib/impl/
native/internal_tmp/
The important lines are lib/impl/ and native/internal_tmp/. Technically cn1libs are just zips. When you do a refresh libs they unzip into the right directories under lib/impl and native/internal_tmp. By excluding these directories we can remove duplicates that can result in conflicts.
Committing the res file is a matter of personal choice. It is committed in the git ignore files above but you can remove it. The res file is at risk of corruption and in that case having a history we can refer to, matters a lot.
But the resource file is a bit of a problematic file. As a binary file if we have a team working with it the conflicts can be a major blocker. This was far worse with the old GUI builder, that was one of the big motivations of moving into the new GUI builder which works better for teams.
Still, if you want to keep an eye of every change in the resource file you can switch on the File → XML Team Mode which should be on by default. This mode creates a file hierarchy under the res directory to match the res file you opened. E.g. if you have a file named src/theme.res it will create a matching res/theme.xml and also nest all the images and resources you use in the res directory.
That’s very useful as you can edit the files directly and keep track of every file in git. However, this has two big drawbacks:
-
It’s flaky - while this mode works it never reached the stability of the regular res file mode
-
It conflicts - the simulator/device are oblivious to this mode. So if you fetch an update you also need to update the res file and you might still have conflicts related to that file
Ultimately both of these issues shouldn’t be a deal breaker. Even though this mode is a bit flaky it’s better than the alternative as you can literally "see" the content of the resource file. You can easily revert and reapply your changes to the res file when merging from git, it’s tedious but again not a deal breaker.
Building on the gitignore we have for NetBeans the eclipse version should look like this:
.DS_Store
*.jar
build/
dist/
lib/impl/
native/internal_tmp/
.metadata
bin/
tmp/
*.tmp
*.bak
*.swp
*.zip
*~.nib
local.properties
.settings/
.loadpath
.recommenders
.externalToolBuilders/
*.launch
*.pydevproject
.cproject
.factorypath
.buildpath
.project
.classpath
.DS_Store
*.jar
build/
dist/
lib/impl/
native/internal_tmp/
*.zip
.idea/**/workspace.xml
.idea/**/tasks.xml
.idea/dictionaries
.idea/**/dataSources/
.idea/**/dataSources.ids
.idea/**/dataSources.xml
.idea/**/dataSources.local.xml
.idea/**/sqlDataSources.xml
.idea/**/dynamic.xml
.idea/**/uiDesigner.xml
.idea/**/gradle.xml
.idea/**/libraries
*.iws
/out/
atlassian-ide-plugin.xml
About This Guide
Introduction
Basics: Themes, Styles, Components & Layouts
Theme Basics
Advanced Theming
Working With The GUI Builder
The Components Of Codename One
Using ComponentSelector
Animations & Transitions
The EDT - Event Dispatch Thread
Monetization
Graphics, Drawing, Images & Fonts
Events
File-System,-Storage,-Network-&-Parsing
Miscellaneous Features
Performance, Size & Debugging
Advanced Topics/Under The Hood
Signing, Certificates & Provisioning
Appendix: Working With iOS
Appendix: Working with Mac OS X
Appendix: Working With Javascript
Appendix: Working With UWP
Security
cn1libs
Appendix: Casual Game Programming