Read this in other languages:
 English,
  日本語,
日本語,  Portugues do Brasil,
  Française,
 Español.
In this exercise, we are going to explore the latest Ansible command line
utility ansible-navigator to learn how to work with inventory files and the
listing of modules when needing assistance. The goal is to familarize yourself
with how ansible-navigator works and how it can be used to enrich your Ansible
experience.
An inventory file is a text file that specifies the nodes that will be managed by the control machine. The nodes to be managed may include a list of hostnames or IP addresses of those nodes. The inventory file allows for nodes to be organized into groups by declaring a host group name within square brackets ([]).
To use the ansible-navigator command for host management, you need to provide
an inventory file which defines a list of hosts to be managed from the control
node. In this lab, the inventory is provided by your instructor. The inventory
file is an ini formatted file listing your hosts, sorted in groups,
additionally providing some variables. An example may look as follows:
[web]
node1 ansible_host=<X.X.X.X>
node2 ansible_host=<Y.Y.Y.Y>
node3 ansible_host=<Z.Z.Z.Z>

[control]
ansible-1 ansible_host=44.55.66.77
To view your inventory with ansible-navigator, use the command
ansible-navigator inventory --list -m stdout. This command displays all nodes
and their respective groups.
[student@ansible-1 rhel_workshop]$ cd /home/student
[student@ansible-1 ~]$ ansible-navigator inventory --list -m stdout
{
    "_meta": {
        "hostvars": {
            "ansible-1": {
                "ansible_become": "true",
                "ansible_host": "ansible-1.example.com",
                "ansible_ssh_common_args": "-o StrictHostKeyChecking=no",
                "ansible_ssh_private_key_file": "~/.ssh/8qnxkkey.pem",
                "ansible_user": "ec2-user",
                "timeout": 60
            },
            "node1": {
                "ansible_become": "true",
                "ansible_host": "node1.example.com",
                "ansible_ssh_common_args": "-o StrictHostKeyChecking=no",
                "ansible_ssh_private_key_file": "~/.ssh/8qnxkkey.pem",
                "ansible_user": "ec2-user",
                "timeout": 60
            },
            "node2": {
                "ansible_become": "true",
                "ansible_host": "node2.example.com",
                "ansible_ssh_common_args": "-o StrictHostKeyChecking=no",
                "ansible_ssh_private_key_file": "~/.ssh/8qnxkkey.pem",
                "ansible_user": "ec2-user",
                "timeout": 60
            },
            "node3": {
                "ansible_become": "true",
                "ansible_host": "node3.example.com",
                "ansible_ssh_common_args": "-o StrictHostKeyChecking=no",
                "ansible_ssh_private_key_file": "~/.ssh/8qnxkkey.pem",
                "ansible_user": "ec2-user",
                "timeout": 60
            }
        }
    },
    "all": {
        "children": [
            "control",
            "ungrouped",
            "web"
        ]
    },
    "control": {
        "hosts": [
            "ansible-1"
        ]
    },
    "web": {
        "hosts": [
            "node1",
            "node2",
            "node3"
        ]
    }
}
NOTE: -m is short for --mode which allows for the mode to be switched to standard output instead of using the text-based user interface (TUI).
For a less detailed view, ansible-navigator inventory --graph -m stdout offers
a visual representation of groupings.
[student@ansible-1 ~]$ ansible-navigator inventory --graph -m stdout
@all:
  |--@control:
  |  |--ansible-1
  |--@ungrouped:
  |--@web:
  |  |--node1
  |  |--node2
  |  |--node3
We can clearly see that nodes: node1, node2, node3 are part of the web
group, while ansible-1 is part of the control group.
An inventory file can organize your hosts in groups or define variables. In our
example, the current inventory has the groups web and control. Run
ansible-navigator with these host patterns and observe the output:
Using the ansible-navigator inventory command, you can run commands that
provide information only for one host or group. For example, run the following
commands and observe their different outputs.
[student@ansible-1 ~]$ ansible-navigator inventory --graph web -m stdout
[student@ansible-1 ~]$ ansible-navigator inventory --graph control -m stdout
[student@ansible-1 ~]$ ansible-navigator inventory --host node1 -m stdout
Tip
The inventory can contain more data. e.g. if you have hosts that run on non-standard SSH ports you can put the port number after the hostname with a colon. One can also define names specific to Ansible and have them point to the IP or hostname.
Ansible Automation Platform comes with multiple supported Execution Environments (EEs). These EEs come with bundled supported collections that contain supported content, including modules.
Tip
In
ansible-navigatorexit by pressing the buttonESC.
To browse your available modules first enter interactive mode:
$ ansible-navigatorBrowse a collection by typing :collections
:collectionsTo explore a specific collection's modules, enter the number next to the collection name.
For example in the screenshot above, the number 0 corresponds to
amazon.aws collection. To zoom into the collection type the number 0.
0Directly access detailed documentation for any module by specifying its
corresponding number. For
example the module ec2_tag corresponds to 24.
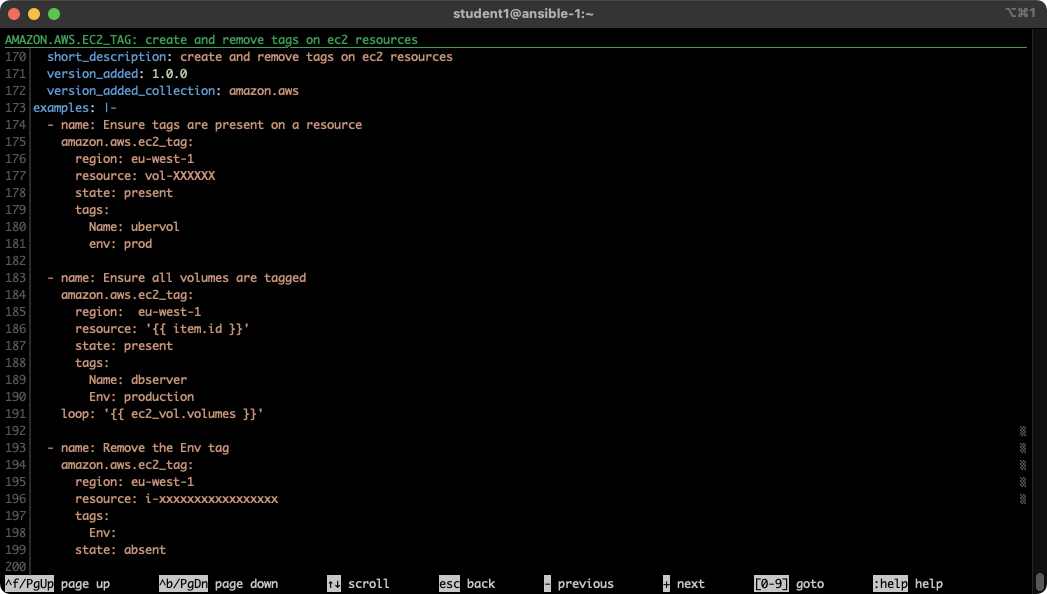
:24Scrolling down using the arrow keys or page-up and page-down can show us documentation and examples.
You can skip directly to a particular module by simply typing :doc namespace.collection.module-name. For example typing :doc amazon.aws.ec2_tag
would skip directly to the final page shown above.
Tip
Different execution environments can have access to different collections, and different versions of those collections. By using the built-in documentation you know that it will be accurate for that particular version of the collection.
Navigation
{% if page.url contains 'ansible_rhel_90' %}
Previous Exercise - Next Exercise
{% else %}
Previous Exercise - Next Exercise
{% endif %}
Click here to return to the Ansible for Red Hat Enterprise Linux Workshop


