

Need a quick overview? Try the OpenWISP Demo.
OpenWISP Controller is a configuration manager that allows to automate several networking tasks like adoption, provisioning, management VPN configuration, X509 certificates automatic generation, revocation of x509 certificates and a lot more features.
OpenWISP is not only an application designed for end users, but can also be used as a framework on which custom network automation solutions can be built on top of its building blocks.
Other popular building blocks that are part of the OpenWISP ecosystem are:
- openwisp-monitoring: provides device status monitoring, collection of metrics, charts, alerts, possibility to define custom checks
- openwisp-firmware-upgrader: automated firmware upgrades (single devices or mass network upgrades)
- openwisp-radius: based on FreeRADIUS, allows to implement network access authentication systems like 802.1x WPA2 Enterprise, captive portal authentication, Hotspot 2.0 (802.11u)
- openwisp-network-topology: provides way to collect and visualize network topology data from dynamic mesh routing daemons or other network software (eg: OpenVPN); it can be used in conjunction with openwisp-monitoring to get a better idea of the state of the network
- openwisp-ipam: allows to manage the assignment of IP addresses used in the network
- openwisp-notifications: allows users to be aware of important events happening in the network.
For a more complete overview of the OpenWISP modules and architecture, see the OpenWISP Architecture Overview.
Want to help OpenWISP? Find out how to help us grow here.
Table of Contents:
- Project Structure & main features
- Installation instructions
- Usage reference
- Default Templates
- Required Templates
- How to use configuration variables
- User defined device variables
- Predefined device variables
- Group variables
- Organization variables
- Global variables
- Template default values
- System defined variables
- Example usage of variables
- How to configure push updates
- Sending Commands to Devices
- Device Groups
- Export/Import Device data
- Organization Limits
- How to setup WireGuard tunnels
- How to setup VXLAN over WireGuard tunnels
- How to setup ZeroTier Tunnels
- How to configure automatic provisioning of subnets and IPs
- Default Alerts / Notifications
- REST API Reference
- Live documentation
- Browsable web interface
- Authentication
- Pagination
- List of endpoints
- List devices
- Create device
- Get device detail
- Download device configuration
- Change details of device
- Patch details of device
- Delete device
- List device connections
- Create device connection
- Get device connection detail
- Change device connection detail
- Patch device connection detail
- Delete device connection
- List credentials
- Create credential
- Get credential detail
- Change credential detail
- Patch credential detail
- Delete credential
- List commands of a device
- Execute a command a device
- Get command details
- List device groups
- Create device group
- Get device group detail
- Change device group detail
- Get device group from certificate common name
- Get device location
- Create device location
- Change details of device location
- Delete device location
- Get device coordinates
- Update device coordinates
- List locations
- Create location
- Get location details
- Change location details
- Delete location
- List devices in a location
- List locations with devices deployed (in GeoJSON format)
- List floorplans
- Create floorplan
- Get floorplan details
- Change floorplan details
- Delete floorplan
- List templates
- Create template
- Get template detail
- Download template configuration
- Change details of template
- Patch details of template
- Delete template
- List VPNs
- Create VPN
- Get VPN detail
- Download VPN configuration
- Change details of VPN
- Patch details of VPN
- Delete VPN
- List CA
- Create new CA
- Import existing CA
- Get CA Detail
- Change details of CA
- Patch details of CA
- Download CA(crl)
- Delete CA
- Renew CA
- List Cert
- Create new Cert
- Import existing Cert
- Get Cert Detail
- Change details of Cert
- Patch details of Cert
- Delete Cert
- Renew Cert
- Revoke Cert
- Settings
OPENWISP_SSH_AUTH_TIMEOUTOPENWISP_SSH_BANNER_TIMEOUTOPENWISP_SSH_COMMAND_TIMEOUTOPENWISP_SSH_CONNECTION_TIMEOUTOPENWISP_CONNECTORSOPENWISP_UPDATE_STRATEGIESOPENWISP_CONFIG_UPDATE_MAPPINGOPENWISP_CONTROLLER_BACKENDSOPENWISP_CONTROLLER_VPN_BACKENDSOPENWISP_CONTROLLER_DEFAULT_BACKENDOPENWISP_CONTROLLER_DEFAULT_VPN_BACKENDOPENWISP_CONTROLLER_REGISTRATION_ENABLEDOPENWISP_CONTROLLER_CONSISTENT_REGISTRATIONOPENWISP_CONTROLLER_REGISTRATION_SELF_CREATIONOPENWISP_CONTROLLER_CONTEXTOPENWISP_CONTROLLER_DEFAULT_AUTO_CERTOPENWISP_CONTROLLER_CERT_PATHOPENWISP_CONTROLLER_COMMON_NAME_FORMATOPENWISP_CONTROLLER_MANAGEMENT_IP_DEVICE_LISTOPENWISP_CONTROLLER_CONFIG_BACKEND_FIELD_SHOWNOPENWISP_CONTROLLER_DEVICE_NAME_UNIQUEOPENWISP_CONTROLLER_HARDWARE_ID_ENABLEDOPENWISP_CONTROLLER_HARDWARE_ID_OPTIONSOPENWISP_CONTROLLER_HARDWARE_ID_AS_NAMEOPENWISP_CONTROLLER_DEVICE_VERBOSE_NAMEOPENWISP_CONTROLLER_HIDE_AUTOMATICALLY_GENERATED_SUBNETS_AND_IPSOPENWISP_CONTROLLER_SUBNET_DIVISION_TYPESOPENWISP_CONTROLLER_APIOPENWISP_CONTROLLER_API_HOSTOPENWISP_CONTROLLER_USER_COMMANDSOPENWISP_CONTROLLER_ORGANIZATION_ENABLED_COMMANDSOPENWISP_CONTROLLER_DEVICE_GROUP_SCHEMAOPENWISP_CONTROLLER_SHARED_MANAGEMENT_IP_ADDRESS_SPACEOPENWISP_CONTROLLER_MANAGEMENT_IP_ONLYOPENWISP_CONTROLLER_DSA_OS_MAPPINGOPENWISP_CONTROLLER_DSA_DEFAULT_FALLBACKOPENWISP_CONTROLLER_GROUP_PIE_CHARTOPENWISP_CONTROLLER_API_TASK_RETRY_OPTIONS
- Signals
- Extending openwisp-controller
- 1. Initialize your project & custom apps
- 2. Install
openwisp-controller - 3. Add your apps in INSTALLED_APPS
- 4. Add
EXTENDED_APPS - 5. Add
openwisp_utils.staticfiles.DependencyFinder - 6. Add
openwisp_utils.loaders.DependencyLoader - 5. Initial Database setup
- 6. Django Channels Setup
- 7. Other Settings
- 6. Inherit the AppConfig class
- 7. Create your custom models
- 8. Add swapper configurations
- 9. Create database migrations
- 10. Create the admin
- 11. Create root URL configuration
- 12. Import the automated tests
- Other base classes that can be inherited and extended
- Custom Subnet Division Rule Types
- Registering new notification types
- Contributing
- Changelog
- License
- Support
OpenWISP Controller is a python package consisting of four django apps:
- configuration management for embedded devices supporting different firmwares:
- OpenWRT
- OpenWISP Firmware
- support for additional firmware can be added by specifying custom backends
- configuration editor based on JSON-Schema editor
- advanced edit mode: edit NetJSON DeviceConfiguration objects for maximum flexibility
- configuration templates: reduce repetition to the minimum, configure default and required templates
- configuration variables: reference ansible-like variables in the configuration and templates
- template tags: tag templates to automate different types of auto-configurations (eg: mesh, WDS, 4G)
- device groups: add devices to dedicated groups to ease management of group of devices
- simple HTTP resources: allow devices to automatically download configuration updates
- VPN management: automatically provision VPN tunnels, including cryptographic keys, IP addresses
- REST API
- Export/Import devices
The PKI app is based on django-x509, it allows to create, import and view x509 CAs and certificates directly from the administration dashboard, it also adds different endpoints to the REST API.
This app allows OpenWISP Controller to use different protocols to reach network devices. Currently, the default connnection protocols are SSH and SNMP, but the protocol mechanism is extensible and more protocols can be implemented if needed.
The SSH connector allows the controller to initialize connections to the devices in order perform push operations:
- Sending configuration updates.
- Executing shell commands.
- Perform firmware upgrades via the additional firmware upgrade module.
- REST API
The default connection protocol implemented is SSH, but other protocol mechanism is extensible and custom protocols can be implemented as well.
Access via SSH key is recommended, the SSH key algorithms supported are:
- RSA
- Ed25519
The SNMP connector is useful to collect monitoring information and it's used in openwisp-monitoring for performing checks to collect monitoring information. Read more on how to use it.
The geographic app is based on django-loci and allows to define the geographic coordinates of the devices, as well as their indoor coordinates on floorplan images.
It also adds different endpoints to the REST API.
This app allows to automatically provision subnets and IP addresses which will be available as system defined configuration variables that can be used in templates. The purpose of this app is to allow users to automatically provision and configure specific subnets and IP addresses to the devices without the need of manual intervention.
Refer to "How to configure automatic provisioning of subnets and IPs" section of this documentation to learn about features provided by this app.
This app is optional, if you don't need it you can avoid adding it to
settings.INSTALLED_APPS.
See:
- Python >= 3.7
- OpenSSL
Install from pypi:
pip install openwisp-controllerInstall tarball:
pip install https://github.com/openwisp/openwisp-controller/tarball/masterAlternatively you can install via pip using git:
pip install -e git+git://github.com/openwisp/openwisp-controller#egg=openwisp_controllerIf you want to contribute, follow the instructions in Installing for development.
Install the system dependencies:
sudo apt update
sudo apt install -y sqlite3 libsqlite3-dev openssl libssl-dev
sudo apt install -y gdal-bin libproj-dev libgeos-dev libspatialite-dev libsqlite3-mod-spatialite
sudo apt install -y chromium
Fork and clone the forked repository:
git clone git://github.com/<your_fork>/openwisp-controllerNavigate into the cloned repository:
cd openwisp-controller/Launch Redis and PostgreSQL:
docker-compose up -d redis postgresSetup and activate a virtual-environment. (we'll be using virtualenv)
python -m virtualenv env
source env/bin/activate
Make sure that you are using pip version 20.2.4 before moving to the next step:
pip install -U pip wheel setuptoolsInstall development dependencies:
pip install -e .
pip install -r requirements-test.txt
npm install -g jshint stylelint
Install WebDriver for Chromium for your browser version from https://chromedriver.chromium.org/home
and Extract chromedriver to one of directories from your $PATH (example: ~/.local/bin/).
Create database:
cd tests/
./manage.py migrate
./manage.py createsuperuser
Launch celery worker (for background jobs):
celery -A openwisp2 worker -l infoLaunch development server:
./manage.py runserver 0.0.0.0:8000You can access the admin interface at http://127.0.0.1:8000/admin/.
Run tests with:
./runtests.py --parallel
# To run database tests against PostgreSQL backend
POSTGRESQL=1 ./runtests.py --parallel
Run quality assurance tests with:
./run-qa-checksNOTE: This Docker image is for development purposes only. For the official OpenWISP Docker images, see: docker-openwisp.
Build from the Dockerfile:
docker-compose buildRun the docker container:
docker-compose upYou may encounter some issues while installing GeoDjango.
If you are getting below exception:
django.core.exceptions.ImproperlyConfigured: Unable to load the SpatiaLite library extension
then, You need to specify SPATIALITE_LIBRARY_PATH in your settings.py as explained in
django documentation regarding how to install and configure spatialte.
Please refer troubleshooting issues related to geospatial libraries.
Add openwisp_controller applications to INSTALLED_APPS:
INSTALLED_APPS = [
    ...
    # openwisp2 modules
    'openwisp_controller.config',
    'openwisp_controller.pki',
    'openwisp_controller.geo',
    'openwisp_controller.connection',
    'openwisp_controller.subnet_division', # Optional
    'openwisp_controller.notifications',
    'openwisp_users',
    'openwisp_notifications',
    'openwisp_ipam',
    # openwisp2 admin theme
    # (must be loaded here)
    'openwisp_utils.admin_theme',
    'admin_auto_filters',
    'django.contrib.admin',
    'django.forms',
    'import_export',
    ...
]
EXTENDED_APPS = ('django_x509', 'django_loci')Note: The order of applications in INSTALLED_APPS should be maintained,
otherwise it might not work properly.
Other settings needed in settings.py:
STATICFILES_FINDERS = [
    'django.contrib.staticfiles.finders.FileSystemFinder',
    'django.contrib.staticfiles.finders.AppDirectoriesFinder',
    'openwisp_utils.staticfiles.DependencyFinder',
]

ASGI_APPLICATION = 'openwisp_controller.geo.channels.routing.channel_routing'
CHANNEL_LAYERS = {
    # in production you should use another channel layer backend
    'default': {'BACKEND': 'channels.layers.InMemoryChannelLayer'},
}

TEMPLATES = [
    {
        'BACKEND': 'django.template.backends.django.DjangoTemplates',
        'DIRS': [],
        'OPTIONS': {
            'loaders': [
                'django.template.loaders.filesystem.Loader',
                'django.template.loaders.app_directories.Loader',
                'openwisp_utils.loaders.DependencyLoader',
            ],
            'context_processors': [
                'django.template.context_processors.debug',
                'django.template.context_processors.request',
                'django.contrib.auth.context_processors.auth',
                'django.contrib.messages.context_processors.messages',
                'openwisp_utils.admin_theme.context_processor.menu_items',
                'openwisp_notifications.context_processors.notification_api_settings',
            ],
        },
    }
]

FORM_RENDERER = 'django.forms.renderers.TemplatesSetting'
Add the URLs to your main urls.py:
urlpatterns = [
    # ... other urls in your project ...
    # openwisp-controller urls
    url(r'^admin/', admin.site.urls),
    url(r'', include('openwisp_controller.urls')),
]
Configure caching (you may use a different cache storage if you want):
CACHES = {
    'default': {
        'BACKEND': 'django_redis.cache.RedisCache',
        'LOCATION': 'redis://localhost/0',
        'OPTIONS': {
            'CLIENT_CLASS': 'django_redis.client.DefaultClient',
        }
    }
}

SESSION_ENGINE = 'django.contrib.sessions.backends.cache'
SESSION_CACHE_ALIAS = 'default'
Configure celery (you may use a different broker if you want):
# here we show how to configure celery with redis but you can
# use other brokers if you want, consult the celery docs
CELERY_BROKER_URL = 'redis://localhost/1'

INSTALLED_APPS.append('djcelery_email')
EMAIL_BACKEND = 'djcelery_email.backends.CeleryEmailBackend'
If you decide to use redis (as shown in these examples), install the required python packages:
pip install redis django-redis
Then run:
./manage.py migrateWhen templates are flagged as default, they will be automatically assigned to new devices.
If there are multiple default templates, these are assigned to the device in alphabetical order based on their names, for example, given the following default templates:
- Access
- Interfaces
- SSH Keys
They will be assigned to devices in exactly that order.
If for some technical reason (eg: one default template depends on the presence of another default template which must be assigned earlier) you need to change the ordering, you can simply rename the templates by prefixing them with numbers, eg:
- 1 Interfaces
- SSH Keys
- Access
Required templates are similar to Default templates but cannot be unassigned from a device configuration, they can only be overridden.
They will be always assigned earlier than default templates, so they can be overridden if needed.
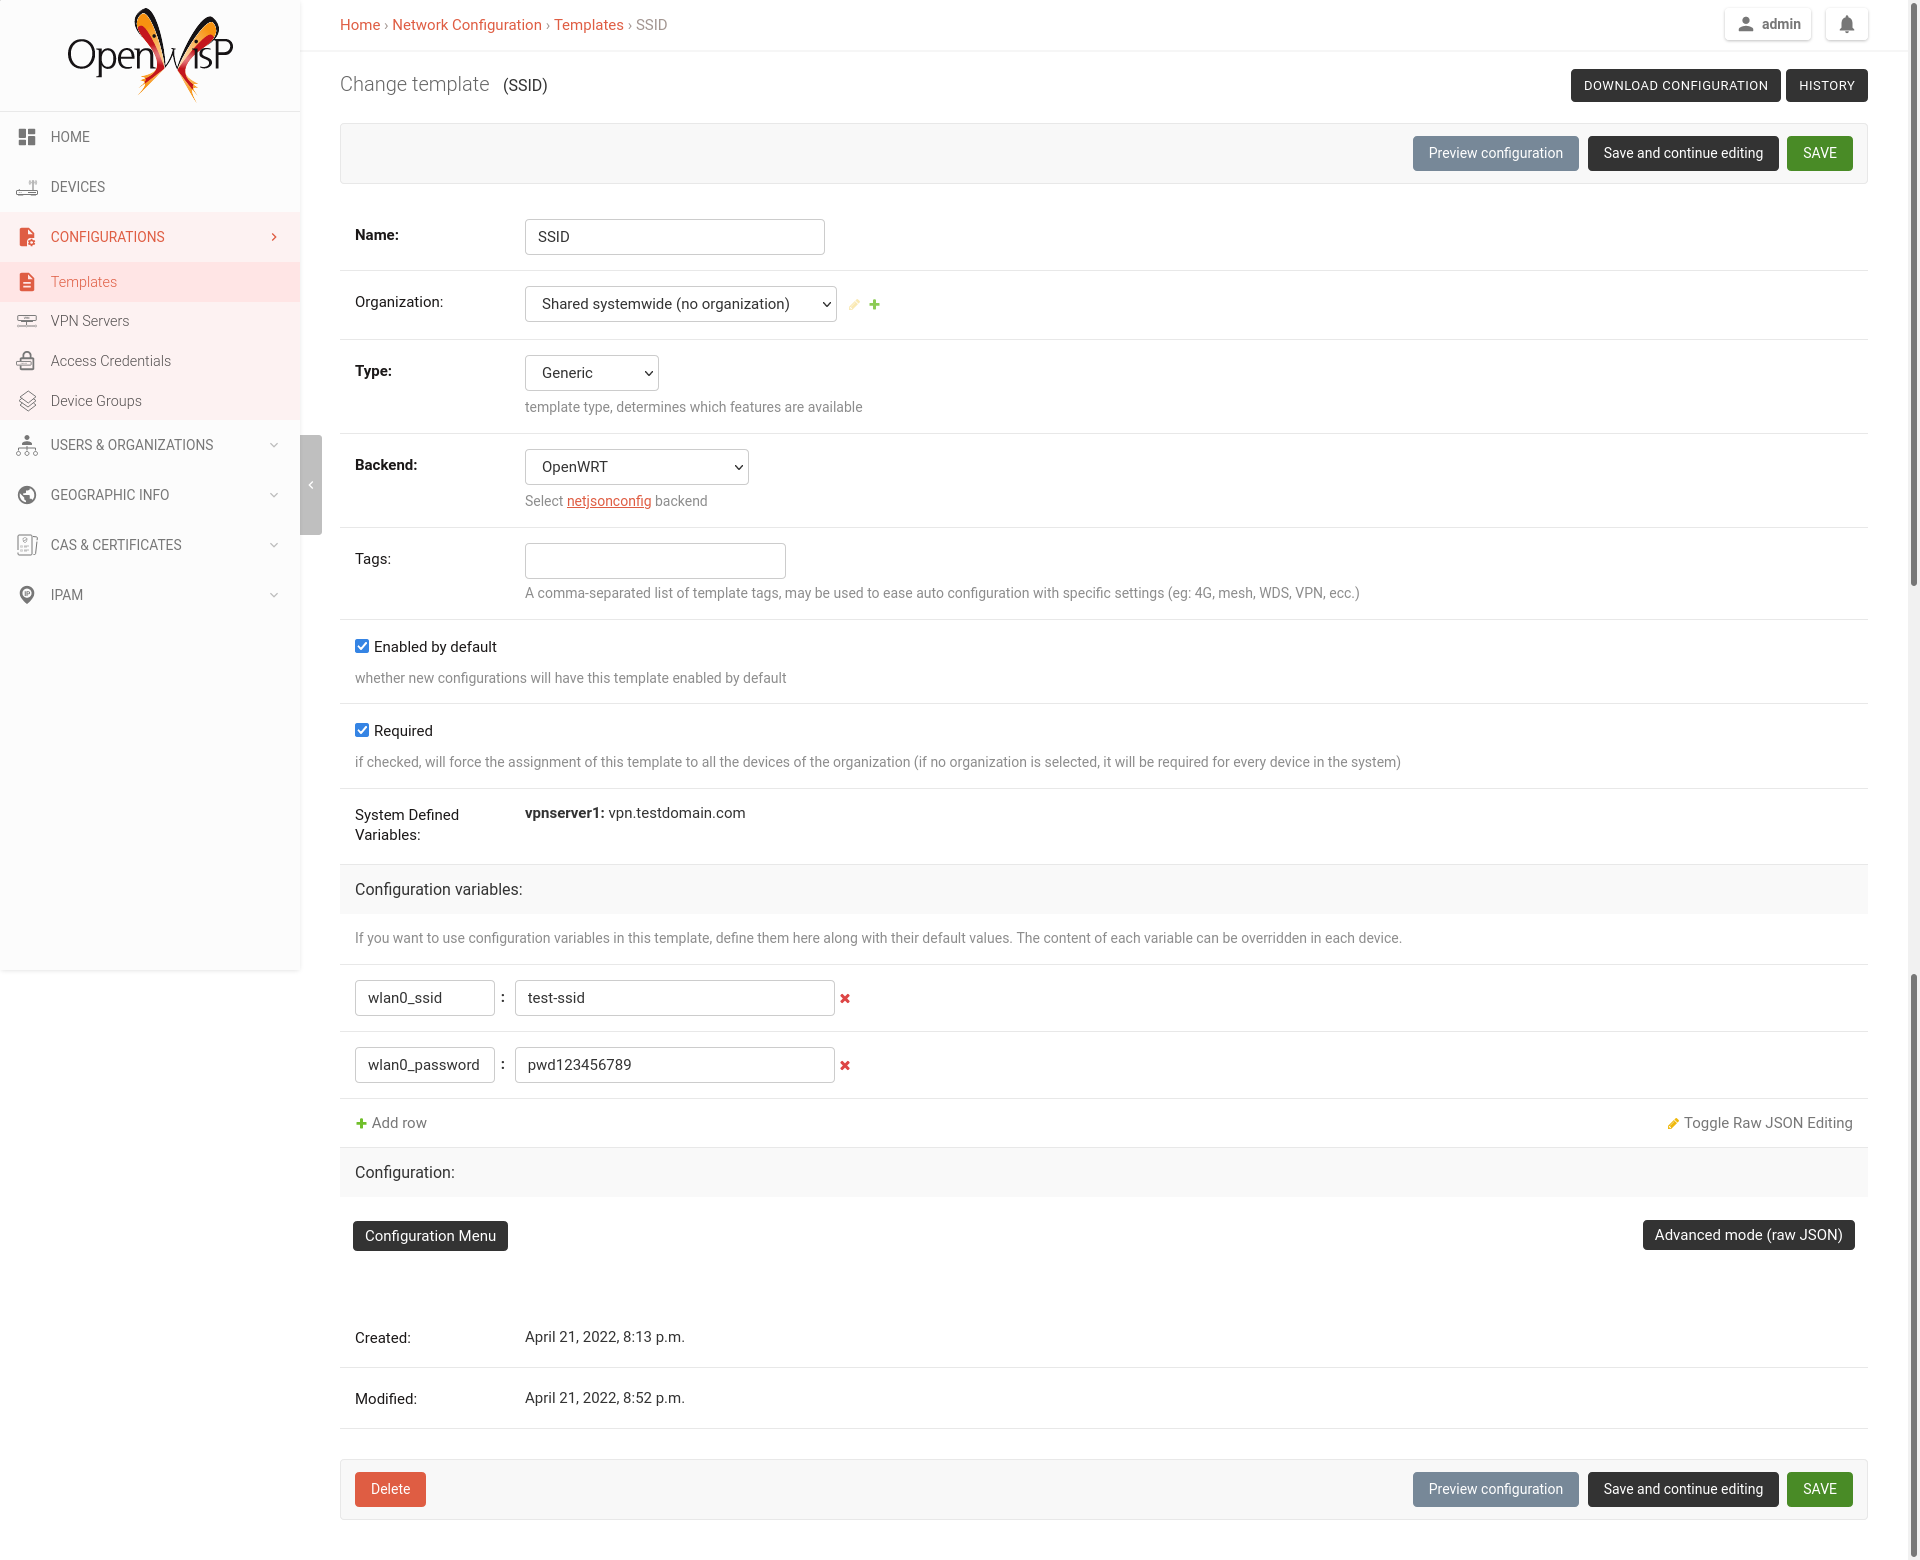
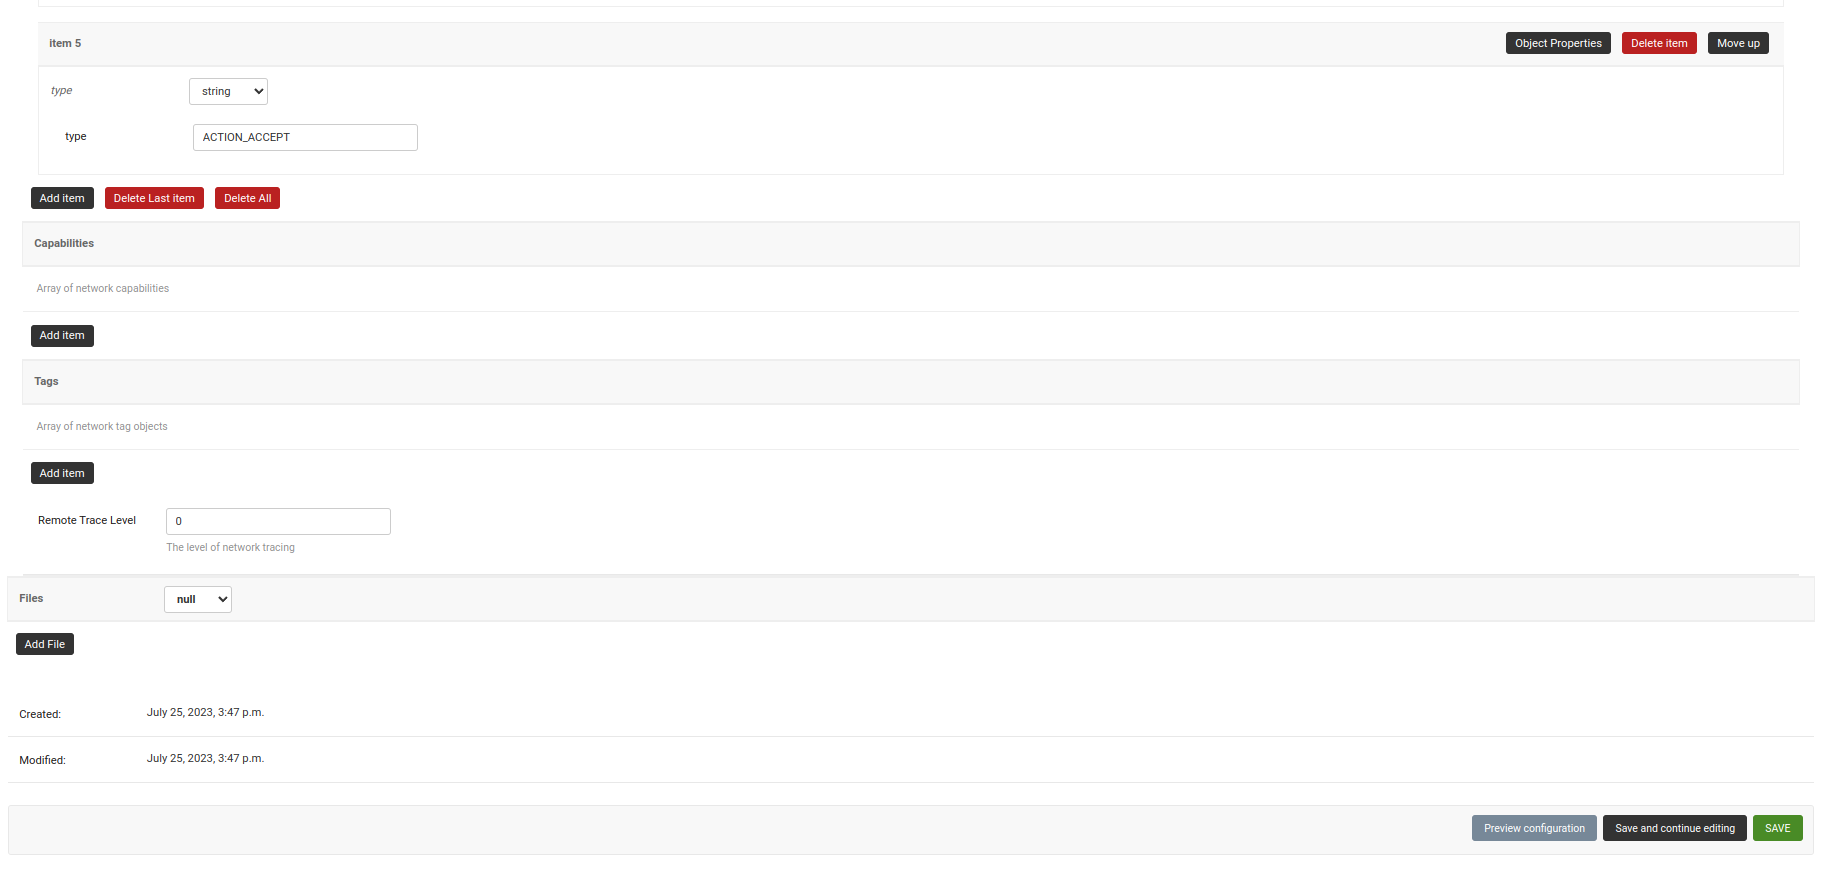
In the example above, the "SSID" template is flagged as "(required)" and its checkbox is always checked and disabled.
Sometimes the configuration is not exactly equal on all the devices, some parameters are unique to each device or need to be changed by the user.
In these cases it is possible to use configuration variables in conjunction with templates, this feature is also known as configuration context, think of it like a dictionary which is passed to the function which renders the configuration, so that it can fill variables according to the passed context.
The different ways in which variables are defined are described below in the order (high to low) of their precedence:
- User defined device variables
- Predefined device variables
- Group variables
- Organization variables
- Global variables
- Template default values
In the device configuration section you can find a section named "Configuration variables" where it is possible to define the configuration variables and their values, as shown in the example below:
Each device gets the following attributes passed as configuration variables:
idkeynamemac_address
Variables can also be defined in Device groups.
Refer the Group configuration variables section for detailed information.
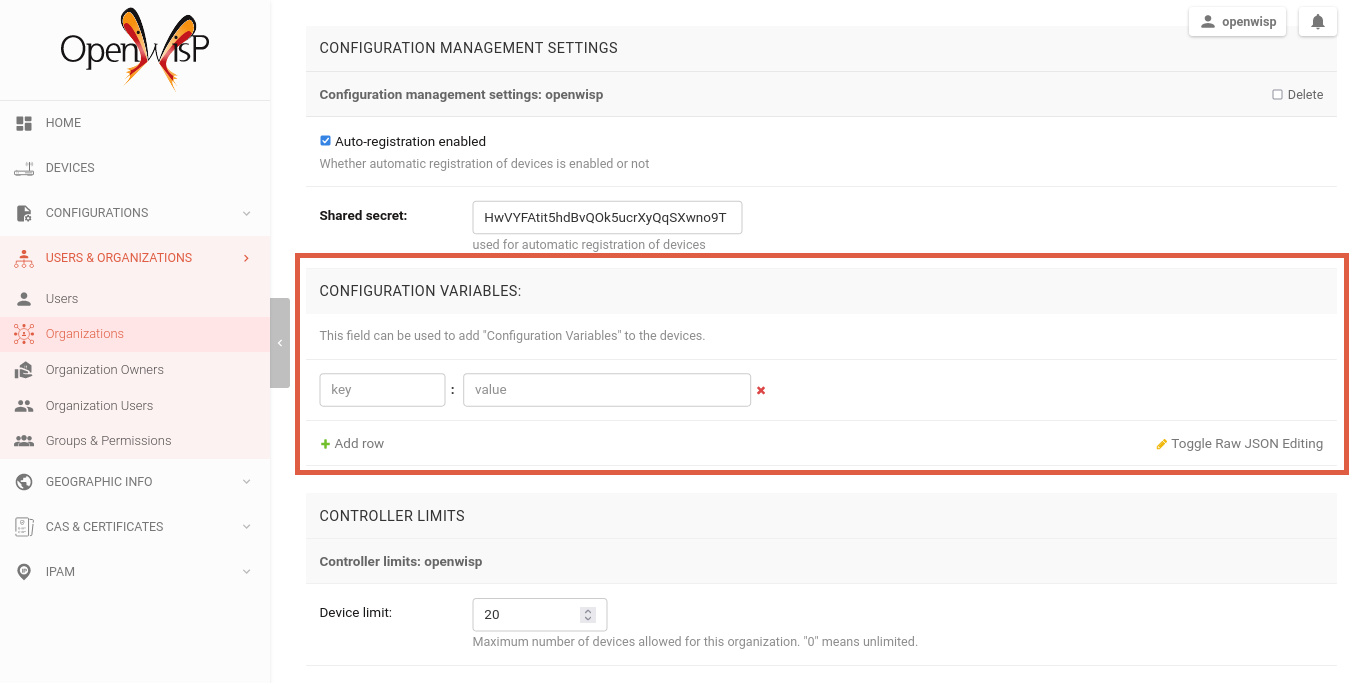
Variables can also be defined at the organization level.
You can set the organization variables from the organization change page
/admin/openwisp_users/organization/<organization-id>/change/, under the
Configuration Management Settings.
Variables can also be defined globally using the OPENWISP_CONTROLLER_CONTEXT setting.
It's possible to specify the default values of variables defined in a template.
This allows to achieve 2 goals:
- pass schema validation without errors (otherwise it would not be possible to save the template in the first place)
- provide good default values that are valid in most cases but can be overridden in the device if needed
These default values will be overridden by the User defined device variables.
The default values of variables can be manipulated from the section "configuration variables" in the edit template page:
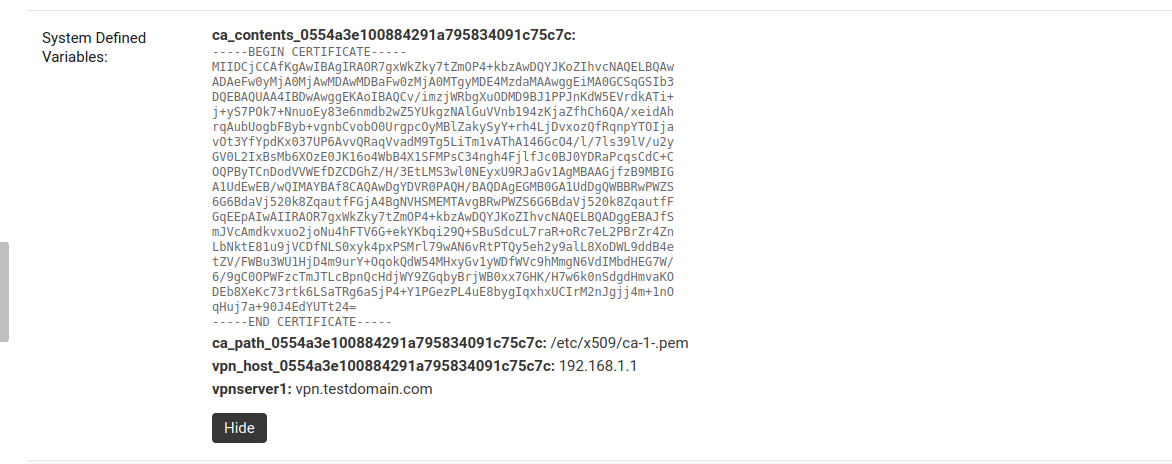
Predefined device variables, global variables and other variables that are automatically managed by the system (eg: when using templates of type VPN-client) are displayed in the admin UI as System Defined Variables in read-only mode.
Note: Group configuration variables are also added to the System Defined Variables of the device.
Here's a typical use case, the WiFi SSID and WiFi password. You don't want to define this for every device, but you may want to allow operators to easily change the SSID or WiFi password for a specific device without having to re-define the whole wifi interface to avoid duplicating information.
This would be the template:
{
    "interfaces": [
        {
            "type": "wireless",
            "name": "wlan0",
            "wireless": {
                "mode": "access_point",
                "radio": "radio0",
                "ssid": "{{wlan0_ssid}}",
                "encryption": {
                    "protocol": "wpa2_personal",
                    "key": "{{wlan0_password}}",
                    "cipher": "auto"
                }
            }
        }
    ]
}
These would be the default values in the template:
{
    "wlan0_ssid": "SnakeOil PublicWiFi",
    "wlan0_password": "Snakeoil_pwd!321654"
}
The default values can then be overridden at device level if needed, eg:
{
    "wlan0_ssid": "Room 23 ACME Hotel",
    "wlan0_password": "room_23pwd!321654"
}Follow the procedure described below to enable secure SSH access from OpenWISP to your devices, this is required to enable push updates (whenever the configuration is changed, OpenWISP will trigger the update in the background) and/or firmware upgrades (via the additional module openwisp-firmware-upgrader).
Note: If you have installed OpenWISP with openwisp2 Ansbile role
then you can skip the following steps. The Ansible role automatically creates a
default template to update authorized_keys on networking devices using the
default access credentials.
First of all, we need to generate the SSH key which will be used by OpenWISP to access the devices, to do so, you can use the following command:
echo './sshkey' | ssh-keygen -t ed25519 -C "openwisp"This will create two files in the current directory, one called sshkey (the private key) and one called
sshkey.pub (the public key).
Store the content of these files in a secure location.
Note: Support for ED25519 was added in OpenWrt 21.02 (requires Dropbear > 2020.79). If you are managing devices with OpenWrt < 21, then you will need to use RSA keys:
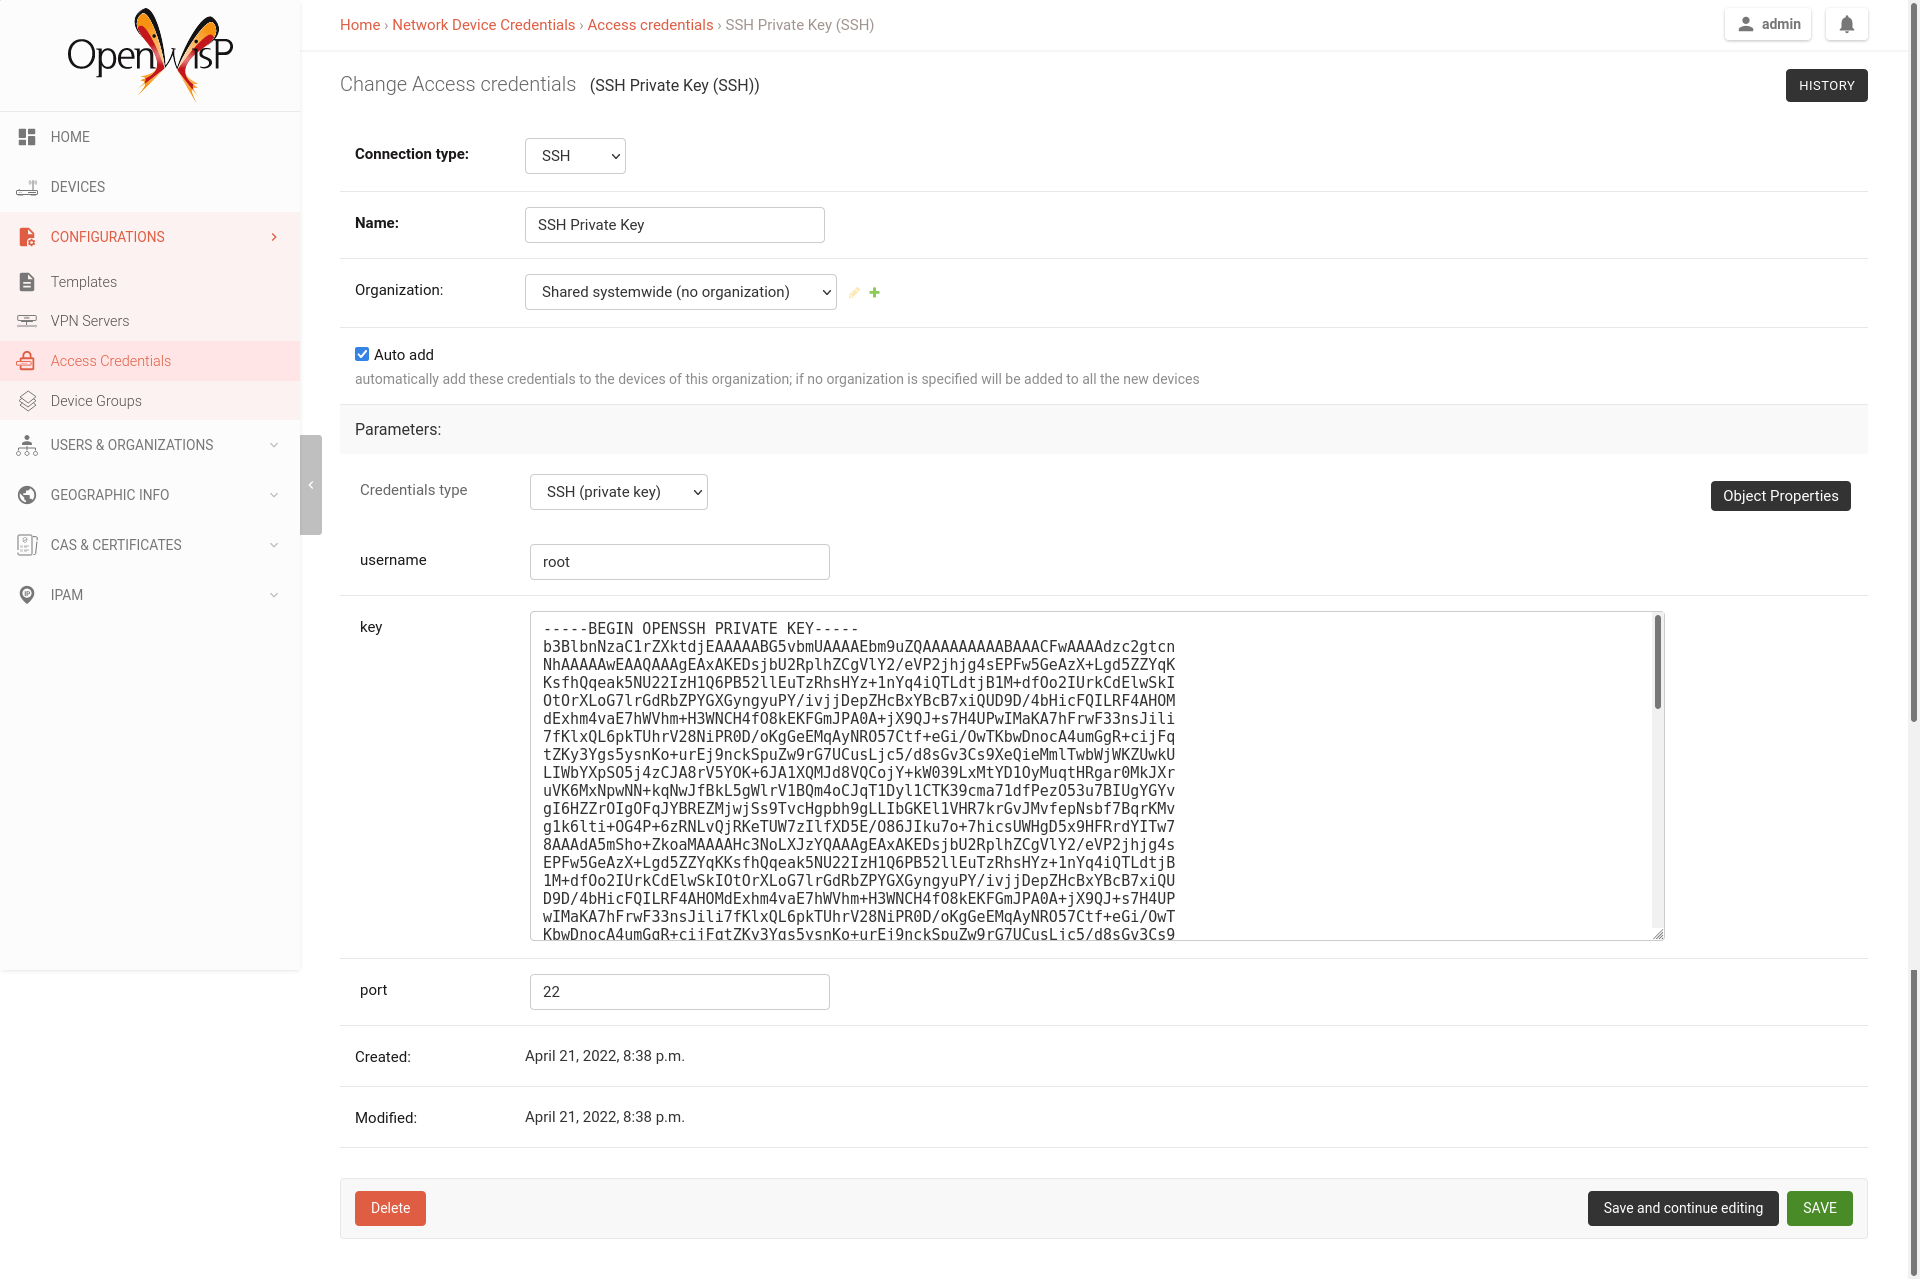
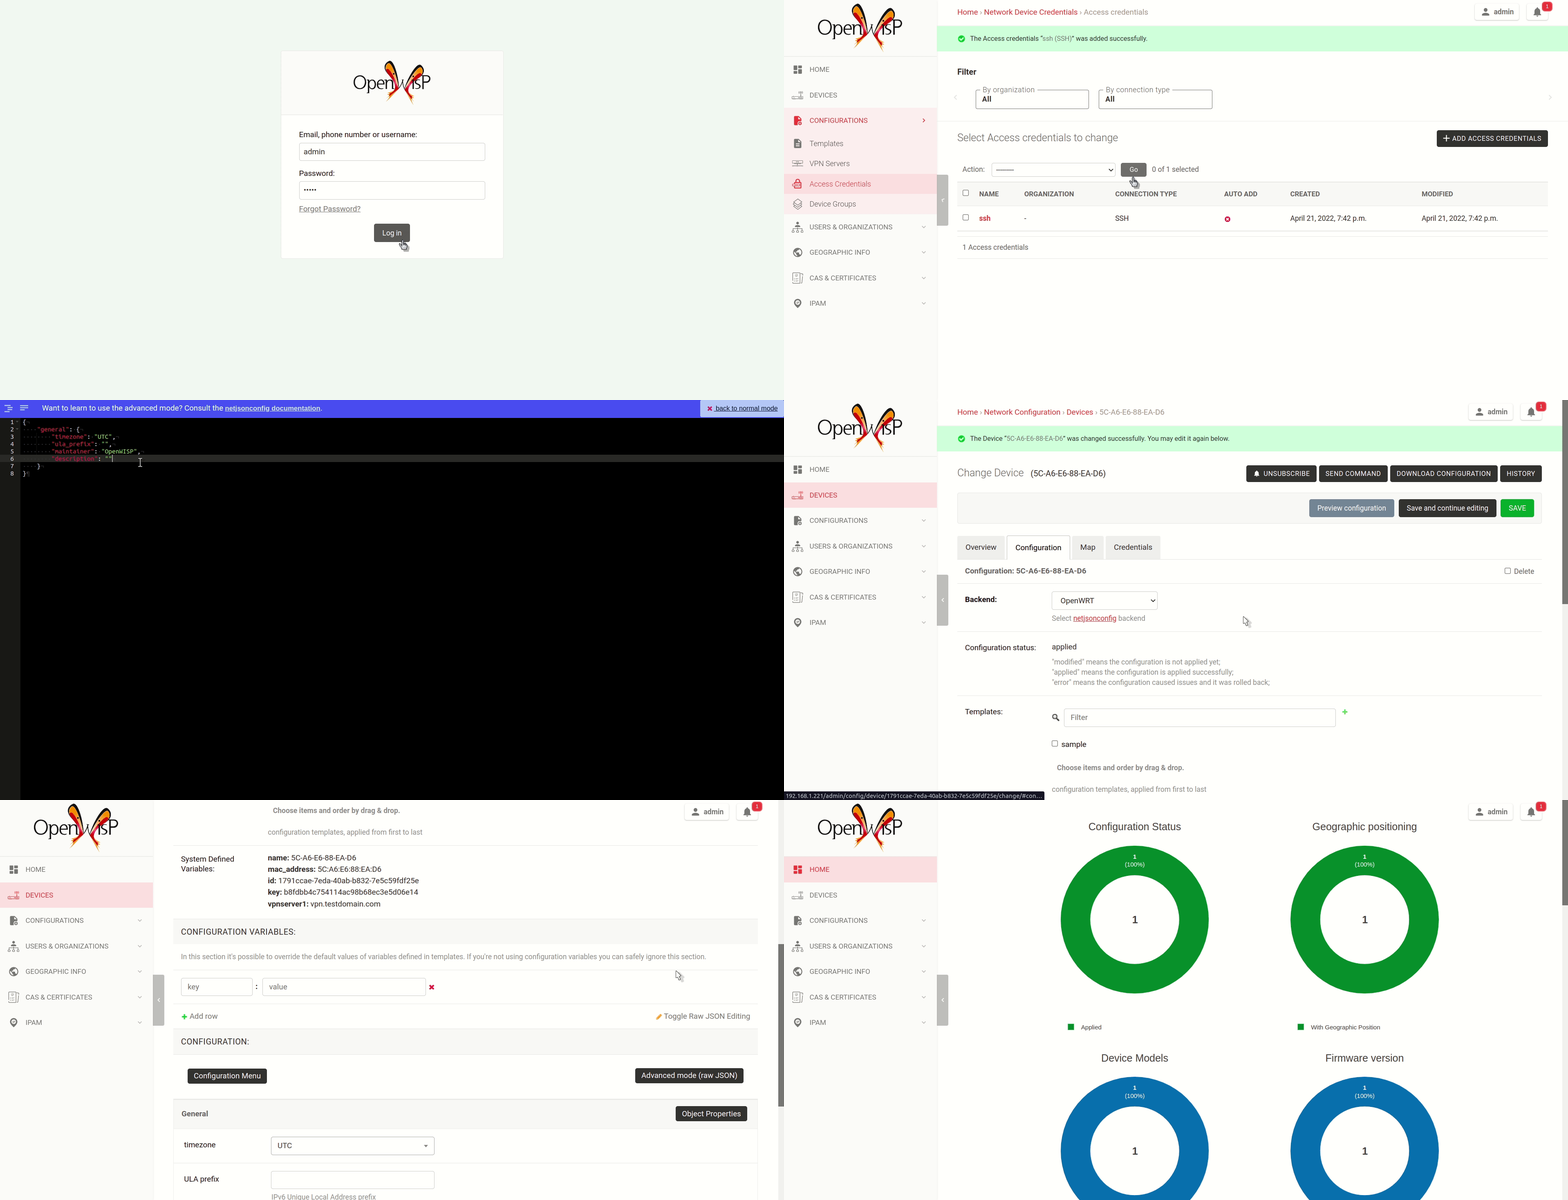
echo './sshkey' | ssh-keygen -t rsa -b 4096 -C "openwisp"From the first page of OpenWISP click on "Access credentials", then click
on the "ADD ACCESS CREDENTIALS" button in the upper right corner
(alternatively, go to the following URL: /admin/connection/credentials/add/).
Select SSH as type, enable the Auto add checkbox, then at the field
"Credentials type" select "SSH (private key)", now type "root" in the username field,
while in the key field you have to paste the contents of the private key just created.
Now hit save.
The credentials just created will be automatically enabled for all the devices in the system (both existing devices and devices which will be added in the future).
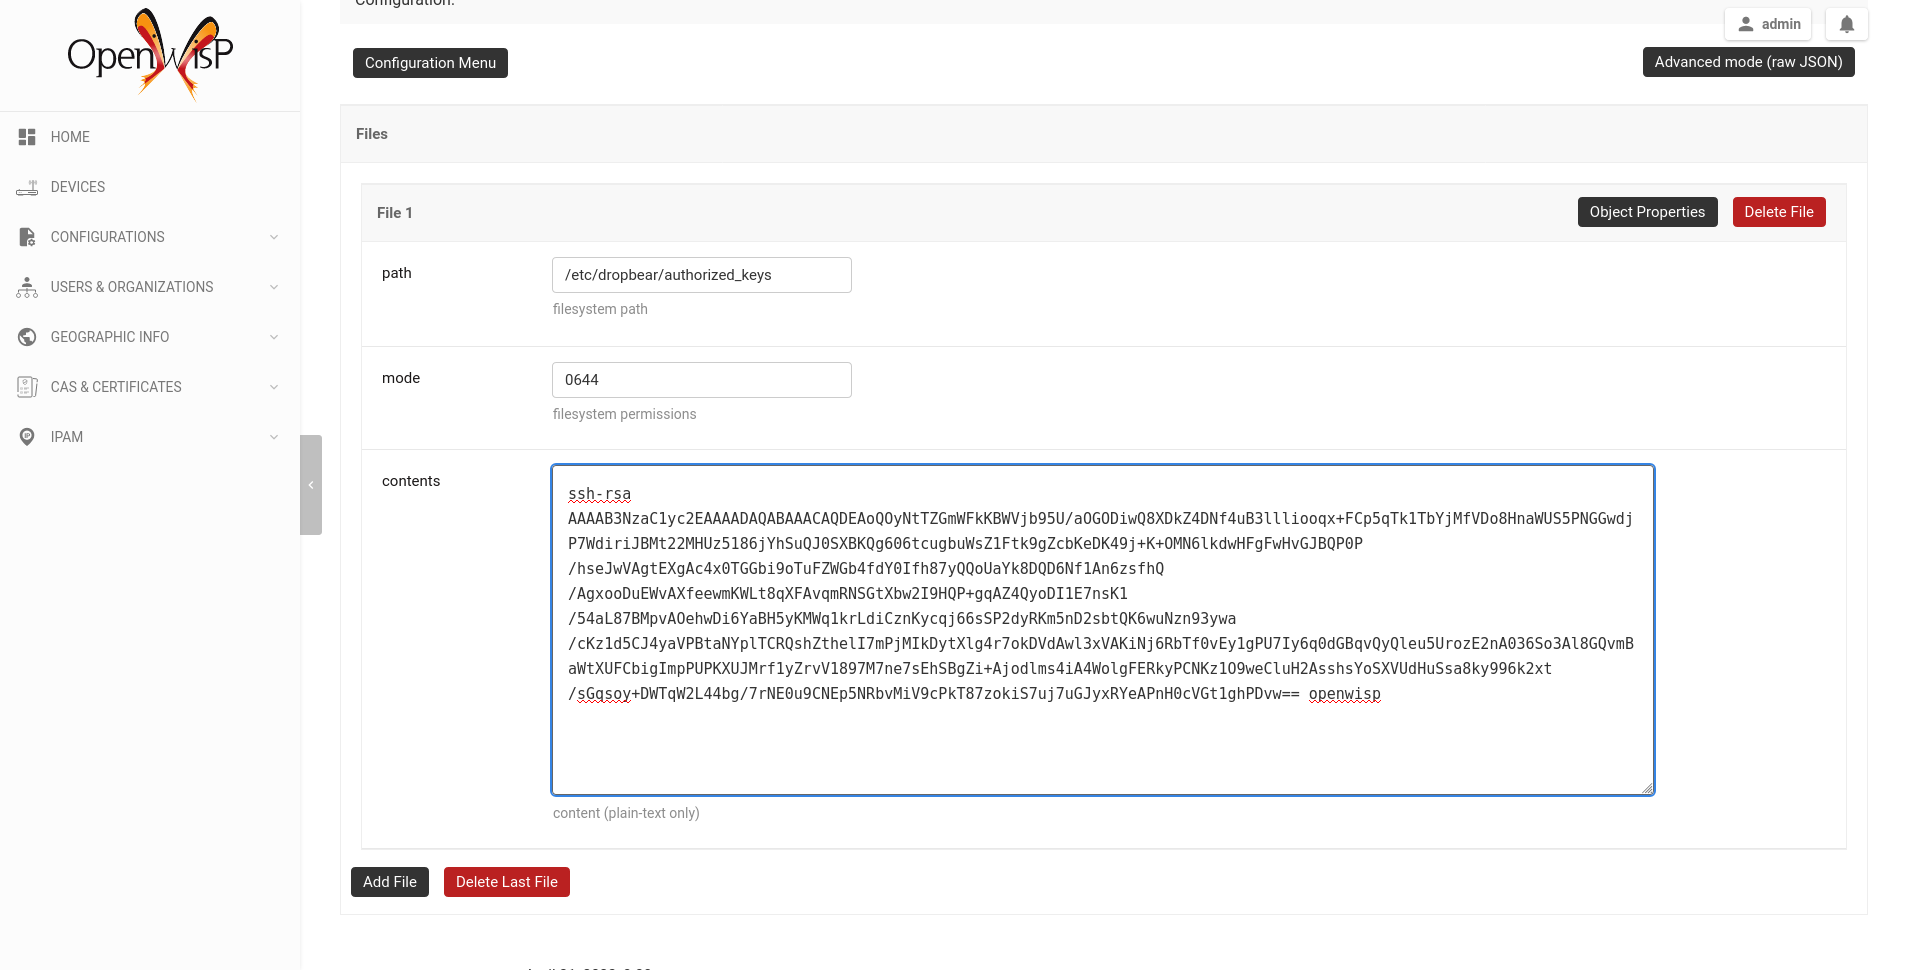
Now we need to instruct your devices to allow OpenWISP accessing via SSH,
in order to do this we need to add the contents of the public key file created in step 1
(sshkey.pub) in the file /etc/dropbear/authorized_keys on the devices, the
recommended way to do this is to create a configuration template in OpenWISP:
from the first page of OpenWISP, click on "Templates", then and click on the
"ADD TEMPLATE" button in the upper right corner (alternatively, go to the following URL:
/admin/config/template/add/).
Check enabled by default, then scroll down the configuration section,
click on "Configuration Menu", scroll down, click on "Files" then close the menu
by clicking again on "Configuration Menu". Now type /etc/dropbear/authorized_keys
in the path field of the file, then paste the contents of sshkey.pub in contents.
Now hit save.
There's a catch: you will need to assign the template to any existing device.
Once you have performed the 3 steps above, you can test it as follows:
- Ensure there's at least one device turned on and connected to OpenWISP, ensure this device has the "SSH Authorized Keys" assigned to it.
- Ensure the celery worker of OpenWISP Controller is running (eg:
ps aux | grep celery) - SSH into the device and wait (maximum 2 minutes) until
/etc/dropbear/authorized_keysappears as specified in the template. - While connected via SSH to the device run the following command in the console:
logread -f, now try changing the device name in OpenWISP - Shortly after you change the name in OpenWISP, you should see some output in the SSH console indicating another SSH access and the configuration update being performed.
By default, there are three options in the Send Command dropdown:
- Reboot
- Change Password
- Custom Command
While the first two options are self-explanatory, the custom command option allows you to execute any command on the device as shown in the example below.
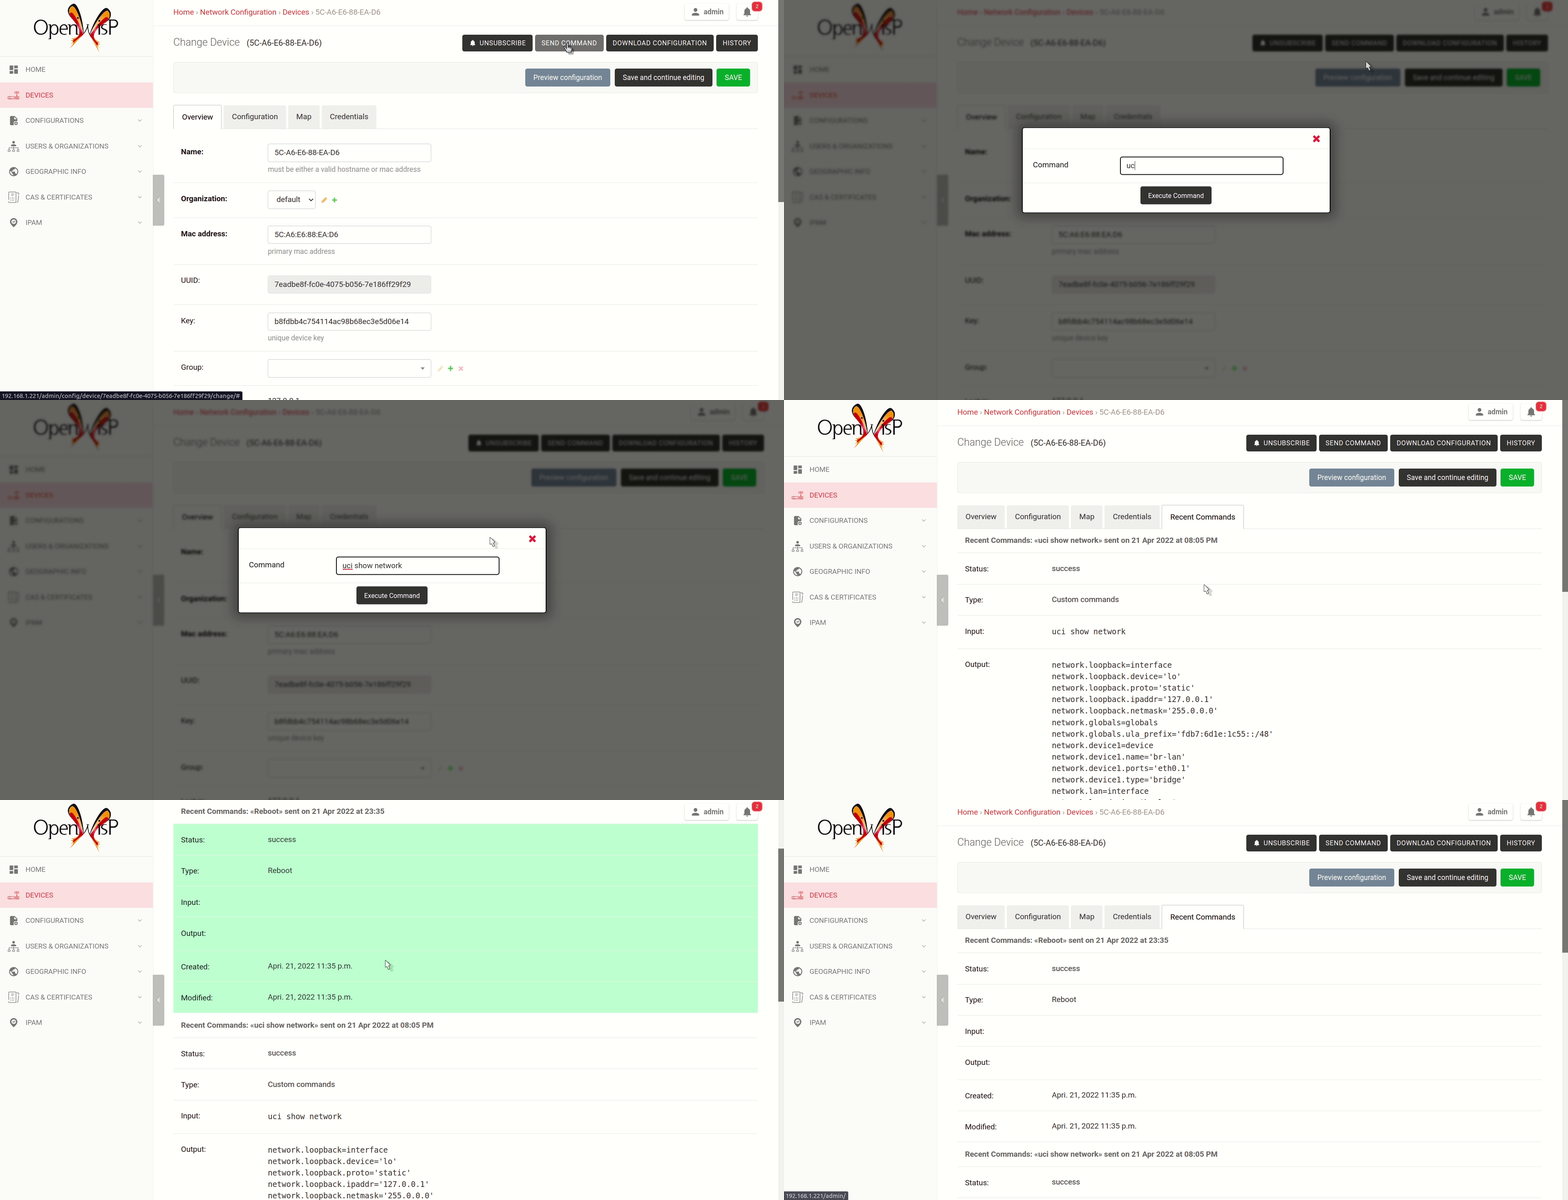
Note: in order for this feature to work, a device needs to have at least one Access Credential (see How to configure push updates).
The Send Command button will be hidden until the device has at least one Access Credential.
If you need to allow your users to quickly send specific commands that are used often in your network regardless of your users' knowledge of Linux shell commands, you can add new commands by following instructions in the "How to define new options in the commands menu" section below.
If you are an advanced user and want to register commands programatically, then refer to "Register / Unregistering commands" section.
Let's explore to define new custom commands to help users perform additional management actions without having to be Linux/Unix experts.
We can do so by using the OPENWISP_CONTROLLER_USER_COMMANDS django setting.
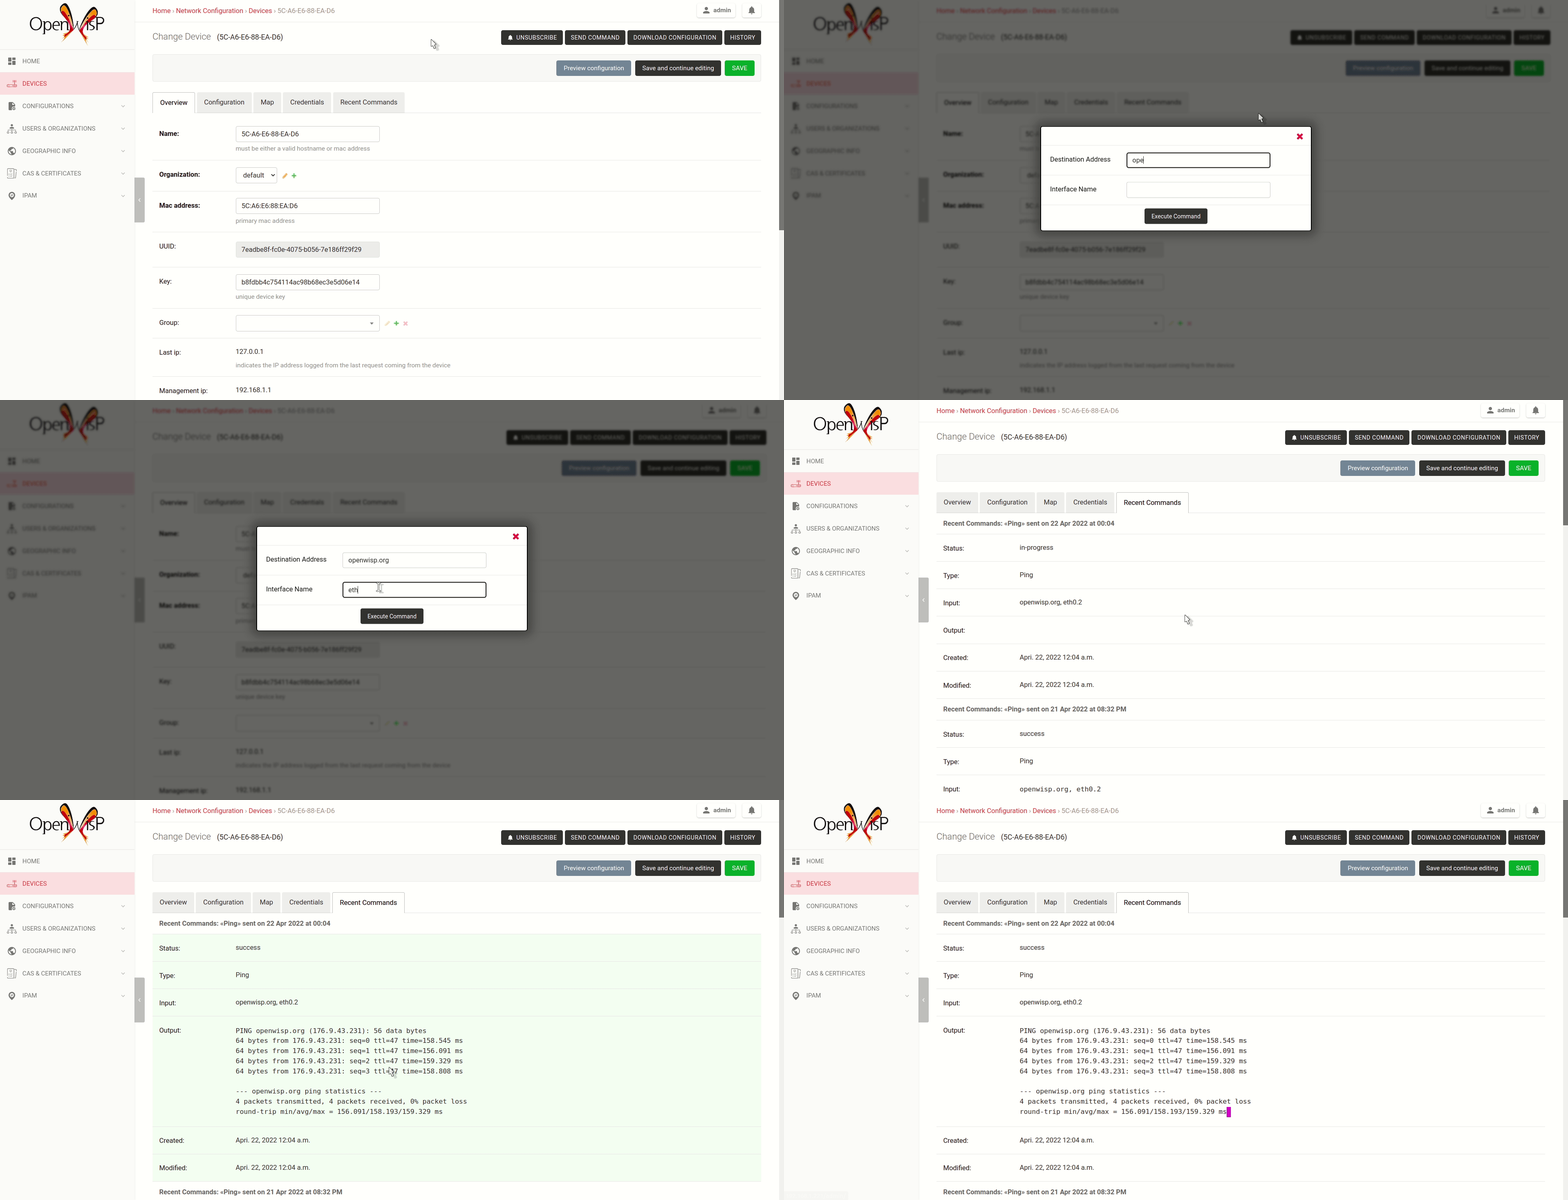
The following example defines a simple command that can ping an input
destination_address through a network interface, interface_name.
# In yourproject/settings.py

def ping_command_callable(destination_address, interface_name=None):
    command = f'ping -c 4 {destination_address}'
    if interface_name:
        command += f' -I {interface_name}'
    return command

OPENWISP_CONTROLLER_USER_COMMANDS = [
    (
        'ping',
        {
            'label': 'Ping',
            'schema': {
                'title': 'Ping',
                'type': 'object',
                'required': ['destination_address'],
                'properties': {
                    'destination_address': {
                        'type': 'string',
                        'title': 'Destination Address',
                    },
                    'interface_name': {
                        'type': 'string',
                        'title': 'Interface Name',
                    },
                },
                'message': 'Destination Address cannot be empty',
                'additionalProperties': False,
            },
            'callable': ping_command_callable,
        }
    )
]
The above code will add the "Ping" command in the user interface as show in the GIF below:
The OPENWISP_CONTROLLER_USER_COMMANDS setting takes a list of tuple
each containing two elements. The first element of the tuple should contain an
identifier for the command and the second element should contain a dict
defining configuration of the command.
The dict defining configuration for command should contain following keys:
A str defining label for the command used internally by Django.
A dict defining JSONSchema for inputs of command.
You can specify the inputs for your command, add rules for performing validation
and make inputs required or optional.
Here is a detailed explanation of the schema used in above example:
{
    # Name of the command displayed in "Send Command" widget
    'title': 'Ping',
    # Use type "object" if the command needs to accept inputs
    # Use type "null" if the command does not accepts any input
    'type': 'object',
    # Specify list of inputs that are required
    'required': ['destination_address'],
    # Define the inputs for the commands along with their properties
    'properties': {
        'destination_address': {
            # type of the input value
            'type': 'string',
            # label used for displaying this input field
            'title': 'Destination Address',
        },
        'interface_name': {
            'type': 'string',
            'title': 'Interface Name',
        },
    },
    # Error message to be shown if validation fails
    'message': 'Destination Address cannot be empty'),
    # Whether specifying addtionaly inputs is allowed from the input form
    'additionalProperties': False,
}
This example uses only handful of properties available in JSONSchema. You can experiment with other properties of JSONSchema for schema of your command.
A callable or str defining dotted path to a callable. It should return
the command (str) to be executed on the device. Inputs of the command are
passed as arguments to this callable.
The example above includes a callable(ping_command_callable) for
ping command.
OpenWISP Controller provides registering and unregistering commands
through utility functions openwisp_controller.connection.commands.register_command
and openwisp_notifications.types.unregister_notification_type.
You can use these functions to register or unregister commands
from your code.
Note: These functions are to be used as an alternative to the "OPENWISP_CONTROLLER_USER_COMMANDS" when developing custom modules based on openwisp-controller or when developing custom third party apps.
| Parameter | Description |
command_name |
A str defining identifier for the command. |
command_config |
A dict defining configuration of the command
as shown in "Command Configuration". |
Note: It will raise ImproperlyConfigured exception if a command is already
registered with the same name.
| Parameter | Description |
command_name |
A str defining name of the command. |
Note: It will raise ImproperlyConfigured exception if such command does not exists.
Device Groups provide features aimed at adding specific management rules for the devices of an organization:
- Group similar devices by having dedicated groups for access points, routers, etc.
- Define group metadata.
- Define group configuration templates.
- Define group configuration variables.
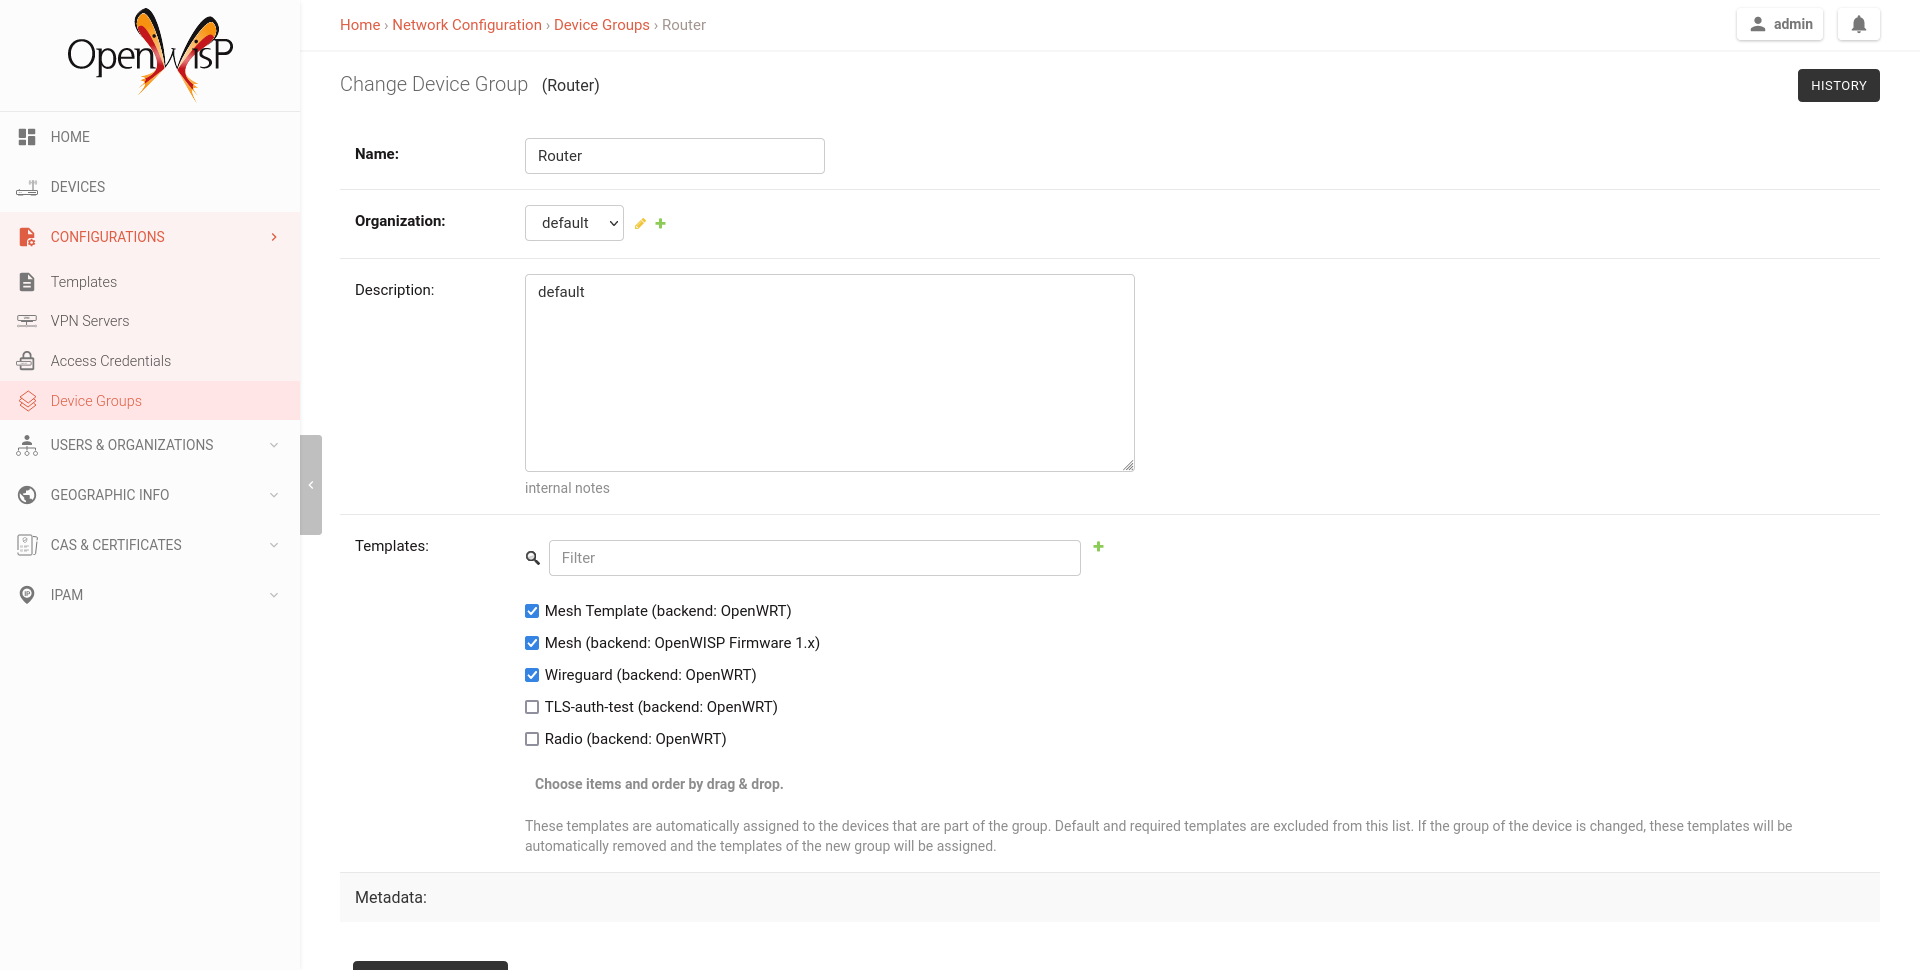
Groups allow to define templates which are automatically assigned to devices belonging to the group. When using this feature, keep in mind the following important points:
- Templates of any configuration backend can be selected, when a device is assigned to a group, only the templates which matches the device configuration backend are applied to the device.
- The system will not force group templates onto devices, this means that users can remove the applied group templates from a specific device if needed.
- If a device group is changed, the system will automatically remove the group templates of the old group and apply the new templates of the new group (this operation is implemented by leveraging the group_templates_changed signal).
- If the group templates are changed, the devices which belong to the group will be automatically updated to reflect the changes (this operation is executed in a background task).
- In case the configuration backend of a device is changed, the system will handle this automatically too and update the group templates accordingly (this operation is implemented by leveraging the config_backend_changed signal).
- If a device does not have a configuration defined yet, but it is assigned to a group which has templates defined, the system will automatically create a configuration for it using the default backend specified in OPENWISP_CONTROLLER_DEFAULT_BACKEND setting.
Note: the list of templates shown in the edit group page do not contain templates flagged as "default" or "required" to avoid redundancy because those templates are automatically assigned by the system to new devices.
This feature works also when editing group templates or the group assigned to a device via the REST API.
Groups allow to define configuration variables which are automatically added to the device's context in the System Defined Variables. Check the "How to use configuration variables" section to learn about precedence of different configuration variables.
This feature works also when editing group templates or the group assigned to a device via the REST API.
Groups allow to store additional information regarding a group in the structured metadata field (which can be accessed via the REST API).
The metadata field allows custom structure and validation to standardize information across all groups using the "OPENWISP_CONTROLLER_DEVICE_GROUP_SCHEMA" setting.
Note: Group configuration variables and Group metadata serves different purposes. The group configuration variables should be used when the device configuration is required to be changed for particular group of devices. Group metadata should be used to store additional data for the devices. Group metadata is not used for configuration generation.
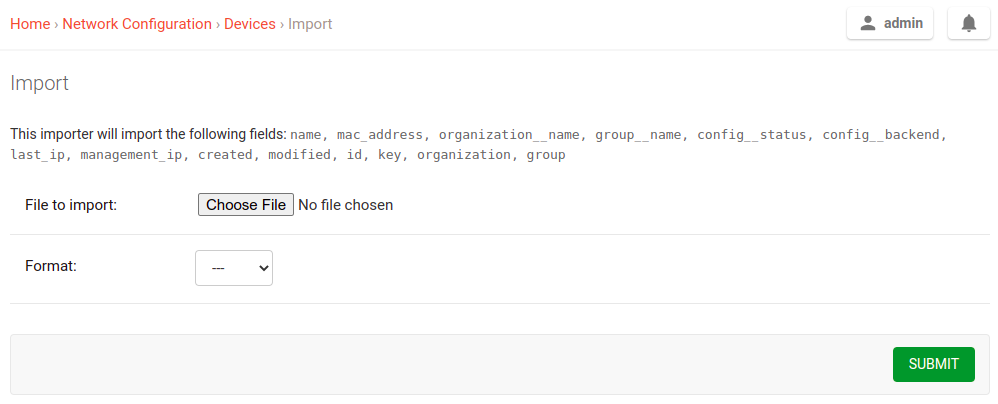
The device list page offers two buttons to export and import device data in different formats.
The export feature respects any filters selected in the device list.
For importing devices into the system, only the required fields are needed,
for example, the following CSV file will import a device named
TestImport with mac address 00:11:22:09:44:55 in the organization with
UUID 3cb5e18c-0312-48ab-8dbd-038b8415bd6f:
organization_id,name,mac_address
3cb5e18c-0312-48ab-8dbd-038b8415bd6f,TestImport,00:11:22:09:44:55
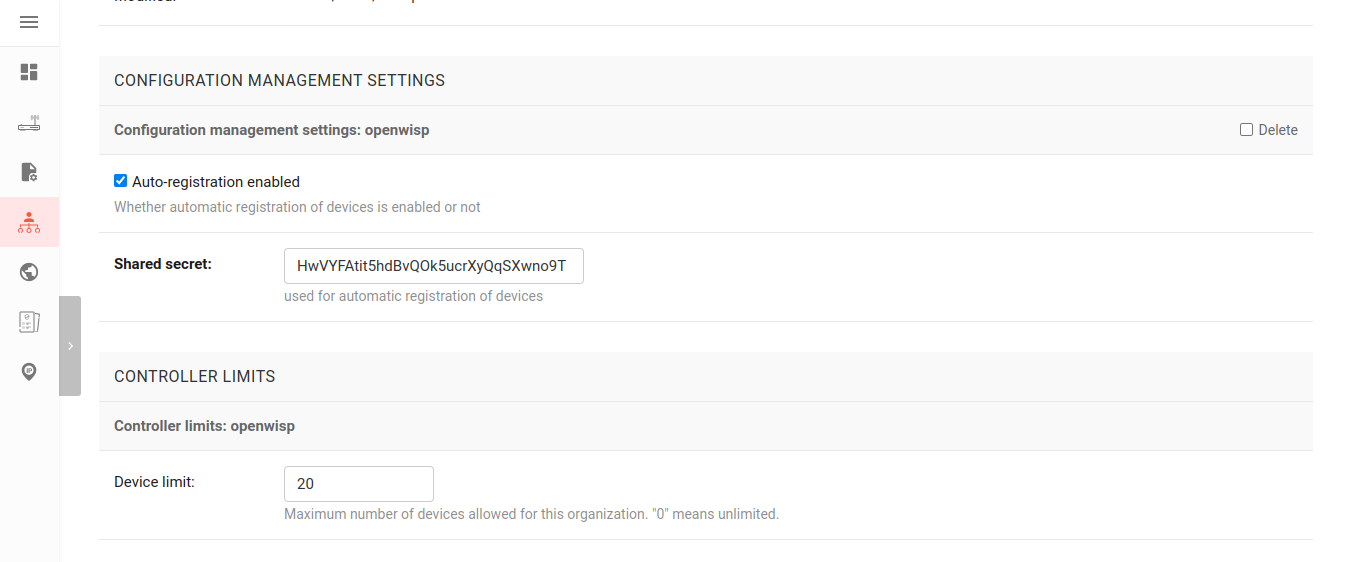
Allows configuring following limits for each organization:
- Limit number of devices managed by the organization.
You can change the limits from the organization's admin page:
Follow the procedure described below to setup WireGuard tunnels on your devices.
Note: This example uses Shared systemwide (no organization) option as the organization for VPN server and VPN client template. You can use any organization as long as VPN server, VPN client template and Device has same organization.
Visit
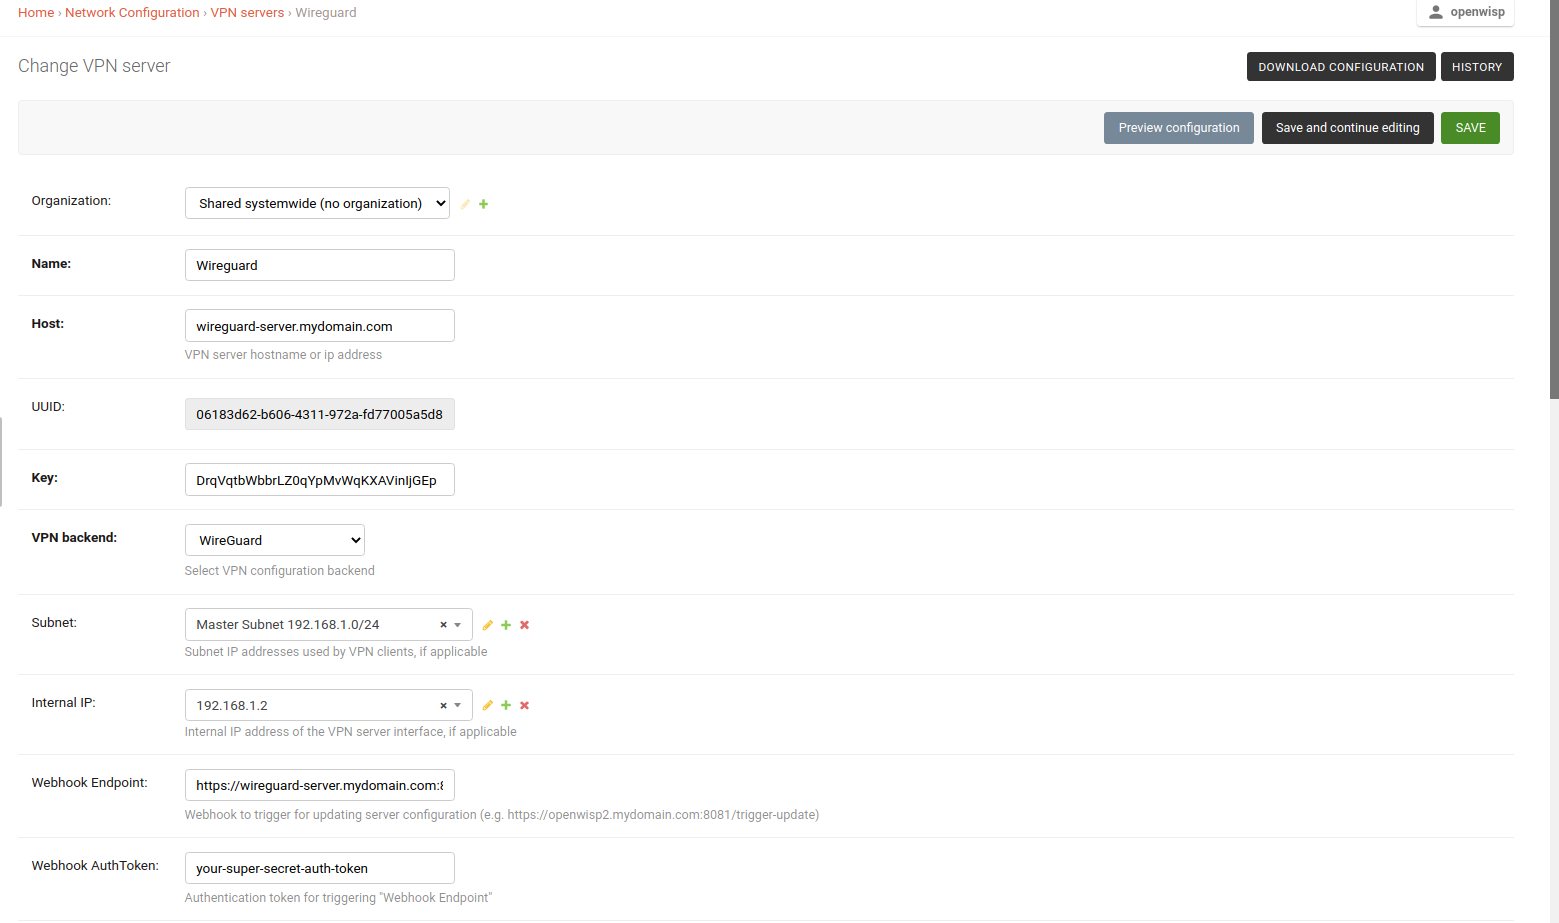
/admin/config/vpn/add/to add a new VPN server.We will set Name of this VPN server
Wireguardand Host aswireguard-server.mydomain.com(update this to point to your WireGuard VPN server).Select
WireGuardfrom the dropdown as VPN Backend.When using WireGuard, OpenWISP takes care of managing IP addresses (assigning an IP address to each VPN peer). You can create a new subnet or select an existing one from the dropdown menu. You can also assign an Internal IP to the WireGuard Server or leave it empty for OpenWISP to configure. This IP address will be used by the WireGuard interface on server.
We have set the Webhook Endpoint as
https://wireguard-server.mydomain.com:8081/trigger-updatefor this example. You will need to update this according to you VPN upgrader endpoint. Set Webhook AuthToken to any strong passphrase, this will be used to ensure that configuration upgrades are requested from trusted sources.Note: If you are following this tutorial for also setting up WireGuard VPN server, just substitute
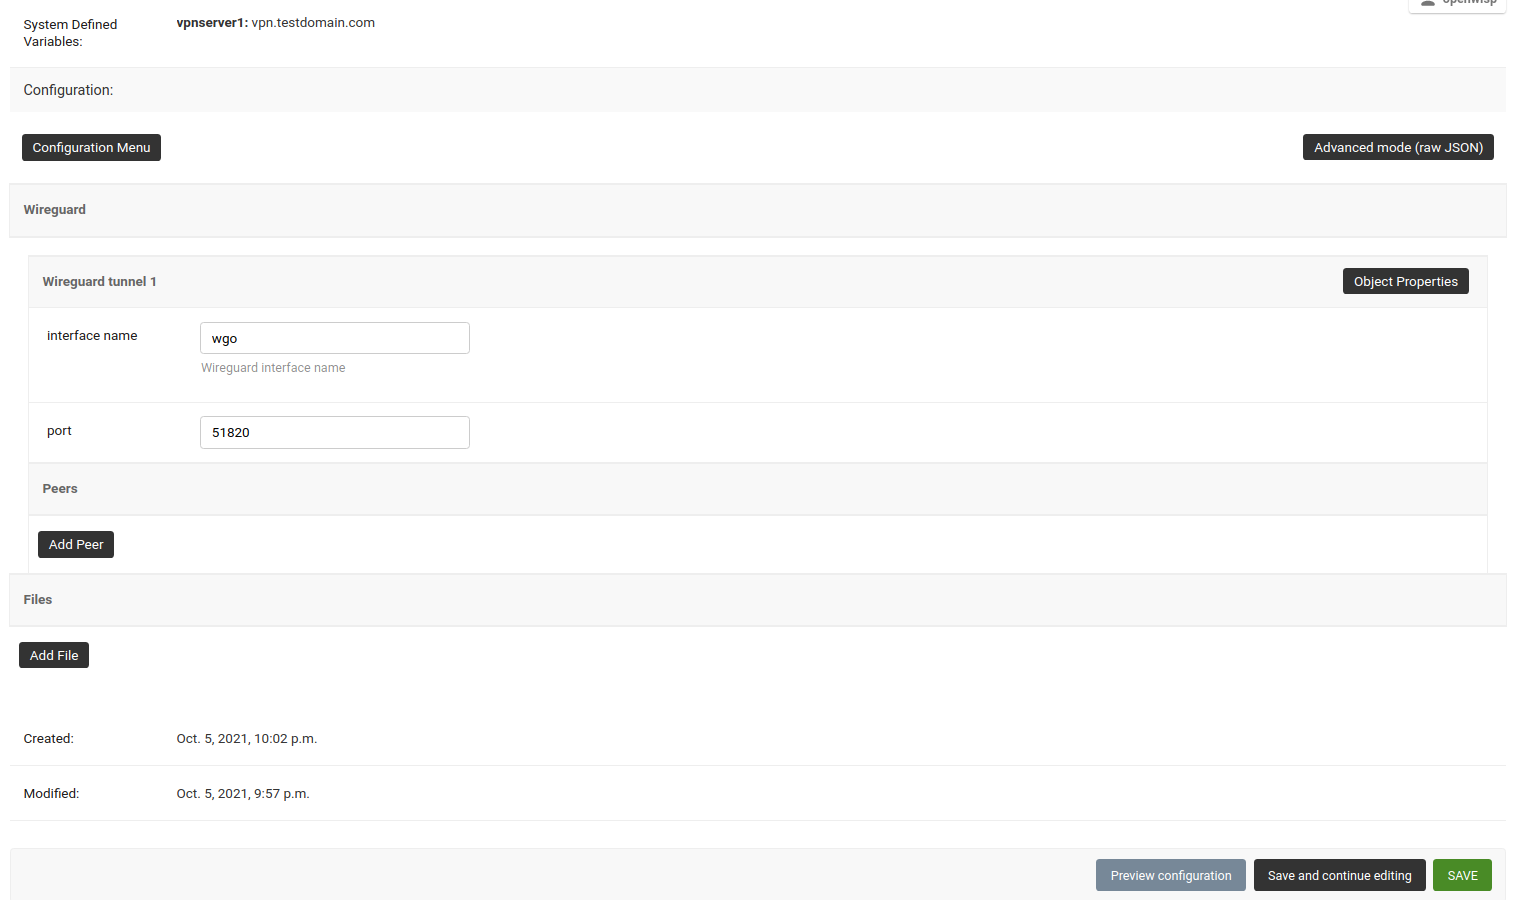
wireguard-server.mydomain.comwith hostname of your VPN server and follow the steps in next section.Under the configuration section, set the name of WireGuard tunnel 1 interface. We have used
wg0in this example.
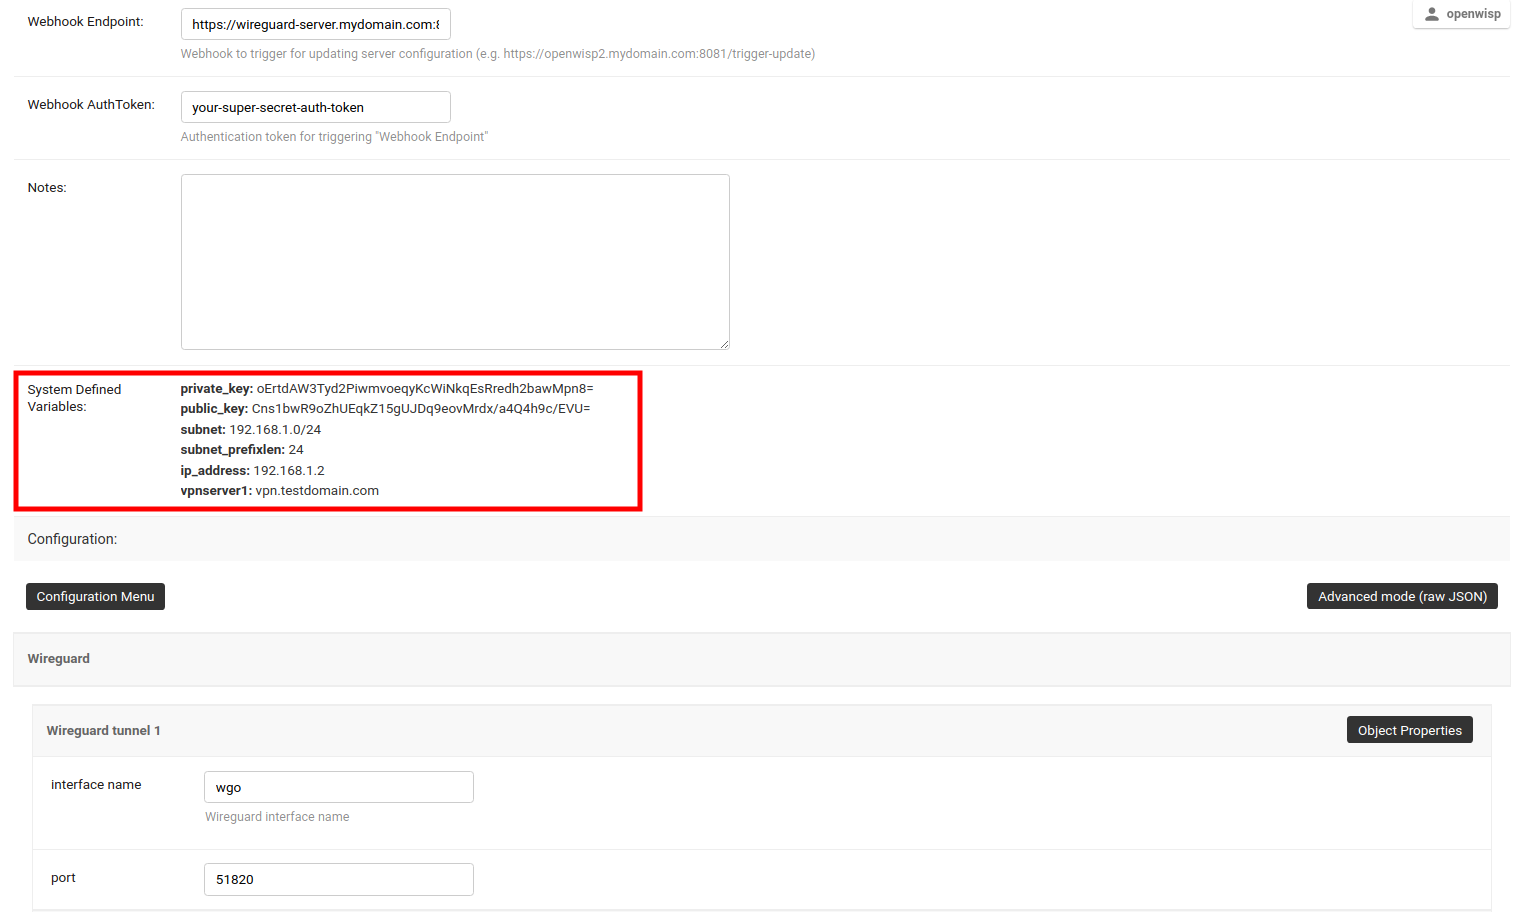
- After clicking on Save and continue editing, you will see that OpenWISP has automatically created public and private key for WireGuard server in System Defined Variables along with internal IP address information.
If you haven't already setup WireGuard on your VPN server, this will be a good time do so. We recommend using the ansible-wireguard-openwisp role for installing WireGuard since it also installs scripts that allows OpenWISP to manage WireGuard VPN server.
Pay attention to the VPN server attributes used in your playbook. It should be same as VPN server configuration in OpenWISP.
- Visit
/admin/config/template/add/to add a new template. - Set
Wireguard Clientas Name (you can set whatever you want) and selectVPN-clientas type from the dropdown list. - The Backend field refers to the backend of the device this template can
be applied to. For this example, we will leave it to
OpenWRT. - Select the correct VPN server from the dropdown for the VPN field. Here
it is
Wireguard. - Ensure that Automatic tunnel provisioning is checked. This will make OpenWISP to automatically generate public and private keys and provision IP address for each WireGuard VPN client.
- After clicking on Save and continue editing button, you will see details of Wireguard VPN server in System Defined Variables. The template configuration will be automatically generated which you can tweak accordingly. We will use the automatically generated VPN client configuration for this example.
Note: This step assumes that you already have a device registered on OpenWISP. Register or create a device before proceeding.
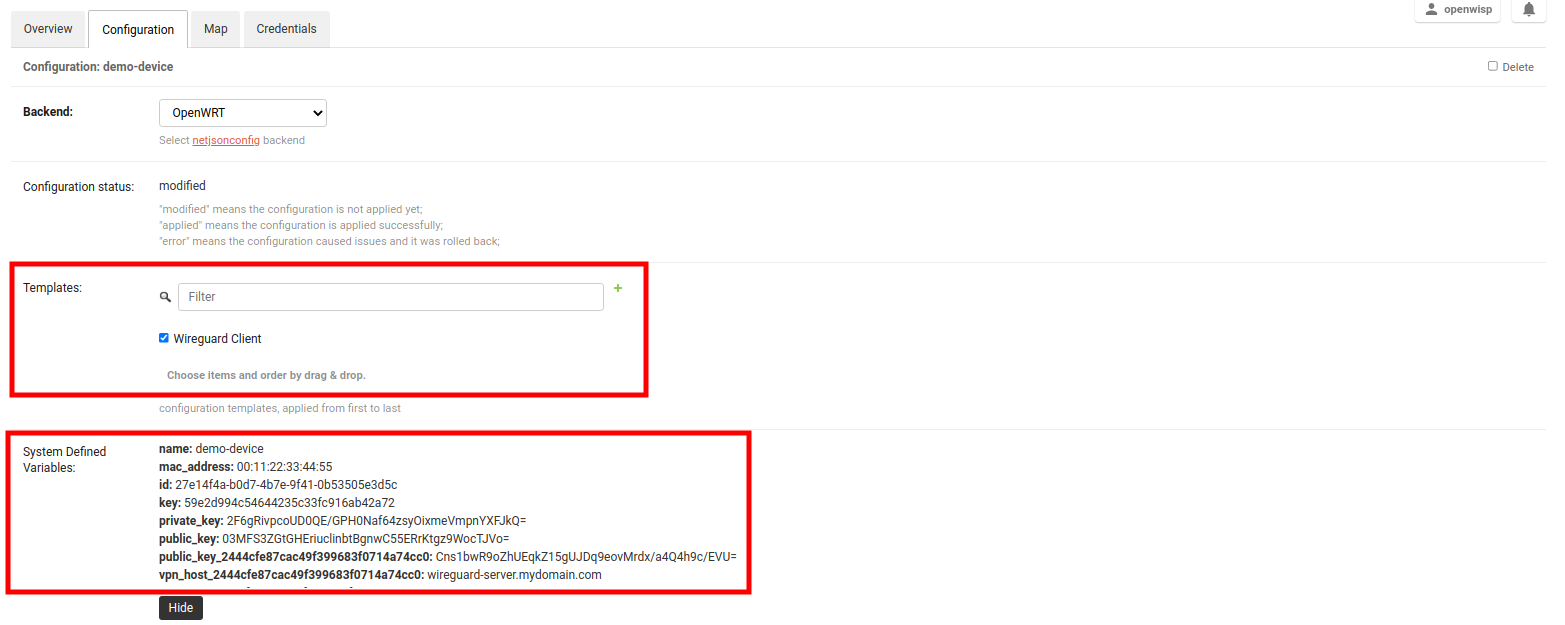
- Open the Configuration tab of the concerned device.
- Select the WireGuard Client template.
- Upon clicking on Save and continue editing button, you will see some entries in System Defined Variables. It will contain internal IP address, private and public key for the WireGuard client on the device along with details of WireGuard VPN server.
Voila! You have successfully configured OpenWISP to manage WireGuard tunnels for your devices.
By following these steps, you will be able to setup layer 2 VXLAN tunnels encapsulated in WireGuard tunnels which work on layer 3.
Note: This example uses Shared systemwide (no organization) option as the organization for VPN server and VPN client template. You can use any organization as long as VPN server, VPN client template and Device has same organization.
Visit
/admin/config/vpn/add/to add a new VPN server.We will set Name of this VPN server
Wireguard VXLANand Host aswireguard-vxlan-server.mydomain.com(update this to point to your WireGuard VXLAN VPN server).Select
VXLAN over WireGuardfrom the dropdown as VPN Backend.When using VXLAN over WireGuard, OpenWISP takes care of managing IP addresses (assigning an IP address to each VPN peer). You can create a new subnet or select an existing one from the dropdown menu. You can also assign an Internal IP to the WireGuard Server or leave it empty for OpenWISP to configure. This IP address will be used by the WireGuard interface on server.
We have set the Webhook Endpoint as
https://wireguard-vxlan-server.mydomain.com:8081/trigger-updatefor this example. You will need to update this according to you VPN upgrader endpoint. Set Webhook AuthToken to any strong passphrase, this will be used to ensure that configuration upgrades are requested from trusted sources.Note: If you are following this tutorial for also setting up WireGuard VPN server, just substitute
wireguard-server.mydomain.comwith hostname of your VPN server and follow the steps in next section.Under the configuration section, set the name of WireGuard tunnel 1 interface. We have used
wg0in this example.
- After clicking on Save and continue editing, you will see that OpenWISP has automatically created public and private key for WireGuard server in System Defined Variables along with internal IP address information.
If you haven't already setup WireGuard on your VPN server, this will be a good time do so. We recommend using the ansible-wireguard-openwisp role for installing WireGuard since it also installs scripts that allows OpenWISP to manage WireGuard VPN server along with VXLAN tunnels.
Pay attention to the VPN server attributes used in your playbook. It should be same as VPN server configuration in OpenWISP.
- Visit
/admin/config/template/add/to add a new template. - Set
Wireguard VXLAN Clientas Name (you can set whatever you want) and selectVPN-clientas type from the dropdown list. - The Backend field refers to the backend of the device this template can
be applied to. For this example, we will leave it to
OpenWRT. - Select the correct VPN server from the dropdown for the VPN field. Here
it is
Wireguard VXLAN. - Ensure that Automatic tunnel provisioning is checked. This will make OpenWISP to automatically generate public and private keys and provision IP address for each WireGuard VPN client along with VXLAN Network Indentifier(VNI).
- After clicking on Save and continue editing button, you will see details of Wireguard VXLAN VPN server in System Defined Variables. The template configuration will be automatically generated which you can tweak accordingly. We will use the automatically generated VPN client configuration for this example.
Note: This step assumes that you already have a device registered on OpenWISP. Register or create a device before proceeding.
- Open the Configuration tab of the concerned device.
- Select the WireGuard VXLAN Client template.
- Upon clicking on Save and continue editing button, you will see some entries in System Defined Variables. It will contain internal IP address, private and public key for the WireGuard client on the device and details of WireGuard VPN server along with VXLAN Network Identifier(VNI) of this device.
Voila! You have successfully configured OpenWISP to manage VXLAN over WireGuard tunnels for your devices.
Follow the procedure described below to setup ZeroTier tunnels on your devices.
Note: This example uses Shared systemwide (no organization) option as the organization for VPN server and VPN client template. You can use any organization as long as VPN server, VPN client template and Device has same organization.
If you haven't already set up a self-hosted Zerotier network controller on your server, now is a good time to do so. You can start by simply installing Zerotier on your server from the official website.
Visit
/admin/config/vpn/add/to add a new VPN server.We will set Name of this VPN server
ZeroTierand Host asmy-zerotier-server.mydomain.com:9993(update this to point to your ZeroTier VPN server).Select
ZeroTierfrom the dropdown as VPN Backend.When using ZeroTier, OpenWISP takes care of managing IP addresses (assigning an IP address to each VPN clients (Zerotier network members). You can create a new subnet or select an existing one from the dropdown menu. You can also assign an Internal IP to the Zerotier controller or leave it empty for OpenWISP to configure. This IP address will be used to assign it to the Zerotier controller running on the server.
Set the Webhook AuthToken, this will be ZeroTier authorization token which you can obtain by running the following command on the ZeroTier controller:
sudo cat /var/lib/zerotier-one/authtoken.secret
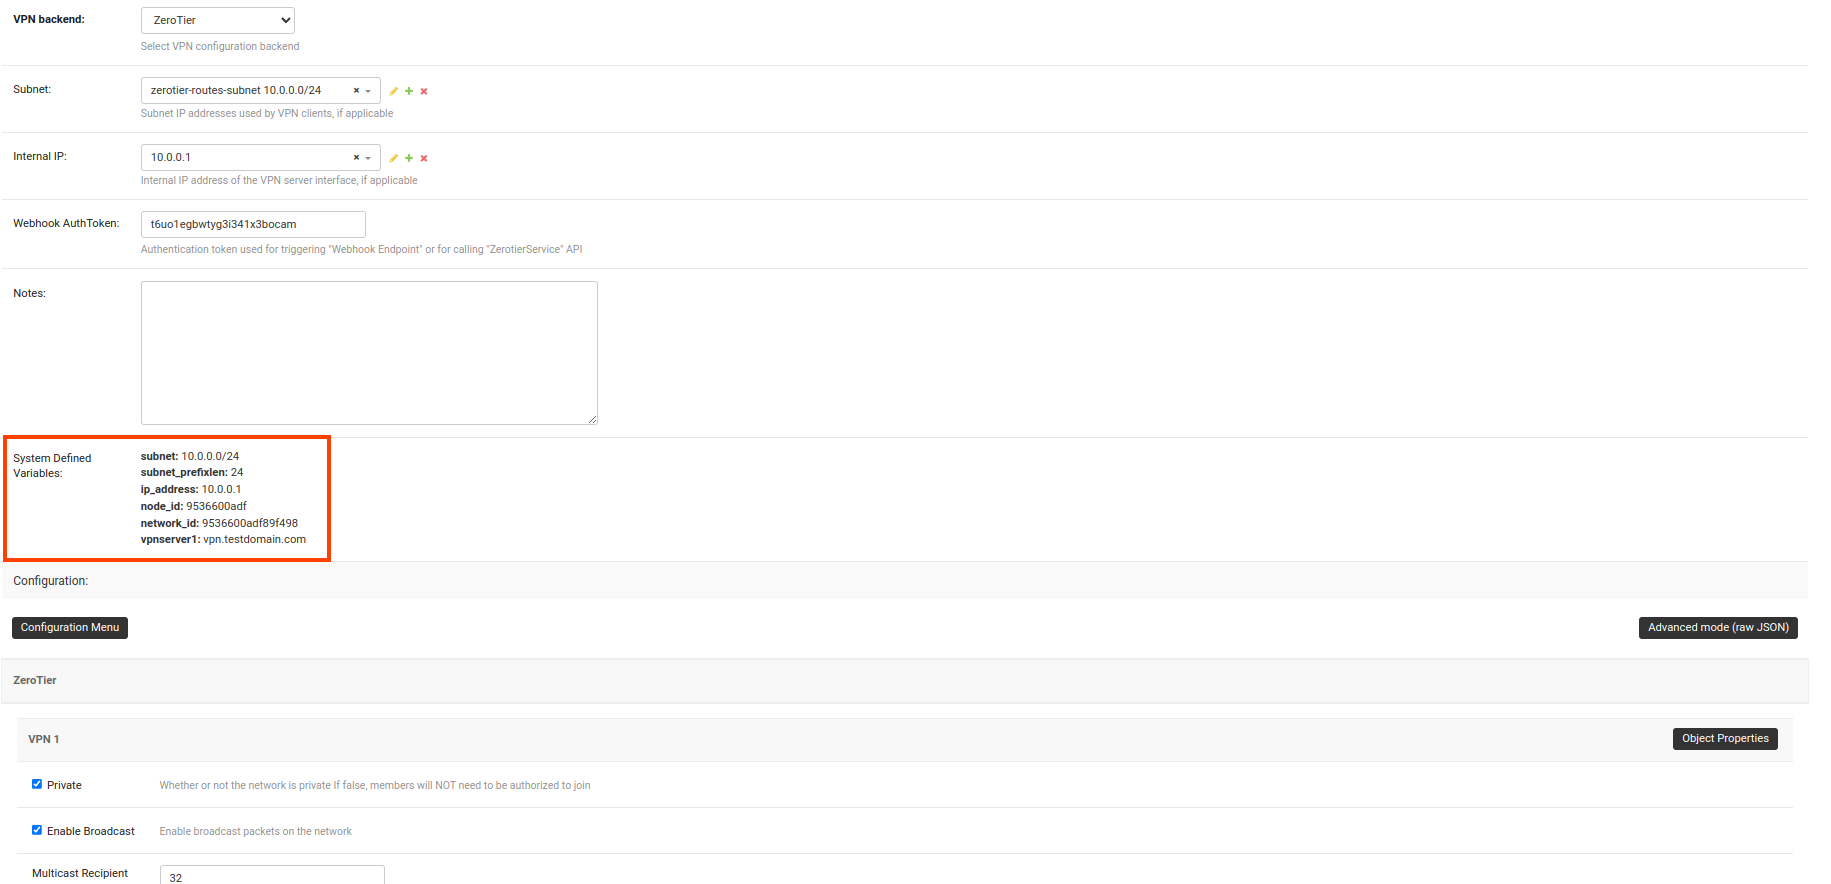
- After clicking on Save and continue editing, OpenWISP automatically detects the node address of the Zerotier controller and creates a Zerotier network. The network_id of this network can be viewed in the System Defined Variables section, where it also provides internal IP address information.
- Visit
/admin/config/template/add/to add a new template. - Set
ZeroTier Clientas Name (you can set whatever you want) and selectVPN-clientas type from the dropdown list. - The Backend field refers to the backend of the device this template can
be applied to. For this example, we will leave it to
OpenWRT. - Select the correct VPN server from the dropdown for the VPN field. Here
it is
ZeroTier. - Ensure that the Automatic tunnel provisioning option is checked. This will enable OpenWISP to automatically provision an IP address and ZeroTier identity secrets (used for assigning member IDs) for each ZeroTier VPN client.
- After clicking on Save and continue editing button, you will see details of ZeroTier VPN server in System Defined Variables. The template configuration will be automatically generated which you can tweak accordingly. We will use the automatically generated VPN client configuration for this example.
Note: OpenWISP uses zerotier-idtool to manage ZeroTier identity secrets. Please make sure that you have ZeroTier package installed on the server.
Note: This step assumes that you already have a device registered on OpenWISP. Register or create a device before proceeding.
- Open the Configuration tab of the concerned device.
- Select the ZeroTier Client template.
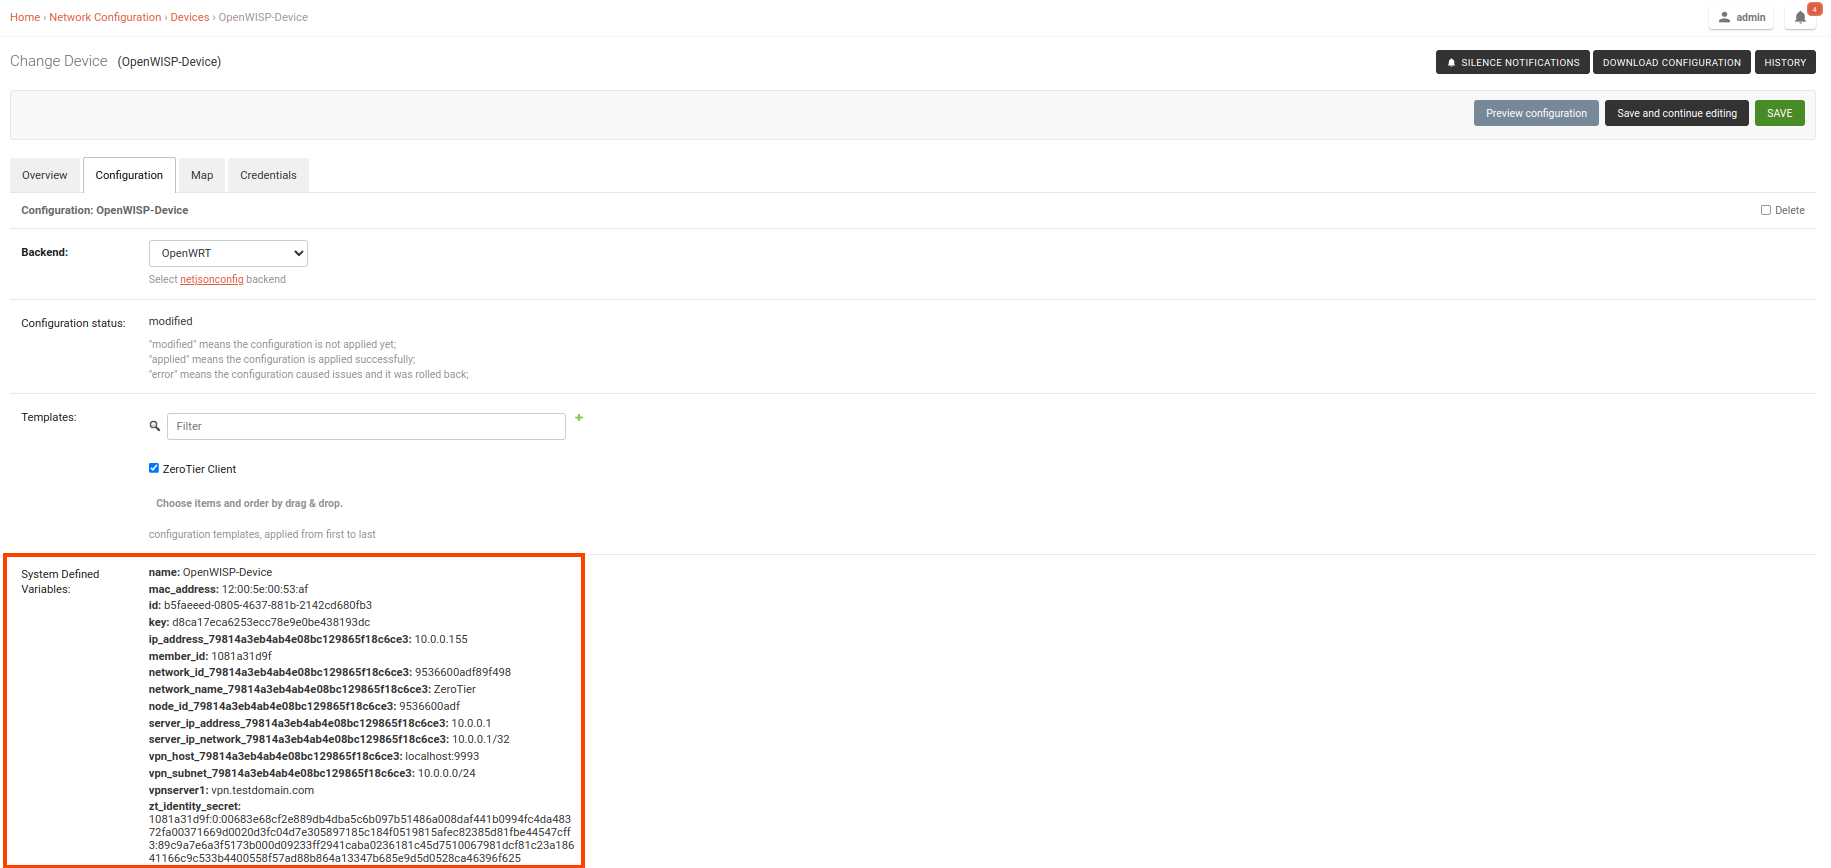
- Upon clicking the Save and Continue Editing button, you will see entries in the System Defined Variables section. These entries will include zerotier_member_id, identity_secret, and the internal IP address of the ZeroTier client (network member) on the device, along with details of the VPN server.
- Once the configuration is successfully applied to the device, you will notice a new ZeroTier interface
that is up and running. This interface will have the name
owzt89f498(whereowztis followed by the last six hexadecimal characters of the ZeroTier network ID).
Voila! You have successfully configured OpenWISP to manage ZeroTier tunnels for your devices.
The following steps will help you configure automatic provisioning of subnets and IPs for devices.
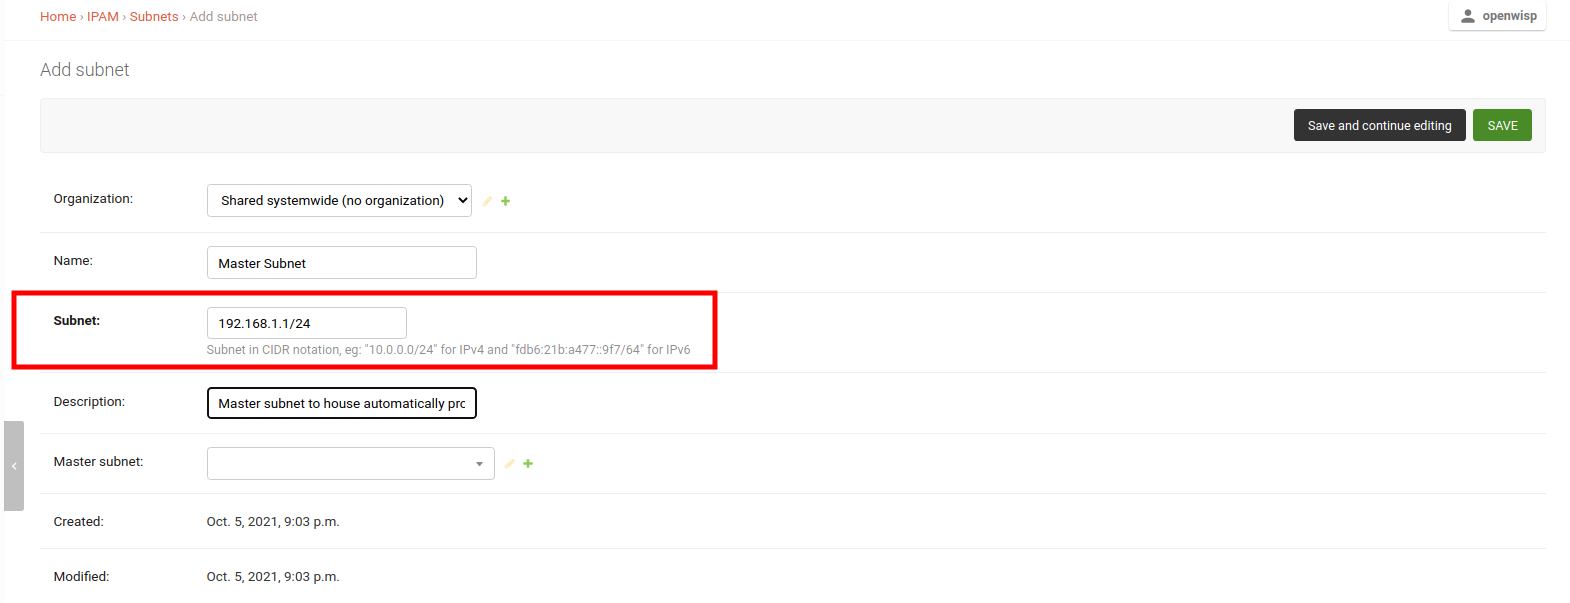
Create a master subnet under which automatically generated subnets will be provisioned.
Note: Choose the size of the subnet appropriately considering your use case.
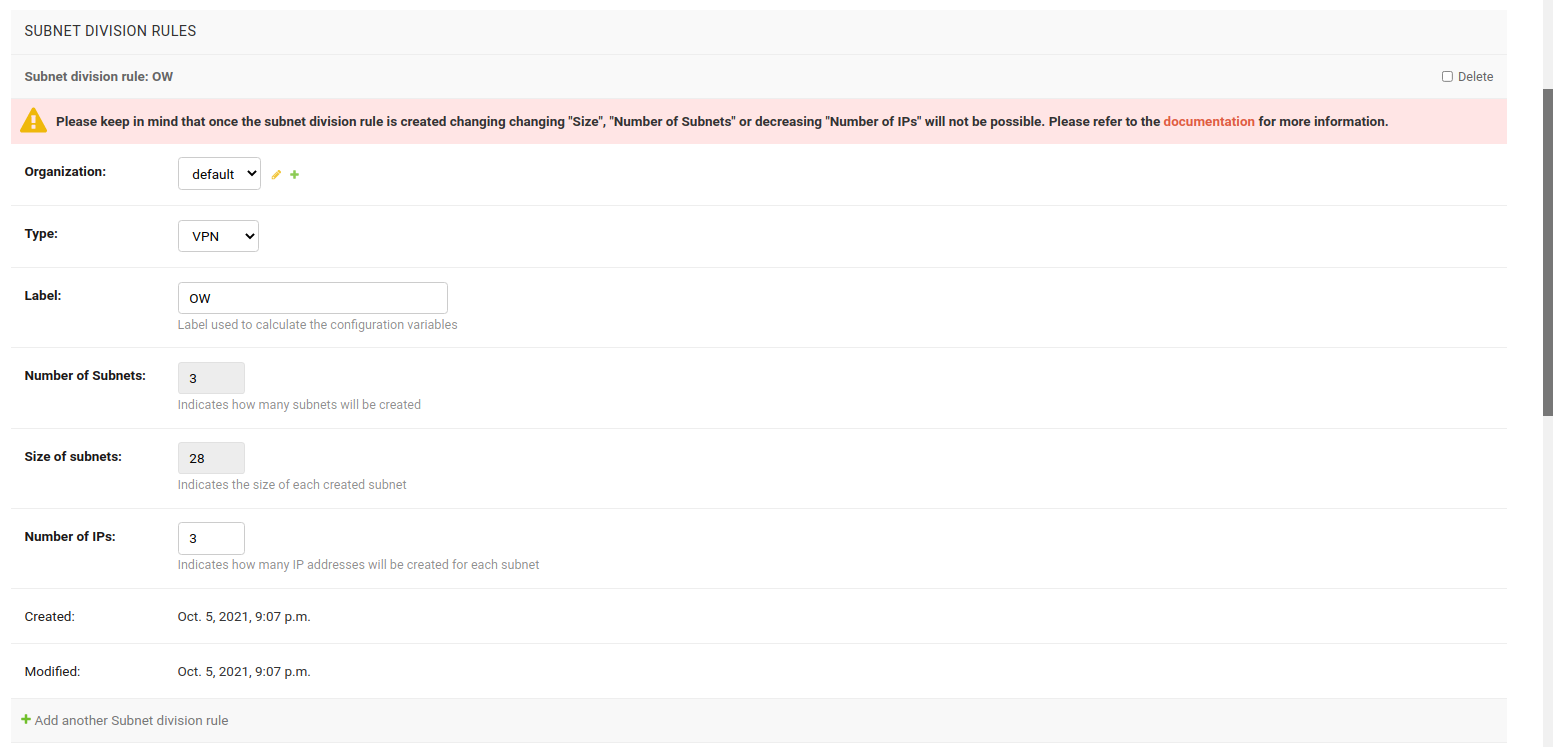
On the same page, add a subnet division rule that will be used to provision subnets under the master subnet.
The type of subnet division rule controls when subnets and IP addresses will be provisioned for a device. The subnet division rule types currently implemented are described below.
This rule type is triggered whenever a device configuration (config.Config model)
is created for the organization specified in the rule.
Creating a new rule of "Device" type will also provision subnets and IP addresses for existing devices of the organization automatically.
Note: a device without a configuration will not trigger this rule.
This rule is triggered when a VPN client template is assigned to a device, provided the VPN server to which the VPN client template relates to has the same subnet for which the subnet division rule is created.
Note: This rule will only work for WireGuard and VXLAN over WireGuard VPN servers.
In this example, VPN subnet division rule is used.
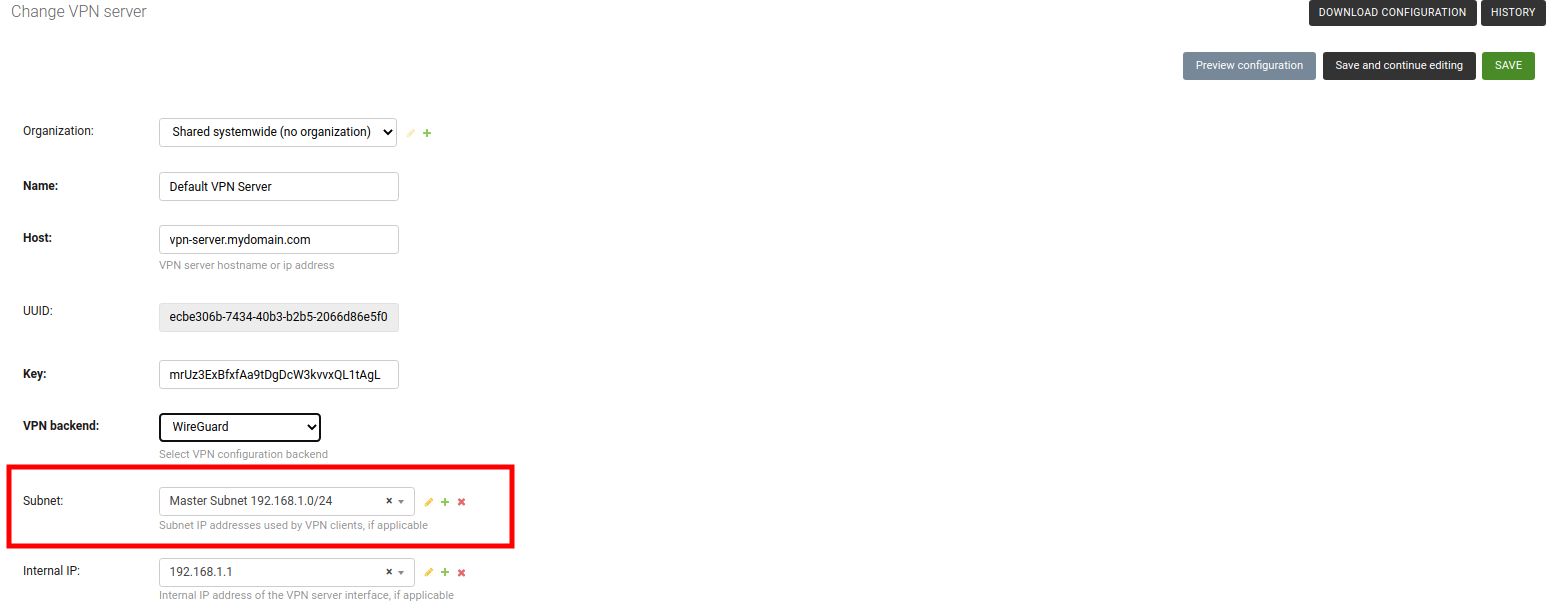
Now create a VPN Server and choose the previously created master subnet as the subnet for this VPN Server.
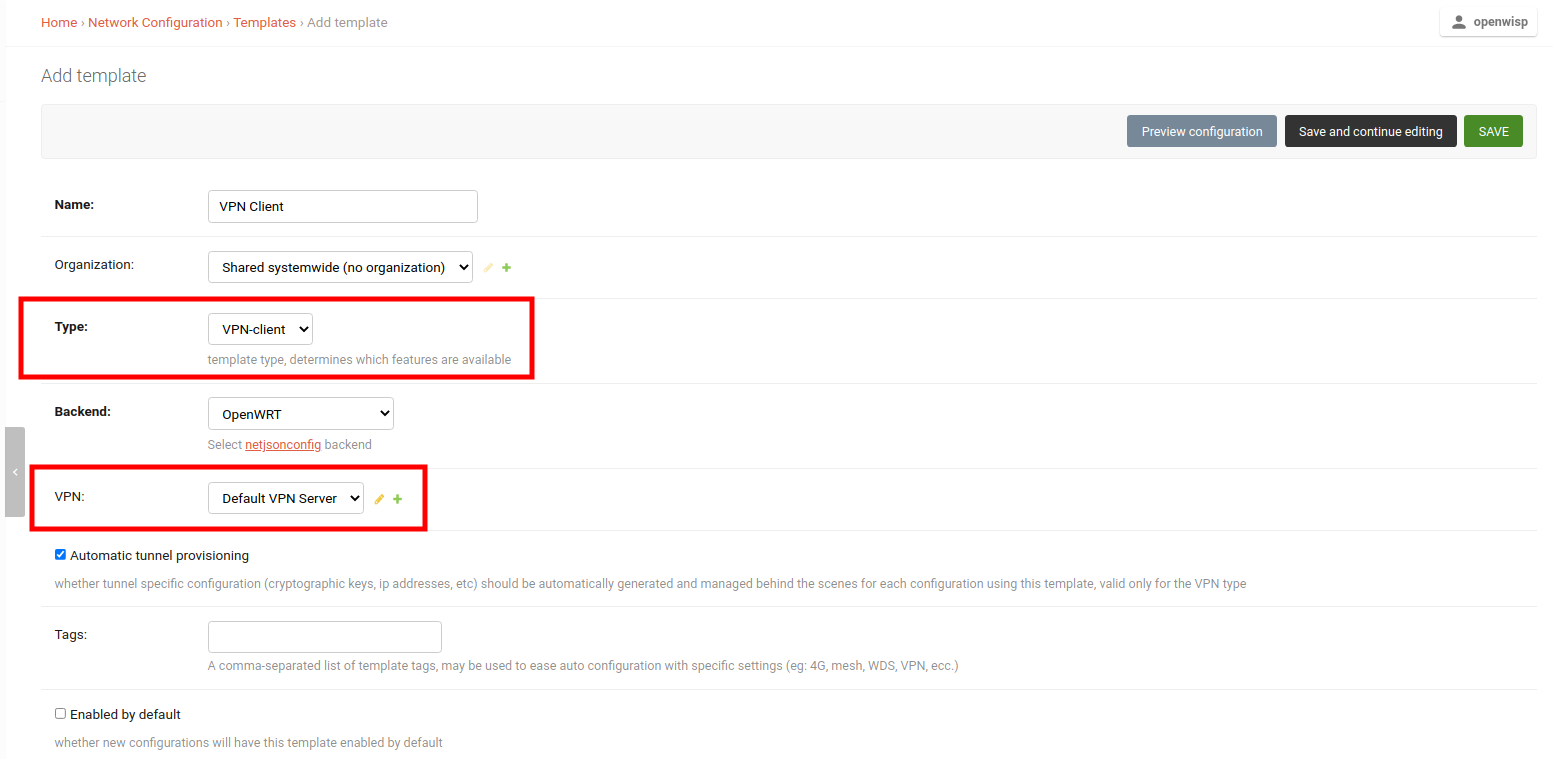
Create a template, setting the Type field to VPN Client and VPN field to use the previously created VPN Server.
Note: You can also check the Enable by default field if you want to automatically apply this template to devices that will register in future.
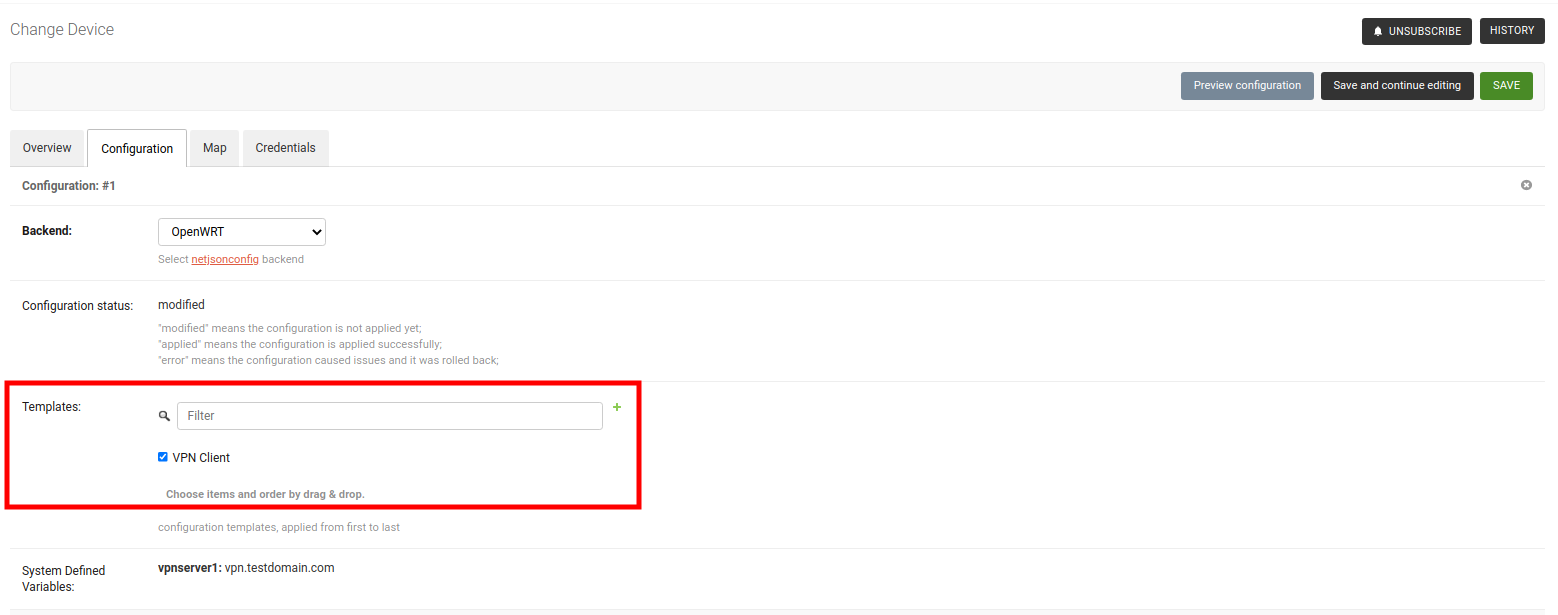
With everything in place, you can now apply the VPN Client Template to devices.
After saving the device, you should see all provisioned Subnets and IPs for this device under System Defined Variables.
Voila! You can now use these variables in configuration of the device. Refer to How to use configuration variables section of this documentation to learn how to use configuration variables.
- In the above example Subnet, VPN Server, and VPN Client Template belonged to the default organization. You can use Systemwide Shared Subnet, VPN Server, or VPN Client Template too, but Subnet Division Rule will be always related to an organization. The Subnet Division Rule will only be triggered when such VPN Client Template will be applied to a Device having the same organization as Subnet Division Rule.
- You can also use the configuration variables for provisioned subnets and IPs in the Template.
Each variable will be resolved differently for different devices. E.g.
OW_subnet1_ip1will resolve to10.0.0.1for one device and10.0.0.55for another. Every device gets its own set of subnets and IPs. But don't forget to provide the default fall back values in the "default values" template field (used mainly for validation). - The Subnet Division Rule will automatically create a reserved subnet, this subnet can be used to provision any IP addresses that have to be created manually. The rest of the master subnet address space must not be interfered with or the automation implemented in this module will not work.
- The above example used VPN subnet division rule. Similarly, device subnet division rule can be used, which only requires creating a subnet and a subnet division rule.
In the current implementation, it is not possible to change "Size", "Number of Subnets" and "Number of IPs" fields of an existing subnet division rule due to following reasons:
Allowing to change size of provisioned subnets of an existing subnet division rule will require rebuilding of Subnets and IP addresses which has possibility of breaking existing configurations.
Allowing to decrease number of subnets of an existing subnet division rule can create patches of unused subnets dispersed everywhere in the master subnet. Allowing to increase number of subnets will break the continuous allocation of subnets for every device. It can also break configuration of devices.
Allowing to decrease number of IPs of an existing subnet division rule will lead to deletion of IP Addresses which can break configuration of devices being used. It is allowed to increase number of IPs.
If you want to make changes to any of above fields, delete the existing rule and create a new one. The automation will provision for all existing devices that meets the criteria for provisioning. WARNING: It is possible that devices get different subnets and IPs from previous provisioning.
| Notification Type | Use |
config_error |
Fires when status of a device configuration changes to error. |
device_registered |
Fires when a new device is registered automatically on the network. |
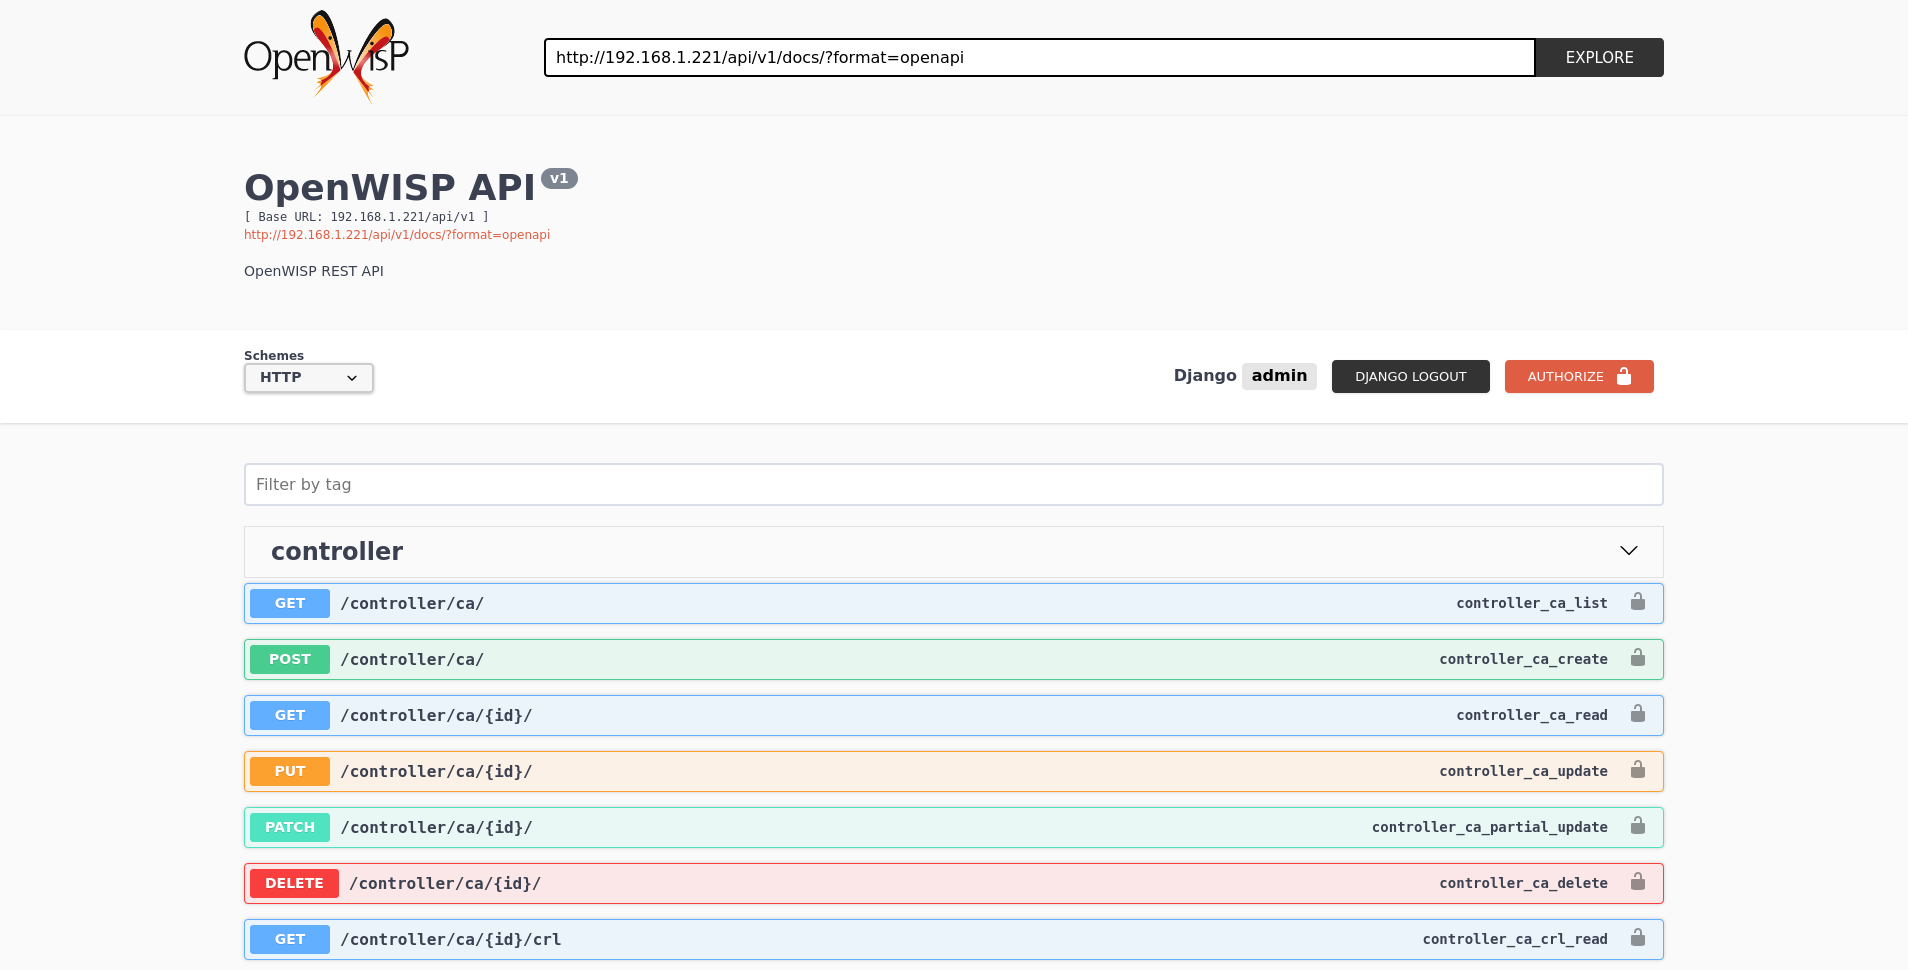
A general live API documentation (following the OpenAPI specification) at /api/v1/docs/.
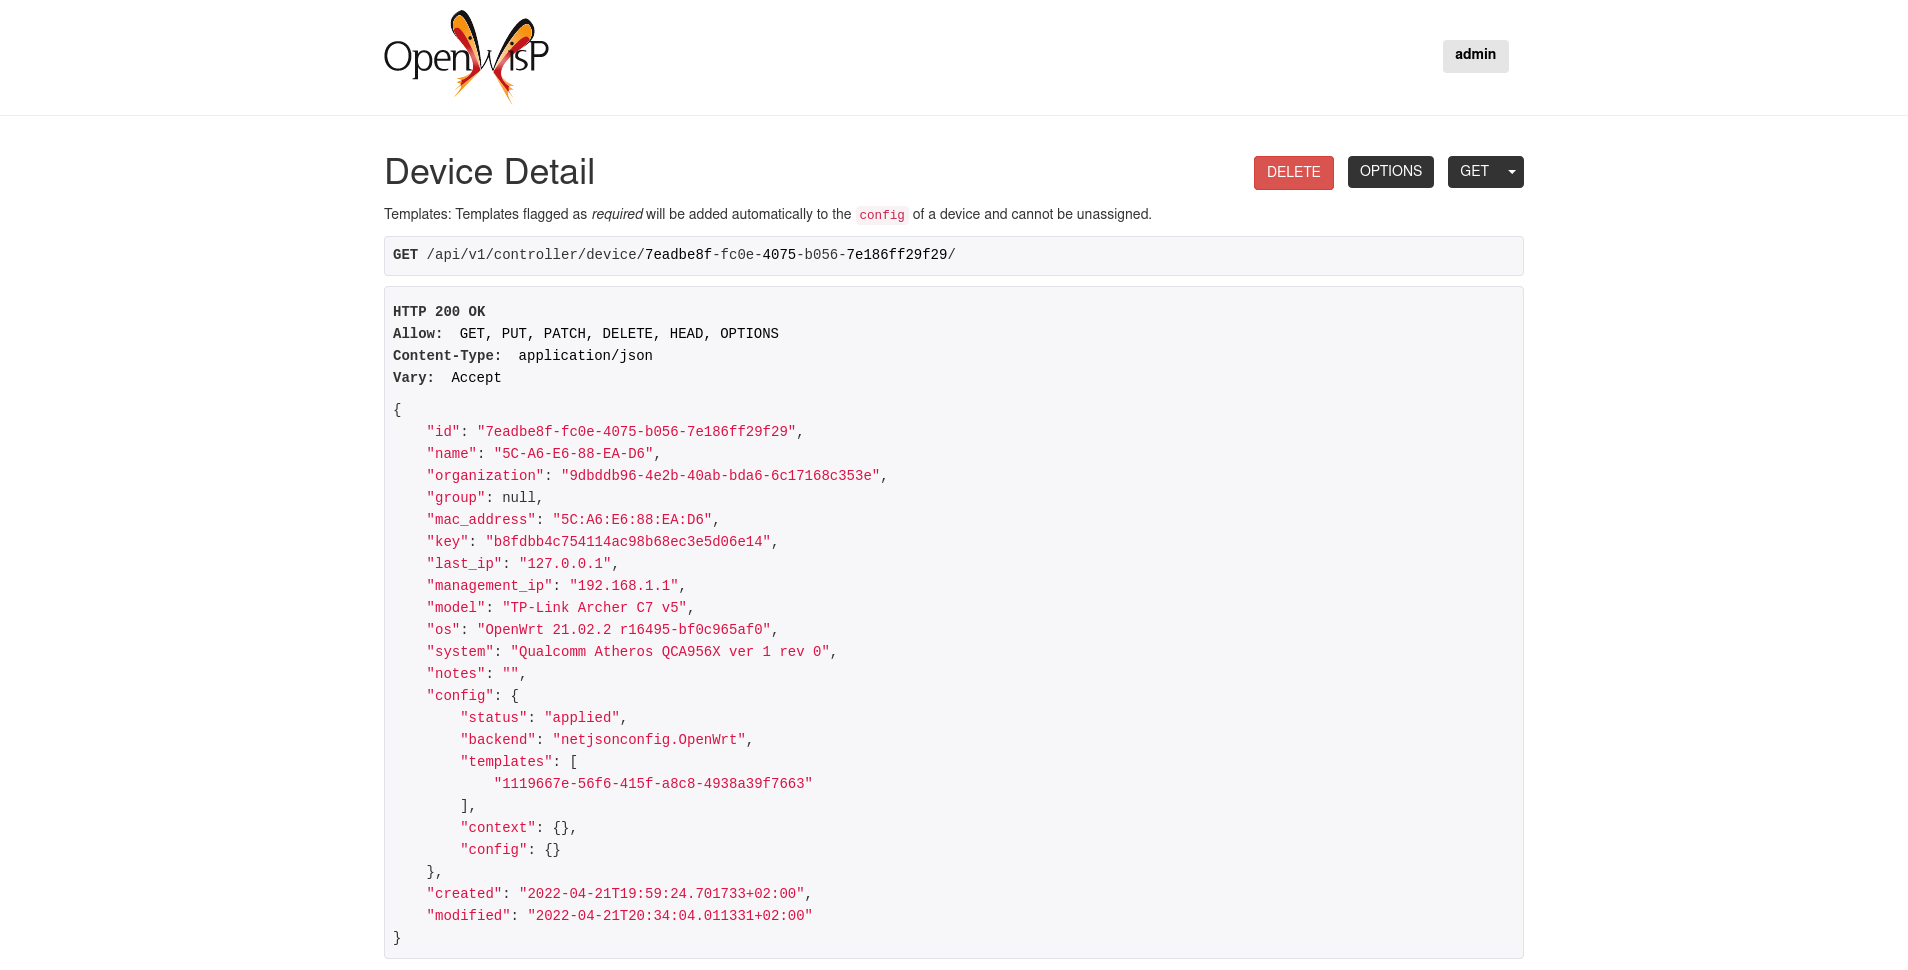
Additionally, opening any of the endpoints listed below directly in the browser will show the browsable API interface of Django-REST-Framework, which makes it even easier to find out the details of each endpoint.
See openwisp-users: authenticating with the user token.
When browsing the API via the Live documentation or the Browsable web page, you can also use the session authentication by logging in the django admin.
All list endpoints support the page_size parameter that allows paginating
the results in conjunction with the page parameter.
GET /api/v1/controller/template/?page_size=10
GET /api/v1/controller/template/?page_size=10&page=2
Since the detailed explanation is contained in the Live documentation and in the Browsable web page of each point, here we'll provide just a list of the available endpoints, for further information please open the URL of the endpoint in your browser.
GET /api/v1/controller/device/
Available filters
You can filter a list of devices based on their configuration
status using the status (e.g modified, applied, or error).
GET /api/v1/controller/device/?config__status={status}
You can filter a list of devices based on their configuration backend
using the backend (e.g netjsonconfig.OpenWrt or netjsonconfig.OpenWisp).
GET /api/v1/controller/device/?config__backend={backend}
You can filter a list of devices based on their
organization using the organization_id or organization_slug.
GET /api/v1/controller/device/?organization={organization_id}
GET /api/v1/controller/device/?organization_slug={organization_slug}
You can filter a list of devices based on their
configuration templates using the template_id.
GET /api/v1/controller/device/?config__templates={template_id}
You can filter a list of devices based on
their device group using the group_id.
GET /api/v1/controller/device/?group={group_id}
You can filter a list of devices that have a device
location object using the with_geo (eg. true or false).
GET /api/v1/controller/device/?with_geo={with_geo}
You can filter a list of devices based on
their creation time using the creation_time.
# Created exact
GET /api/v1/controller/device/?created={creation_time}

# Created greater than or equal to
GET /api/v1/controller/device/?created__gte={creation_time}

# Created is less than
GET /api/v1/controller/device/?created__lt={creation_time}
POST /api/v1/controller/device/
GET /api/v1/controller/device/{id}/
GET /api/v1/controller/device/{id}/configuration/
The above endpoint triggers the download of a tar.gz file containing the generated configuration for that specific device.
PUT /api/v1/controller/device/{id}/
PATCH /api/v1/controller/device/{id}/
Note: To assign, unassign, and change the order of the assigned templates add,
remove, and change the order of the {id} of the templates under the config field in the JSON response respectively.
Moreover, you can also select and unselect templates in the HTML Form of the Browsable API.
The required template(s) from the organization(s) of the device will added automatically
to the config and cannot be removed.
Example usage: For assigning template(s) add the/their {id} to the config of a device,
curl -X PATCH \
    http://127.0.0.1:8000/api/v1/controller/device/76b7d9cc-4ffd-4a43-b1b0-8f8befd1a7c0/ \
    -H 'authorization: Bearer dc8d497838d4914c9db9aad9b6ec66f6c36ff46b' \
    -H 'content-type: application/json' \
    -d '{
            "config": {
                "templates": ["4791fa4c-2cef-4f42-8bb4-c86018d71bd3"]
            }
        }'
Example usage: For removing assigned templates, simply remove the/their {id} from the config of a device,
curl -X PATCH \
    http://127.0.0.1:8000/api/v1/controller/device/76b7d9cc-4ffd-4a43-b1b0-8f8befd1a7c0/ \
    -H 'authorization: Bearer dc8d497838d4914c9db9aad9b6ec66f6c36ff46b' \
    -H 'content-type: application/json' \
    -d '{
            "config": {
                "templates": []
            }
        }'
Example usage: For reordering the templates simply change their order from the config of a device,
curl -X PATCH \
    http://127.0.0.1:8000/api/v1/controller/device/76b7d9cc-4ffd-4a43-b1b0-8f8befd1a7c0/ \
    -H 'authorization: Bearer dc8d497838d4914c9db9aad9b6ec66f6c36ff46b' \
    -H 'cache-control: no-cache' \
    -H 'content-type: application/json' \
    -H 'postman-token: b3f6a1cc-ff13-5eba-e460-8f394e485801' \
    -d '{
            "config": {
                "templates": [
                    "c5bbc697-170e-44bc-8eb7-b944b55ee88f",
                    "4791fa4c-2cef-4f42-8bb4-c86018d71bd3"
                ]
            }
}'DELETE /api/v1/controller/device/{id}/
GET /api/v1/controller/device/{id}/connection/
POST /api/v1/controller/device/{id}/connection/
GET /api/v1/controller/device/{id}/connection/{id}/
PUT /api/v1/controller/device/{id}/connection/{id}/
PATCH /api/v1/controller/device/{id}/connection/{id}/
DELETE /api/v1/controller/device/{id}/connection/{id}/
GET /api/v1/connection/credential/
POST /api/v1/connection/credential/
GET /api/v1/connection/credential/{id}/
PUT /api/v1/connection/credential/{id}/
PATCH /api/v1/connection/credential/{id}/
DELETE /api/v1/connection/credential/{id}/
GET /api/v1/controller/device/{id}/command/
POST /api/v1/controller/device/{id}/command/
GET /api/v1/controller/device/{device_id}/command/{command_id}/
GET /api/v1/controller/group/
Available filters
You can filter a list of device groups based on their
organization using the organization_id or organization_slug.
GET /api/v1/controller/group/?organization={organization_id}
GET /api/v1/controller/group/?organization_slug={organization_slug}
You can filter a list of device groups that have a
device object using the empty (eg. true or false).
GET /api/v1/controller/group/?empty={empty}
POST /api/v1/controller/group/
GET /api/v1/controller/group/{id}/
PUT /api/v1/controller/group/{id}/
This endpoint allows to change the group templates too.
GET /api/v1/controller/cert/{common_name}/group/
This endpoint can be used to retrieve group information and metadata by the common name of a certificate used in a VPN client tunnel, this endpoint is used in layer 2 tunneling solutions for firewall/captive portals.
It is also possible to filter device group by providing organization slug of certificate's organization as show in the example below:
GET /api/v1/controller/cert/{common_name}/group/?org={org1_slug},{org2_slug}
GET /api/v1/controller/device/{id}/location/
PUT /api/v1/controller/device/{id}/location/
You can create DeviceLocation object by using primary
keys of existing Location and FloorPlan objects as shown in
the example below.
{
    "location": "f0cb5762-3711-4791-95b6-c2f6656249fa",
    "floorplan": "dfeb6724-aab4-4533-aeab-f7feb6648acd",
    "indoor": "-36,264"
}
Note: The indoor field represents the coordinates of the
point placed on the image from the top left corner. E.g. if you
placed the pointer on the top left corner of the floorplan image,
its indoor coordinates will be 0,0.
curl -X PUT \
    http://127.0.0.1:8000/api/v1/controller/device/8a85cc23-bad5-4c7e-b9f4-ffe298defb5c/location/ \
    -H 'authorization: Bearer dc8d497838d4914c9db9aad9b6ec66f6c36ff46b' \
    -H 'content-type: application/json' \
    -d '{
        "location": "f0cb5762-3711-4791-95b6-c2f6656249fa",
        "floorplan": "dfeb6724-aab4-4533-aeab-f7feb6648acd",
        "indoor": "-36,264"
        }'
You can also create related Location and FloorPlan objects for the
device directly from this endpoint.
The following example demonstrates creating related location object in a single request.
{
    "location": {
        "name": "Via del Corso",
        "address": "Via del Corso, Roma, Italia",
        "geometry": {
            "type": "Point",
            "coordinates": [12.512124, 41.898903]
        },
        "type": "outdoor",
    }
}
curl -X PUT \
http://127.0.0.1:8000/api/v1/controller/device/8a85cc23-bad5-4c7e-b9f4-ffe298defb5c/location/ \
-H 'authorization: Bearer dc8d497838d4914c9db9aad9b6ec66f6c36ff46b' \
-H 'content-type: application/json' \
-d '{
"location": {
"name": "Via del Corso",
"address": "Via del Corso, Roma, Italia",
"geometry": {
"type": "Point",
"coordinates": [12.512124, 41.898903]
},
"type": "outdoor"
}
}'
Note: You can also specify the geometry in Well-known text (WKT)
format, like following:
{
    "location": {
        "name": "Via del Corso",
        "address": "Via del Corso, Roma, Italia",
        "geometry": "POINT (12.512124 41.898903)",
        "type": "outdoor",
    }
}
Similarly, you can create Floorplan object with the same request.
But, note that a FloorPlan can be added to DeviceLocation only
if the related Location object defines an indoor location. The example
below demonstrates creating both Location and FloorPlan objects.
// This is not a valid JSON object. The JSON format is
// only used for showing available fields.
{
    "location.name": "Via del Corso",
    "location.address": "Via del Corso, Roma, Italia",
    "location.geometry.type": "Point",
    "location.geometry.coordinates": [12.512124, 41.898903]
    "location.type": "outdoor",
    "floorplan.floor": 1,
    "floorplan.image": floorplan.png,
}
curl -X PUT \
    http://127.0.0.1:8000/api/v1/controller/device/8a85cc23-bad5-4c7e-b9f4-ffe298defb5c/location/ \
    -H 'authorization: Bearer dc8d497838d4914c9db9aad9b6ec66f6c36ff46b' \
    -H 'content-type: multipart/form-data; boundary=----WebKitFormBoundary7MA4YWxkTrZu0gW' \
    -F 'location.name=Via del Corso' \
    -F 'location.address=Via del Corso, Roma, Italia' \
    -F location.geometry.type=Point \
    -F 'location.geometry.coordinates=[12.512124, 41.898903]' \
    -F location.type=indoor \
    -F floorplan.floor=1 \
    -F '[email protected]'
Note: The request in above example uses multipart content-type
for uploading floorplan image.
You can also use an existing Location object and create a new
floorplan for that location using this endpoint.
// This is not a valid JSON object. The JSON format is
// only used for showing available fields.
{
    "location": "f0cb5762-3711-4791-95b6-c2f6656249fa",
    "floorplan.floor": 1,
    "floorplan.image": floorplan.png
}
curl -X PUT \
    http://127.0.0.1:8000/api/v1/controller/device/8a85cc23-bad5-4c7e-b9f4-ffe298defb5c/location/ \
    -H 'authorization: Bearer dc8d497838d4914c9db9aad9b6ec66f6c36ff46b' \
    -H 'content-type: multipart/form-data; boundary=----WebKitFormBoundary7MA4YWxkTrZu0gW' \
    -F location=f0cb5762-3711-4791-95b6-c2f6656249fa \
    -F floorplan.floor=1 \
    -F '[email protected]'
PUT /api/v1/controller/device/{id}/location/
Note: This endpoint can be used to update related Location
and Floorplan objects. Refer examples of "Create device location"
section for information on payload format.
DELETE /api/v1/controller/device/{id}/location/
GET /api/v1/controller/device/{id}/coordinates/
Note: This endpoint is intended to be used by devices.
This endpoint skips multi-tenancy and permission checks if the
device key is passed as query_param because the system
assumes that the device is updating it's position.
curl -X GET \
    'http://127.0.0.1:8000/api/v1/controller/device/8a85cc23-bad5-4c7e-b9f4-ffe298defb5c/coordinates/?key=10a0cb5a553c71099c0e4ef236435496'
PUT /api/v1/controller/device/{id}/coordinates/
Note: This endpoint is intended to be used by devices.
This endpoint skips multi-tenancy and permission checks if the
device key is passed as query_param because the system
assumes that the device is updating it's position.
{
    "type": "Feature",
    "geometry": {
        "type": "Point",
        "coordinates": [12.512124, 41.898903]
    },
}
curl -X PUT \
'http://127.0.0.1:8000/api/v1/controller/device/8a85cc23-bad5-4c7e-b9f4-ffe298defb5c/coordinates/?key=10a0cb5a553c71099c0e4ef236435496' \
-H 'content-type: application/json' \
-d '{
"type": "Feature",
"geometry": {
"type": "Point",
"coordinates": [12.512124, 41.898903]
},
}'
GET /api/v1/controller/location/
Available filters
You can filter using organization_id or organization_slug
to get list locations that belongs to an organization.
GET /api/v1/controller/location/?organization={organization_id}
GET /api/v1/controller/location/?organization_slug={organization_slug}
POST /api/v1/controller/location/
If you are creating an indoor location, you can use this endpoint
to create floorplan for the location.
The following example demonstrates creating floorplan along with location in a single request.
{
    "name": "Via del Corso",
    "address": "Via del Corso, Roma, Italia",
    "geometry.type": "Point",
    "geometry.location": [12.512124, 41.898903],
    "type": "indoor",
    "is_mobile": "false",
    "floorplan.floor": "1",
    "floorplan.image": floorplan.png,
    "organization": "1f6c5666-1011-4f1d-bce9-fc6fcb4f3a05"
}
curl -X POST \
    http://127.0.0.1:8000/api/v1/controller/location/ \
    -H 'authorization: Bearer dc8d497838d4914c9db9aad9b6ec66f6c36ff46b' \
    -H 'content-type: multipart/form-data; boundary=----WebKitFormBoundary7MA4YWxkTrZu0gW' \
    -F 'name=Via del Corso' \
    -F 'address=Via del Corso, Roma, Italia' \
    -F geometry.type=Point \
    -F 'geometry.coordinates=[12.512124, 41.898903]' \
    -F type=indoor \
    -F is_mobile=false \
    -F floorplan.floor=1 \
    -F '[email protected]' \
    -F organization=1f6c5666-1011-4f1d-bce9-fc6fcb4f3a05
Note: You can also specify the geometry in Well-known text (WKT)
format, like following:
{
    "name": "Via del Corso",
    "address": "Via del Corso, Roma, Italia",
    "geometry": "POINT (12.512124 41.898903)",
    "type": "indoor",
    "is_mobile": "false",
    "floorplan.floor": "1",
    "floorplan.image": floorplan.png,
    "organization": "1f6c5666-1011-4f1d-bce9-fc6fcb4f3a05"
}
GET /api/v1/controller/location/{pk}/
PUT /api/v1/controller/location/{pk}/
Note: Only the first floorplan data present can be
edited or changed. Setting the type of location to
outdoor will remove all the floorplans associated with it.
Refer examples of "Create location" section for information on payload format.
DELETE /api/v1/controller/location/{pk}/
GET /api/v1/controller/location/{id}/device/
Note: this endpoint will only list locations that have been assigned to a device.
GET /api/v1/controller/location/geojson/
Available filters
You can filter using organization_id or organization_slug
to get list location of devices from that organization.
GET /api/v1/controller/location/geojson/?organization_id={organization_id}
GET /api/v1/controller/location/geojson/?organization_slug={organization_slug}
GET /api/v1/controller/floorplan/
Available filters
You can filter using organization_id or organization_slug
to get list floorplans that belongs to an organization.
GET /api/v1/controller/floorplan/?organization={organization_id}
GET /api/v1/controller/floorplan/?organization_slug={organization_slug}
POST /api/v1/controller/floorplan/
GET /api/v1/controller/floorplan/{pk}/
PUT /api/v1/controller/floorplan/{pk}/
DELETE /api/v1/controller/floorplan/{pk}/
GET /api/v1/controller/template/
Available filters
You can filter a list of templates based on their organization
using the organization_id or organization_slug.
GET /api/v1/controller/template/?organization={organization_id}
GET /api/v1/controller/template/?organization_slug={organization_slug}
You can filter a list of templates based on their backend using
the backend (e.g netjsonconfig.OpenWrt or netjsonconfig.OpenWisp).
GET /api/v1/controller/template/?backend={backend}
You can filter a list of templates based on their
type using the type (eg. vpn or generic).
GET /api/v1/controller/template/?type={type}
You can filter a list of templates that are enabled
by default or not using the default (eg. true or false).
GET /api/v1/controller/template/?default={default}
You can filter a list of templates that are required
or not using the required (eg. true or false).
GET /api/v1/controller/template/?required={required}
You can filter a list of templates based on
their creation time using the creation_time.
# Created exact

GET /api/v1/controller/template/?created={creation_time}

# Created greater than or equal to

GET /api/v1/controller/template/?created__gte={creation_time}

# Created is less than

GET /api/v1/controller/template/?created__lt={creation_time}
POST /api/v1/controller/template/
GET /api/v1/controller/template/{id}/
GET /api/v1/controller/template/{id}/configuration/
The above endpoint triggers the download of a tar.gz file
containing the generated configuration for that specific template.
PUT /api/v1/controller/template/{id}/
PATCH /api/v1/controller/template/{id}/
DELETE /api/v1/controller/template/{id}/
GET /api/v1/controller/vpn/
Available filters
You can filter a list of vpns based
on their backend using the backend
(e.g openwisp_controller.vpn_backends.OpenVpn
or openwisp_controller.vpn_backends.Wireguard).
GET /api/v1/controller/vpn/?backend={backend}
You can filter a list of vpns based on their subnet using the subnet_id.
GET /api/v1/controller/vpn/?subnet={subnet_id}
You can filter a list of vpns based on their organization
using the organization_id or organization_slug.
GET /api/v1/controller/vpn/?organization={organization_id}
GET /api/v1/controller/vpn/?organization_slug={organization_slug}
POST /api/v1/controller/vpn/
GET /api/v1/controller/vpn/{id}/
GET /api/v1/controller/vpn/{id}/configuration/
The above endpoint triggers the download of a tar.gz file
containing the generated configuration for that specific VPN.
PUT /api/v1/controller/vpn/{id}/
PATCH /api/v1/controller/vpn/{id}/
DELETE /api/v1/controller/vpn/{id}/
GET /api/v1/controller/ca/
POST /api/v1/controller/ca/
POST /api/v1/controller/ca/
Note: To import an existing CA, only name, certificate
and private_key fields have to be filled in the HTML form or
included in the JSON format.
GET /api/v1/controller/ca/{id}/
PUT /api/v1/controller/ca/{id}/
PATCH /api/v1/controller/ca/{id}/
GET /api/v1/controller/ca/{id}/crl/
The above endpoint triggers the download of {id}.crl file containing
up to date CRL of that specific CA.
DELETE /api/v1/controller/ca/{id}/
POST /api/v1/controller/ca/{id}/renew/
GET /api/v1/controller/cert/
POST /api/v1/controller/cert/
POST /api/v1/controller/cert/
Note: To import an existing Cert, only name, ca,
certificate and private_key fields have to be filled
in the HTML form or included in the JSON format.
GET /api/v1/controller/cert/{id}/
PUT /api/v1/controller/cert/{id}/
PATCH /api/v1/controller/cert/{id}/
DELETE /api/v1/controller/cert/{id}/
POST /api/v1/controller/cert/{id}/renew/
POST /api/v1/controller/cert/{id}/revoke/
You can change the values for the following variables in
settings.py to configure your instance of openwisp-controller.
| type: | int |
| default: | 2 |
| unit: | seconds |
Configure timeout to wait for an authentication response when establishing a SSH connection.
| type: | int |
| default: | 60 |
| unit: | seconds |
Configure timeout to wait for the banner to be presented when establishing a SSH connection.
| type: | int |
| default: | 30 |
| unit: | seconds |
Configure timeout on blocking read/write operations when executing a command in a SSH connection.
| type: | int |
| default: | 5 |
| unit: | seconds |
Configure timeout for the TCP connect when establishing a SSH connection.
| type: | tuple |
| default: | (
('openwisp_controller.connection.connectors.ssh.Ssh', 'SSH'),
('openwisp_controller.connection.connectors.openwrt.snmp.OpenWRTSnmp', 'OpenWRT SNMP'),
('openwisp_controller.connection.connectors.airos.snmp.AirOsSnmp', 'Ubiquiti AirOS SNMP'),
) |
Available connector classes. Connectors are python classes that specify ways in which OpenWISP can connect to devices in order to launch commands.
| type: | tuple |
| default: | (
('openwisp_controller.connection.connectors.openwrt.ssh.OpenWrt', 'OpenWRT SSH'),
) |
Available update strategies. An update strategy is a subclass of a
connector class which defines an update_config method which is
in charge of updating the configuration of the device.
This operation is launched in a background worker when the configuration of a device is changed.
It's possible to write custom update strategies and add them to this setting to make them available in OpenWISP.
| type: | dict |
| default: | {
'netjsonconfig.OpenWrt': OPENWISP_UPDATE_STRATEGIES[0][0],
} |
A dictionary that maps configuration backends to update strategies in order to automatically determine the update strategy of a device connection if the update strategy field is left blank by the user.
| type: | tuple |
| default: | (
('netjsonconfig.OpenWrt', 'OpenWRT'),
('netjsonconfig.OpenWisp', 'OpenWISP'),
) |
Available configuration backends. For more information, see netjsonconfig backends.
| type: | tuple |
| default: | (
('openwisp_controller.vpn_backends.OpenVpn', 'OpenVPN'),
('openwisp_controller.vpn_backends.Wireguard', 'WireGuard'),
('openwisp_controller.vpn_backends.VxlanWireguard', 'VXLAN over WireGuard'),
('openwisp_controller.vpn_backends.ZeroTier', 'ZeroTier'),
) |
Available VPN backends for VPN Server objects. For more information, see netjsonconfig VPN backends.
A VPN backend must follow some basic rules in order to be compatible with openwisp-controller:
- it MUST allow at minimum and at maximum one VPN instance
- the main NetJSON property MUST match the lowercase version of the class name,
eg: when using the
OpenVpnbackend, the system will look intoconfig['openvpn'] - it SHOULD focus on the server capabilities of the VPN software being used
| type: | str |
| default: | OPENWISP_CONTROLLER_BACKENDS[0][0] |
The preferred backend that will be used as initial value when adding new Config or
Template objects in the admin.
This setting defaults to the raw value of the first item in the OPENWISP_CONTROLLER_BACKENDS setting,
which is netjsonconfig.OpenWrt.
Setting it to None will force the user to choose explicitly.
| type: | str |
| default: | OPENWISP_CONTROLLER_VPN_BACKENDS[0][0] |
The preferred backend that will be used as initial value when adding new Vpn objects in the admin.
This setting defaults to the raw value of the first item in the OPENWISP_CONTROLLER_VPN_BACKENDS setting,
which is openwisp_controller.vpn_backends.OpenVpn.
Setting it to None will force the user to choose explicitly.
| type: | bool |
| default: | True |
Whether devices can automatically register through the controller or not.
This feature is enabled by default.
Autoregistration must be supported on the devices in order to work, see openwisp-config automatic registration for more information.
| type: | bool |
| default: | True |
Whether devices that are already registered are recognized when reflashed or reset, hence keeping the existing configuration without creating a new one.
This feature is enabled by default.
Autoregistration must be enabled also on the devices in order to work, see openwisp-config consistent key generation for more information.
| type: | bool |
| default: | True |
Whether devices that are not already present in the system are allowed to register or not.
Turn this off if you still want to use auto-registration to avoid having to manually set the device UUID and key in its configuration file but also want to avoid indiscriminate registration of new devices without explicit permission.
| type: | dict |
| default: | {} |
Additional context that is passed to the default context of each device object.
OPENWISP_CONTROLLER_CONTEXT can be used to define system-wide configuration variables.
For more information regarding how to use configuration variables in OpenWISP, see How to use configuration variables.
For technical information about how variables are handled in the lower levels of OpenWISP, see netjsonconfig context: configuration variables.
| type: | bool |
| default: | True |
The default value of the auto_cert field for new Template objects.
The auto_cert field is valid only for templates which have type
set to VPN and indicates whether configuration regarding the VPN tunnel is
provisioned automatically to each device using the template, eg:
- when using OpenVPN, new x509 certificates will be generated automatically using the same CA assigned to the related VPN object
- when using WireGuard, new pair of private and public keys (using Curve25519) will be generated, as well as an IP address of the subnet assigned to the related VPN object
- when using VXLAN tunnels over Wireguad, in addition to the configuration generated for WireGuard, a new VID will be generated automatically for each device if the configuration option "auto VNI" is turned on in the VPN object
All these auto generated configuration options will be available as template variables.
The objects that are automatically created will also be removed when they are not needed anymore (eg: when the VPN template is removed from a configuration object).
| type: | str |
| default: | /etc/x509 |
The filesystem path where x509 certificate will be installed when
downloaded on routers when auto_cert is being used (enabled by default).
| type: | str |
| default: | {mac_address}-{name} |
Defines the format of the common_name attribute of VPN client certificates
that are automatically created when using VPN templates which have auto_cert
set to True. A unique slug generated using shortuuid
is appended to the common name to introduce uniqueness. Therefore, resulting
common names will have {OPENWISP_CONTROLLER_COMMON_NAME_FORMAT}-{unique-slug}
format.
Note: If the name and mac address of the device are equal,
the name of the device will be omitted from the common name to avoid redundancy.
| type: | bool |
| default: | True |
In the device list page, the column IP will show the management_ip if
available, defaulting to last_ip otherwise.
If this setting is set to False the management_ip won't be shown
in the device list page even if present, it will be shown only in the device
detail page.
You may set this to False if for some reason the majority of your user
doesn't care about the management ip address.
| type: | bool |
| default: | True |
This setting toggles the backend fields in add/edit pages in Device and Template configuration,
as well as the backend field/filter in Device list and Template list.
If this setting is set to False these items will be removed from the UI.
Note: This setting affects only the configuration backend and NOT the VPN backend.
| type: | bool |
| default: | True |
This setting conditionally enforces unique Device names in an Organization. The query to enforce this is case-insensitive.
Note: For this constraint to be optional, it is enforced on an application level and not on database.
| type: | bool |
| default: | False |
The field hardware_id can be used to store a unique hardware id, for example a serial number.
If this setting is set to True then this field will be shown first in the device list page
and in the add/edit device page.
This feature is disabled by default.
| type: | dict |
| default: | {
'blank': not OPENWISP_CONTROLLER_HARDWARE_ID_ENABLED,
'null': True,
'max_length': 32,
'unique': True,
'verbose_name': _('Serial number'),
'help_text': _('Serial number of this device')
} |
Options for the model field hardware_id.
blank: wether the field is allowed to be blanknull: wether an empty value will be stored asNULLin the databasemax_length: maximum length of the fieldunique: wether the value of the field must be uniqueverbose_name: text for the human readable label of the fieldhelp_text: help text to be displayed with the field
| type: | bool |
| default: | True |
When the hardware ID feature is enabled, devices will be referenced with their hardware ID instead of their name.
If you still want to reference devices by their name, set this to False.
| type: | tuple |
| default: | ('Device', 'Devices') |
Defines the verbose_name attribute of the Device model, which is displayed in the
admin site. The first and second element of the tuple represent the singular and plural forms.
For example, if we want to change the verbose name to "Hotspot", we could write:
OPENWISP_CONTROLLER_DEVICE_VERBOSE_NAME = ('Hotspot', 'Hotspots')| type: | bool |
| default: | False |
Setting this to True will hide subnets and IPs generated using subnet division rules
from being displayed on the changelist view of Subnet and IP admin.
| type: | tuple |
| default: | (
('openwisp_controller.subnet_division.rule_types.device.DeviceSubnetDivisionRuleType', 'Device'),
('openwisp_controller.subnet_division.rule_types.vpn.VpnSubnetDivisionRuleType', 'VPN'),
) |
Available types for Subject Division Rule objects. For more information on how to write your own types, read "Custom Subnet Division Rule Types" section of this documentation
| type: | bool |
| default: | True |
Indicates whether the API for Openwisp Controller is enabled or not. To disable the API by default add OPENWISP_CONTROLLER_API = False in settings.py file.
| type: | str |
| default: | None |
Allows to specify backend URL for API requests, if the frontend is hosted separately.
| type: | list |
| default: | [] |
Allows to specify a list of tuples for adding commands as described in
'How to define custom commands" section.
| type: | dict |
| default: | {
# By default all commands are allowed
'__all__': '*',
} |
This setting controls the command types that are enabled on the system By default, all command types are enabled to all the organizations, but it's possible to disable a specific command for a specific organization as shown in the following example:
OPENWISP_CONTROLLER_ORGANIZATION_ENABLED_COMMANDS = {
    '__all__': '*',
    # Organization UUID: # Tuple of enabled commands
    '7448a190-6e65-42bf-b8ea-bb6603e593a5': ('reboot', 'change_password'),
}
In the example above, the organization with UUID 7448a190-6e65-42bf-b8ea-bb6603e593a5
will allow to send only commands of type reboot and change_password,
while all the other organizations will have all command types enabled.
| type: | dict |
| default: | {'type': 'object', 'properties': {}} |
Allows specifying JSONSchema used for validating meta-data of Device Group.
| type: | bool |
| default: | True |
By default, the system assumes that the address space of the management tunnel is shared among all the organizations using the system, that is, the system assumes there's only one management VPN, tunnel or other networking technology to reach the devices it controls.
When set to True, any device belonging to any
organization will never have the same management_ip as another device,
the latest device declaring the management IP will take the IP and any
other device who declared the same IP in the past will have the field
reset to empty state to avoid potential conflicts.
Set this to False if every organization has its dedicated management
tunnel with a dedicated address space that is reachable by the OpenWISP server.
| type: | bool |
| default: | True |
By default, only the management IP will be used to establish connection with the devices.
If the devices are connecting to your OpenWISP instance using a shared layer2
network, hence the OpenWSP server can reach the devices using the last_ip
field, you can set this to False.
| type: | dict |
| default: | {} |
OpenWISP Controller can figure out whether it should use the new OpenWrt syntax
for DSA interfaces (Distributed Switch Architecture) introduced in OpenWrt 21 by
reading the os field of the Device object. However, if the firmware you
are using has a custom firmware identifier, the system will not be able to figure
out whether it should use the new syntax and it will default to
OPENWISP_CONTROLLER_DSA_DEFAULT_FALLBACK.
If you want to make sure the system can parse your custom firmware identifier properly, you can follow the example below.
For the sake of the example, the OS identifier MyCustomFirmware 2.0
corresponds to OpenWrt 19.07, while MyCustomFirmware 2.1 corresponds to
OpenWrt 21.02. Configuring this setting as indicated below will allow
OpenWISP to supply the right syntax automatically.
Example:
OPENWISP_CONTROLLER_DSA_OS_MAPPING = {
    'netjsonconfig.OpenWrt': {
        # OpenWrt >=21.02 configuration syntax will be used for
        # these OS identifiers.
        '>=21.02': [r'MyCustomFirmware 2.1(.*)'],
        # OpenWrt <=21.02 configuration syntax will be used for
        # these OS identifiers.
        '<21.02': [r'MyCustomFirmware 2.0(.*)']
    }
}Note: The OS identifier should be a regular expression as shown in above example.
| type: | bool |
| default: | True |
The value of this setting decides whether to use DSA syntax (OpenWrt >=21 configuration syntax) if openwisp-controller fails to make that decision automatically.
| type: | bool |
| default: | False |
Allows to show a pie chart like the one in the screenshot.
Active groups are groups which have at least one device in them, while emtpy groups do not have any device assigned.
| type: | dict |
| default: | see below |
# default value of OPENWISP_CONTROLLER_API_TASK_RETRY_OPTIONS:

dict(
    max_retries=5, # total number of retries
    retry_backoff=True, # exponential backoff
    retry_backoff_max=600, # 10 minutes
    retry_jitter=True, # randomness into exponential backoff
)
This setting is utilized by background API tasks executed by ZeroTier VPN servers and ZeroTier VPN clients to handle recoverable HTTP status codes such as 429, 500, 502, 503, and 504. These tasks are retried with a maximum of 5 attempts with an exponential backoff and jitter, with a maximum delay of 10 minutes.
This feature ensures that ZeroTier Service API calls are resilient to recoverable failures, improving the reliability of the system.
For more information on these settings, you can refer to the the celery documentation regarding automatic retries for known errors.
Path: openwisp_controller.config.signals.config_modified
Arguments:
instance: instance ofConfigwhich got itsconfigmodifiedprevious_status: indicates the status of the config object before the signal was emittedaction: action which emitted the signal, can be any of the list below: -config_changed: the configuration of the config object was changed -related_template_changed: the configuration of a related template was changed -m2m_templates_changed: the assigned templates were changed (either templates were added, removed or their order was changed)
This signal is emitted every time the configuration of a device is modified.
It does not matter if Config.status is already modified, this signal will
be emitted anyway because it signals that the device configuration has changed.
This signal is used to trigger the update of the configuration on devices, when the push feature is enabled (requires Device credentials).
The signal is also emitted when one of the templates used by the device is modified or if the templates assigned to the device are changed.
This signal is not emitted when the device is created for the first time.
It is also not emitted when templates assigned to a config object are
cleared (post_clear m2m signal), this is necessary because
sortedm2m, the package
we use to implement ordered templates, uses the clear action to
reorder templates (m2m relationships are first cleared and then added back),
therefore we ignore post_clear to avoid emitting signals twice
(one for the clear action and one for the add action).
Please keep this in mind if you plan on using the clear method
of the m2m manager.
Path: openwisp_controller.config.signals.config_status_changed
Arguments:
instance: instance ofConfigwhich got itsstatuschanged
This signal is emitted only when the configuration status of a device has changed.
The signal is emitted also when the m2m template relationships of a config
object are changed, but only on post_add or post_remove actions,
post_clear is ignored for the same reason explained
in the previous section.
Path: openwisp_controller.config.signals.config_backend_changed
Arguments:
instance: instance ofConfigwhich got itsbackendchangedold_backend: the old backend of the config objectbackend: the new backend of the config object
It is not emitted when the device or config is created.
Path: openwisp_controller.config.signals.checksum_requested
Arguments:
instance: instance ofDevicefor which its configuration checksum has been requestedrequest: the HTTP request object
This signal is emitted when a device requests a checksum via the controller views.
The signal is emitted just before a successful response is returned, it is not sent if the response was not successful.
Path: openwisp_controller.config.signals.config_download_requested
Arguments:
instance: instance ofDevicefor which its configuration has been requested for downloadrequest: the HTTP request object
This signal is emitted when a device requests to download its configuration via the controller views.
The signal is emitted just before a successful response is returned, it is not sent if the response was not successful.
Path: openwisp_controller.connection.signals.is_working_changed
Arguments:
instance: instance ofDeviceConnectionis_working: value ofDeviceConnection.is_workingold_is_working: previous value ofDeviceConnection.is_working, eitherNone(for new connections),TrueorFalsefailure_reason: error message explaining reason for failure in establishing connectionold_failure_reason: previous value ofDeviceConnection.failure_reason
This signal is emitted every time DeviceConnection.is_working changes.
It is not triggered when the device is created for the first time.
Path: openwisp_controller.config.signals.management_ip_changed
Arguments:
instance: instance ofDevicemanagement_ip: value ofDevice.management_ipold_management_ip: previous value ofDevice.management_ip
This signal is emitted every time Device.management_ip changes.
It is not triggered when the device is created for the first time.
Path: openwisp_controller.config.signals.device_registered
Arguments:
instance: instance ofDevicewhich got registered.is_new: boolean, will beTruewhen the device is new,Falsewhen the device already exists (eg: a device which gets a factory reset will register again)
This signal is emitted when a device registers automatically through the controller HTTP API.
Path: openwisp_controller.config.signals.device_name_changed
Arguments:
instance: instance ofDevice.
The signal is emitted when the device name changes.
It is not emitted when the device is created.
Path: openwisp_controller.config.signals.device_group_changed
Arguments:
instance: instance ofDevice.group_id: primary key ofDeviceGroupofDeviceold_group_id: primary key of previousDeviceGroupofDevice
The signal is emitted when the device group changes.
It is not emitted when the device is created.
Path: openwisp_controller.config.signals.group_templates_changed
Arguments:
instance: instance ofDeviceGroup.templates: list ofTemplateobjects assigned toDeviceGroupold_templates: list ofTemplateobjects assigned earlier toDeviceGroup
The signal is emitted when the device group templates changes.
It is not emitted when the device is created.
Path: openwisp_controller.subnet_division.signals.subnet_provisioned
Arguments:
instance: instance ofVpnClient.provisioned: dictionary ofSubnetandIpAddressprovisioned,Noneif nothing is provisioned
The signal is emitted when subnets and IP addresses have been provisioned
for a VpnClient for a VPN server with a subnet with
subnet division rule.
Path: openwisp_controller.config.signals.vpn_server_modified
Arguments:
instance: instance ofVpn.
The signal is emitted when the VPN server is modified.
Path: openwisp_controller.config.signals.vpn_peers_changed
Arguments:
instance: instance ofVpn.
The signal is emitted when the peers of VPN server gets changed.
It is only emitted for Vpn object with WireGuard or
VXLAN over WireGuard backend.
One of the core values of the OpenWISP project is Software Reusability, for this reason openwisp-controller provides a set of base classes which can be imported, extended and reused to create derivative apps.
In order to implement your custom version of openwisp-controller, you need to perform the steps described in this section.
When in doubt, the code in the test project will serve you as source of truth: just replicate and adapt that code to get a basic derivative of openwisp-controller working.
If you want to add new users fields, please follow the tutorial to extend the
openwisp-users.
As an example, we have extended openwisp-users to sample_users app and
added a field social_security_number in the sample_users/models.py.
Premise: if you plan on using a customized version of this module, we suggest to start with it since the beginning, because migrating your data from the default module to your extended version may be time consuming.
Firstly, to get started you need to create a django project:
django-admin startproject mycontroller
Now, you need to do is to create some new django apps which will contain your custom version of openwisp-controller.
A django project is a collection of django apps. There are 4 django apps in the openwisp_controller project, namely config, pki, connection & geo. You'll need to create 4 apps in your project for each app in openwisp_controller.
A django app is nothing more than a
python package
(a directory of python scripts), in the following examples we'll call these django app
sample_config, sample_pki, sample_connection, sample_geo
& sample_subnet_division. but you can name it how you want:
django-admin startapp sample_config
django-admin startapp sample_pki
django-admin startapp sample_connection
django-admin startapp sample_geo
django-admin startapp sample_subnet_division
Keep in mind that the command mentioned above must be called from a directory which is available in your PYTHON_PATH so that you can then import the result into your project.
For more information about how to work with django projects and django apps, please refer to the django documentation.
Install (and add to the requirement of your project) openwisp-controller:
pip install openwisp-controller
Now you need to add mycontroller.sample_config,
mycontroller.sample_pki, mycontroller.sample_connection,
mycontroller.sample_geo & mycontroller.sample_subnet_division to
INSTALLED_APPS in your settings.py, ensuring also that
openwisp_controller.config, openwisp_controller.geo,
openwisp_controller.pki, openwisp_controller.connnection &
openwisp_controller.subnet_division have been removed:
# Remember: Order in INSTALLED_APPS is important.
INSTALLED_APPS = [
    # other django installed apps
    'openwisp_utils.admin_theme',
    'admin_auto_filters',
    # all-auth
    'django.contrib.sites',
    'allauth',
    'allauth.account',
    'allauth.socialaccount',
    # openwisp2 module
    # 'openwisp_controller.config', <-- comment out or delete this line
    # 'openwisp_controller.pki', <-- comment out or delete this line
    # 'openwisp_controller.geo', <-- comment out or delete this line
    # 'openwisp_controller.connection', <-- comment out or delete this line
    # 'openwisp_controller.subnet_division', <-- comment out or delete this line
    'mycontroller.sample_config',
    'mycontroller.sample_pki',
    'mycontroller.sample_geo',
    'mycontroller.sample_connection',
    'mycontroller.sample_subnet_division',
    'openwisp_users',
    # admin
    'django.contrib.admin',
    # other dependencies
    'sortedm2m',
    'reversion',
    'leaflet',
    # rest framework
    'rest_framework',
    'rest_framework_gis',
    # channels
    'channels',
    # django-import-export
    'import_export',
]
Substitute mycontroller, sample_config, sample_pki, sample_connection,
sample_geo & sample_subnet_division with the name you chose in step 1.
Add the following to your settings.py:
EXTENDED_APPS = (
    'django_x509',
    'django_loci',
    'openwisp_controller.config',
    'openwisp_controller.pki',
    'openwisp_controller.geo',
    'openwisp_controller.connection',
    'openwisp_controller.subnet_division',
)Add openwisp_utils.staticfiles.DependencyFinder to
STATICFILES_FINDERS in your settings.py:
STATICFILES_FINDERS = [
    'django.contrib.staticfiles.finders.FileSystemFinder',
    'django.contrib.staticfiles.finders.AppDirectoriesFinder',
    'openwisp_utils.staticfiles.DependencyFinder',
]Add openwisp_utils.loaders.DependencyLoader to TEMPLATES
in your settings.py, but ensure it comes before
django.template.loaders.app_directories.Loader:
TEMPLATES = [
    {
        'BACKEND': 'django.template.backends.django.DjangoTemplates',
        'OPTIONS': {
            'loaders': [
                'django.template.loaders.filesystem.Loader',
                'openwisp_utils.loaders.DependencyLoader',
                'django.template.loaders.app_directories.Loader',
            ],
            'context_processors': [
                'django.template.context_processors.debug',
                'django.template.context_processors.request',
                'django.contrib.auth.context_processors.auth',
                'django.contrib.messages.context_processors.messages',
                'openwisp_utils.admin_theme.context_processor.menu_items',
                'openwisp_notifications.context_processors.notification_api_settings',
            ],
        },
    }
]Ensure you are using one of the available geodjango backends, eg:
DATABASES = {
    'default': {
        'ENGINE': 'openwisp_utils.db.backends.spatialite',
        'NAME': 'openwisp-controller.db',
    }
}
For more information about GeoDjango, please refer to the geodjango documentation.
Create asgi.py in your project folder and add following lines in it:
from channels.auth import AuthMiddlewareStack
from channels.routing import ProtocolTypeRouter, URLRouter
from channels.security.websocket import AllowedHostsOriginValidator
from django.core.asgi import get_asgi_application

from openwisp_controller.routing import get_routes
# You can also add your routes like this
from my_app.routing import my_routes

application = ProtocolTypeRouter(
    {   "http": get_asgi_application(),
        'websocket': AllowedHostsOriginValidator(
            AuthMiddlewareStack(URLRouter(get_routes() + my_routes))
        )
    }
)Add the following settings to settings.py:
FORM_RENDERER = 'django.forms.renderers.TemplatesSetting'

ASGI_APPLICATION = 'my_project.asgi.application'
CHANNEL_LAYERS = {
    'default': {
        'BACKEND': 'channels.layers.InMemoryChannelLayer'
    },
}
For more information about FORM_RENDERER setting, please refer to the FORM_RENDERER documentation. For more information about ASGI_APPLICATION setting, please refer to the ASGI_APPLICATION documentation. For more information about CHANNEL_LAYERS setting, please refer to the CHANNEL_LAYERS documentation.
Please refer to the following files in the sample app of the test project:
- sample_config:
- sample_geo:
- sample_pki:
- sample_connection:
- sample_subnet_division:
You have to replicate and adapt that code in your project.
For more information regarding the concept of AppConfig please refer to
the "Applications" section in the django documentation.
For the purpose of showing an example, we added a simple "details" field to the models of the sample app in the test project.
- sample_config models
- sample_geo models
- sample_pki models
- sample_connection models
- sample_subnet_division
You can add fields in a similar way in your models.py file.
Note: for doubts regarding how to use, extend or develop models please refer to the "Models" section in the django documentation.
Once you have created the models, add the following to your settings.py:
# Setting models for swapper module
CONFIG_DEVICE_MODEL = 'sample_config.Device'
CONFIG_DEVICEGROUP_MODEL = 'sample_config.DeviceGroup'
CONFIG_CONFIG_MODEL = 'sample_config.Config'
CONFIG_TEMPLATETAG_MODEL = 'sample_config.TemplateTag'
CONFIG_TAGGEDTEMPLATE_MODEL = 'sample_config.TaggedTemplate'
CONFIG_TEMPLATE_MODEL = 'sample_config.Template'
CONFIG_VPN_MODEL = 'sample_config.Vpn'
CONFIG_VPNCLIENT_MODEL = 'sample_config.VpnClient'
CONFIG_ORGANIZATIONCONFIGSETTINGS_MODEL = 'sample_config.OrganizationConfigSettings'
CONFIG_ORGANIZATIONLIMITS_MODEL = 'sample_config.OrganizationLimits'
DJANGO_X509_CA_MODEL = 'sample_pki.Ca'
DJANGO_X509_CERT_MODEL = 'sample_pki.Cert'
GEO_LOCATION_MODEL = 'sample_geo.Location'
GEO_FLOORPLAN_MODEL = 'sample_geo.FloorPlan'
GEO_DEVICELOCATION_MODEL = 'sample_geo.DeviceLocation'
CONNECTION_CREDENTIALS_MODEL = 'sample_connection.Credentials'
CONNECTION_DEVICECONNECTION_MODEL = 'sample_connection.DeviceConnection'
CONNECTION_COMMAND_MODEL = 'sample_connection.Command'
SUBNET_DIVISION_SUBNETDIVISIONRULE_MODEL = 'sample_subnet_division.SubnetDivisionRule'
SUBNET_DIVISION_SUBNETDIVISIONINDEX_MODEL = 'sample_subnet_division.SubnetDivisionIndex'
Substitute sample_config, sample_pki, sample_connection,
sample_geo & sample_subnet_division with the name you chose in step 1.
Create database migrations:
./manage.py makemigrations
Now, to use the default administrator and operator user groups
like the used in the openwisp_controller module, you'll manually need to make a
migrations file which would look like:
- sample_config/migrations/0002_default_groups_permissions.py
- sample_geo/migrations/0002_default_group_permissions.py
- sample_pki/migrations/0002_default_group_permissions.py
- sample_connection/migrations/0002_default_group_permissions.py
- sample_subnet_division/migrations/0002_default_group_permissions.py
Create database migrations:
./manage.py migrate
For more information, refer to the "Migrations" section in the django documentation.
Refer to the admin.py file of the sample app.
- sample_config admin.py.
- sample_geo admin.py.
- sample_pki admin.py.
- sample_connection admin.py.
- sample_subnet_division admin.py.
To introduce changes to the admin, you can do it in two main ways which are described below.
Note: for more information regarding how the django admin works, or how it can be customized, please refer to "The django admin site" section in the django documentation.
If the changes you need to add are relatively small, you can resort to monkey patching.
For example:
from openwisp_controller.config.admin import (
    DeviceAdmin,
    DeviceGroupAdmin,
    TemplateAdmin,
    VpnAdmin,
)

# DeviceAdmin.fields += ['example'] <-- monkey patching examplefrom openwisp_controller.connection.admin import CredentialsAdmin
# CredentialsAdmin.fields += ['example'] <-- monkey patching examplefrom openwisp_controller.geo.admin import FloorPlanAdmin, LocationAdmin
# FloorPlanAdmin.fields += ['example'] <-- monkey patching examplefrom openwisp_controller.pki.admin import CaAdmin, CertAdmin
# CaAdmin.fields += ['example'] <-- monkey patching examplefrom openwisp_controller.subnet_division.admin import SubnetDivisionRuleInlineAdmin
# SubnetDivisionRuleInlineAdmin.fields += ['example'] <-- monkey patching exampleIf you need to introduce significant changes and/or you don't want to resort to monkey patching, you can proceed as follows:
from django.contrib import admin
from openwisp_controller.config.admin import (
    DeviceAdmin as BaseDeviceAdmin,
    TemplateAdmin as BaseTemplateAdmin,
    VpnAdmin as BaseVpnAdmin,
    DeviceGroupAdmin as BaseDeviceGroupAdmin,
from swapper import load_model

Vpn = load_model('openwisp_controller', 'Vpn')
Device = load_model('openwisp_controller', 'Device')
DeviceGroup = load_model('openwisp_controller', 'DeviceGroup')
Template = load_model('openwisp_controller', 'Template')

admin.site.unregister(Vpn)
admin.site.unregister(Device)
admin.site.unregister(DeviceGroup)
admin.site.unregister(Template)

@admin.register(Vpn)
class VpnAdmin(BaseVpnAdmin):
    # add your changes here

@admin.register(Device)
class DeviceAdmin(BaseDeviceAdmin):
    # add your changes here

@admin.register(DeviceGroup)
class DeviceGroupAdmin(BaseDeviceGroupAdmin):
    # add your changes here

@admin.register(Template)
class TemplateAdmin(BaseTemplateAdmin):
# add your changes herefrom openwisp_controller.connection.admin import CredentialsAdmin as BaseCredentialsAdmin
from django.contrib import admin
from swapper import load_model
Credentials = load_model('openwisp_controller', 'Credentials')
admin.site.unregister(Credentials)
@admin.register(Device)
class CredentialsAdmin(BaseCredentialsAdmin):
# add your changes herefrom openwisp_controller.geo.admin import (
FloorPlanAdmin as BaseFloorPlanAdmin,
LocationAdmin as BaseLocationAdmin
)
from django.contrib import admin
from swapper import load_model
Location = load_model('openwisp_controller', 'Location')
FloorPlan = load_model('openwisp_controller', 'FloorPlan')
admin.site.unregister(FloorPlan)
admin.site.unregister(Location)
@admin.register(FloorPlan)
class FloorPlanAdmin(BaseFloorPlanAdmin):
# add your changes here
@admin.register(Location)
class LocationAdmin(BaseLocationAdmin):
# add your changes herefrom openwisp_controller.geo.admin import (
CaAdmin as BaseCaAdmin,
CertAdmin as BaseCertAdmin
)
from django.contrib import admin
from swapper import load_model
Ca = load_model('openwisp_controller', 'Ca')
Cert = load_model('openwisp_controller', 'Cert')
admin.site.unregister(Ca)
admin.site.unregister(Cert)
@admin.register(Ca)
class CaAdmin(BaseCaAdmin):
# add your changes here
@admin.register(Cert)
class CertAdmin(BaseCertAdmin):
# add your changes herefrom openwisp_controller.subnet_division.admin import (
SubnetAdmin as BaseSubnetAdmin,
IpAddressAdmin as BaseIpAddressAdmin,
SubnetDivisionRuleInlineAdmin as BaseSubnetDivisionRuleInlineAdmin,
)
from django.contrib import admin
from swapper import load_model
Subnet = load_model('openwisp_ipam', 'Subnet')
IpAddress = load_model('openwisp_ipam', 'IpAddress')
SubnetDivisionRule = load_model('subnet_division', 'SubnetDivisionRule')
admin.site.unregister(Subnet)
admin.site.unregister(IpAddress)
admin.site.unregister(SubnetDivisionRule)
@admin.register(Subnet)
class SubnetAdmin(BaseSubnetAdmin):
# add your changes here
@admin.register(IpAddress)
class IpAddressAdmin(BaseIpAddressAdmin):
# add your changes here
@admin.register(SubnetDivisionRule)
class SubnetDivisionRuleInlineAdmin(BaseSubnetDivisionRuleInlineAdmin):
# add your changes herefrom django.contrib import admin
from openwisp_controller.config.utils import get_controller_urls
from openwisp_controller.geo.utils import get_geo_urls
# from .sample_config import views as config_views
# from .sample_geo import views as geo_views
urlpatterns = [
# ... other urls in your project ...
# Use only when changing controller API views (discussed below)
# url(r'^controller/', include((get_controller_urls(config_views), 'controller'), namespace='controller'))
# Use only when changing geo API views (discussed below)
# url(r'^geo/', include((get_geo_urls(geo_views), 'geo'), namespace='geo')),
# openwisp-controller urls
url(r'', include(('openwisp_controller.config.urls', 'config'), namespace='config')),
url(r'', include('openwisp_controller.urls')),
]For more information about URL configuration in django, please refer to the "URL dispatcher" section in the django documentation.
When developing a custom application based on this module, it's a good idea to import and run the base tests too, so that you can be sure the changes you're introducing are not breaking some of the existing features of openwisp-controller.
In case you need to add breaking changes, you can overwrite the tests defined in the base classes to test your own behavior.
See the tests in sample_app to find out how to do this.
- project common tests.py
- sample_config tests.py
- sample_geo tests.py
- sample_geo pytest.py
- sample_pki tests.py
- sample_connection tests.py
- sample_subnet_division tests.py
For running the tests, you need to copy fixtures as well:
- Change sample_config to your config app's name in sample_config fixtures and paste it in the
sample_config/fixtures/directory.
You can then run tests with:
# the --parallel flag is optional
./manage.py test --parallel mycontroller
Substitute mycontroller with the name you chose in step 1.
For more information about automated tests in django, please refer to "Testing in Django".
The following steps are not required and are intended for more advanced customization.
Extending the sample_config/views.py
is required only when you want to make changes in the controller API,
Remember to change config_views location in urls.py in point 11 for extending views.
For more information about django views, please refer to the views section in the django documentation.
Extending the sample_geo/views.py
is required only when you want to make changes in the geo API,
Remember to change geo_views location in urls.py in point 11 for extending views.
For more information about django views, please refer to the views section in the django documentation.
It is possible to create your own subnet division rule types. The rule type determines when subnets and IPs will be provisioned and when they will be destroyed.
You can create your custom rule types by extending
openwisp_controller.subnet_division.rule_types.base.BaseSubnetDivisionRuleType.
Below is an example to create a subnet division rule type that will provision subnets and IPs when a new device is created and will delete them upon deletion for that device.
# In mycontroller/sample_subnet_division/rules_types/custom.py

from django.db.models.signals import post_delete, post_save
from swapper import load_model

from openwisp_controller.subnet_division.rule_types.base import (
    BaseSubnetDivisionRuleType,
)

Device = load_model('config', 'Device')

class CustomRuleType(BaseSubnetDivisionRuleType):
    # The signal on which provisioning should be triggered
    provision_signal = post_save
    # The sender of the provision_signal
    provision_sender = Device
    # Dispatch UID for connecting provision_signal to provision_receiver
    provision_dispatch_uid = 'some_unique_identifier_string'

    # The signal on which deletion should be triggered
    destroyer_signal = post_delete
    # The sender of the destroyer_signal
    destroyer_sender = Device
    # Dispatch UID for connecting destroyer_signal to destroyer_receiver
    destroyer_dispatch_uid = 'another_unique_identifier_string'

    # Attribute path to organization_id
    # Example 1: If organization_id is direct attribute of provision_signal
    #            sender instance, then
    #   organization_id_path = 'organization_id'
    # Example 2: If organization_id is indirect attribute of provision signal
    #            sender instance, then
    #   organization_id_path = 'some_attribute.another_intermediate.organization_id'
    organization_id_path = 'organization_id'

    # Similar to organization_id_path but for the required subnet attribute
    subnet_path = 'subnet'

    # An intermediate method through which you can specify conditions for provisions
    @classmethod
    def should_create_subnets_ips(cls, instance, **kwargs):
        # Using "post_save" provision_signal, the rule should be only
        # triggered when a new object is created.
        return kwargs['created']

    # You can define logic to trigger provisioning for existing objects
    # using following classmethod. By default, BaseSubnetDivisionRuleType
    # performs no operation for existing objects.
    @classmethod
    def provision_for_existing_objects(cls, rule_obj):
        for device in Device.objects.filter(
            organization=rule_obj.organization
        ):
            cls.provision_receiver(device, created=True)
After creating a class for your custom rule type, you will need to set OPENWISP_CONTROLLER_SUBNET_DIVISION_TYPES setting as follows:
OPENWISP_CONTROLLER_SUBNET_DIVISION_TYPES = (                                                                                           |
   ('openwisp_controller.subnet_division.rule_types.vpn.VpnSubnetDivisionRuleType', 'VPN'),
   ('openwisp_controller.subnet_division.rule_types.device.DeviceSubnetDivisionRuleType', 'Device'),
   ('mycontroller.sample_subnet_division.rules_types.custom.CustomRuleType', 'Custom Rule'),
)You can define your own notification types using
register_notification_type function from OpenWISP Notifications.
For more information, see the relevant documentation section about registering notification types in openwisp-notifications.
Once a new notification type is registered, you have to use the "notify" signal provided in openwisp-notifications to send notifications for this type.
Please refer to the OpenWISP contributing guidelines.
See CHANGES.
See LICENSE.


