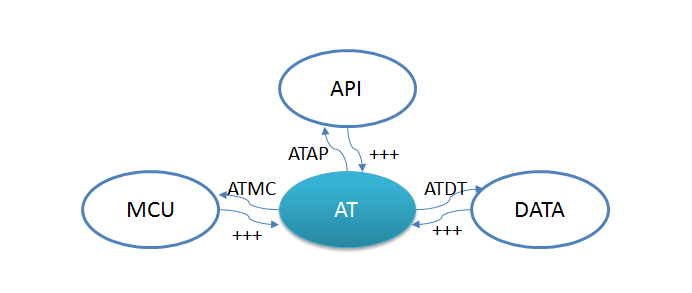
MeshBee® is a 2.4 GHz wireless zigbee RF module. It use microchip JN516x from NXP that enables several different flavors of standards-based zigbee mesh networking. Our released firmware fully supports Zigbee Pro stack. You can use MeshBee® in three different ways: Master Mode: the factory firmware warps the complicated Zigbee stack operation into a few easy to use serial commands(AT commands). Slave Mode: for a complex mesh network, a host application can send API frames to the MeshBee® that contain short address and payload information instead of using AT command. Transparent Mode: MeshBee® can also work as a transparent serial communication node that can be part of a simple point-to-point connection. When operating in this mode, the modules act as a serial line replacement - all UART data received through UART1 is directly send to a specified remote node.
Mesh Bee will bring you lots of fun.
The AT commands that MeshBee radios use for interactive are a descendant of hayes command set. Every AT command starts with “AT”, and followed by two characters that indicate which command is being executed, then by some optional configuration values.
Syntax for sending AT commands:

AT+ASCII+Parameter

Example:
       ATDA0000
In this mode,other MCU connects to MeshBee and sends API frame through UART.
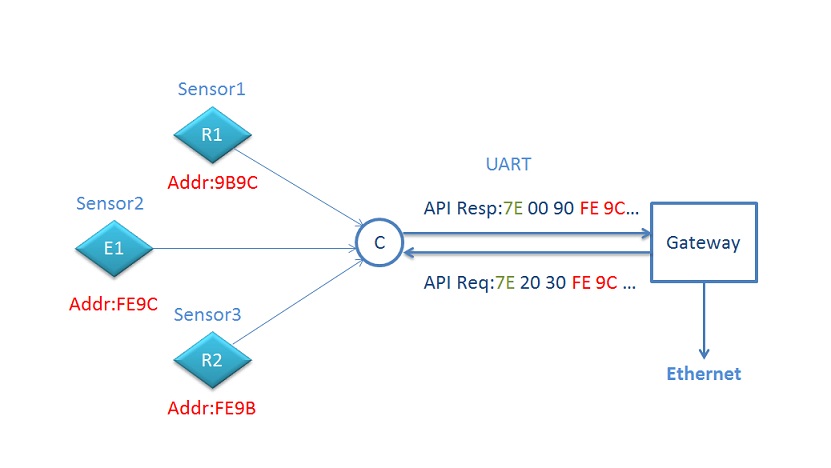
API is simplfy a set of standard interfaces created to allow other MCU to interact with MeshBee.For our purposes,API supports local control and remote control.For instance,PC can send an API frame to Coordinator A, A received this frame,and execute sleeping command. The most important thing to note is that APIs are specifically engineered to enable MeshBee to talk efficiently to other MCU.
Every transfer of information requires a protocol. We defined the API frame format like this(structure defined in firmware_at_api.h):
Each frame has a start delimiter for sync. Different types of frames contain different types of data structures,the Api Identifier tells us what type of API frame we are looking at. Cmd name indicate which command you want to execute.
User can use our released library(On going) to package API frame.
In API mode,user's MCU which connected to the Coordinator, has the ability to access every node in network.
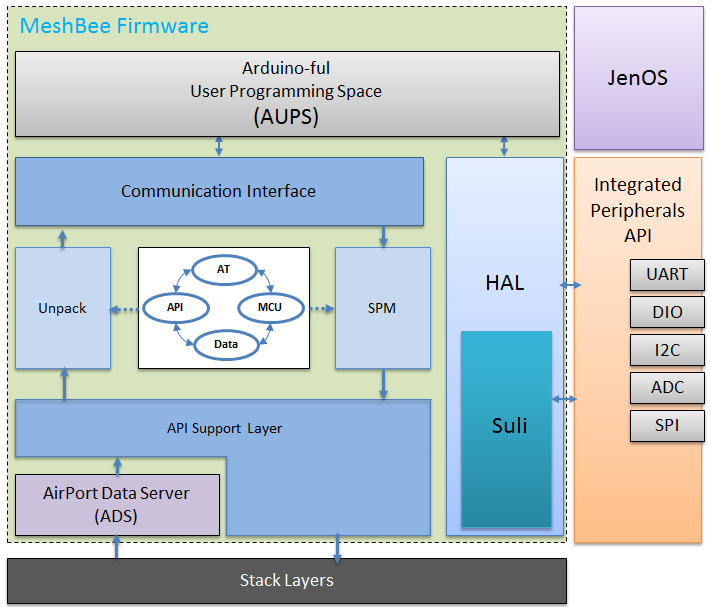
The most exciting thing to announce is that an arduino-ful user programming space(AUPS),by which you can treat MeshBee as a wireless arduino, was provided.You can develop a stand-alone application in AUPS. The user application consists of two arduino-style functions at the top level: setup & loop, which act just like arduino's.
If you want to use it,only three simple steps are required:
 (1) WRITE YOUR OWN CODE JUST LIKE ARDUINO STYLE
     arduino_setup()
     {
       /* Initialize your own system */
     }

     arduino_loop()
     {
       /* This loop will be execute */
     }

 (2) In AT mode, using command ATMF to set the delay time between each arduino_loop

 (3) In AT mode, input command ATMC
     MeshBee will enter MCU mode(arduino-ful MCU)
     then,arduino loop will be executed cyclically.
     When you exist MCU mode,this loop will be
     suspended.
We introduced Suli too. Suli means Seeed Unified Library Interface. We'll switch to Suli for our future module driver/library release. That means our suli-compatible library/driver will adapt all platforms that suli supporting. Please glance over https://github.com/Seeed-Studio/Suli for more information.
A micro-RPC framework was implemented in MeshBee.
Each system in peer-to-peer mode can make an RPC.
RPC Commands are in the format: "//
This is an example of the RPC command required to turn on a LED on MeshBee:
/myled/write HIGH
(1) How to deploy your own PRC method?
Open /include/rpc_usr.h at first.
* 1. Add a set of methods which is divided into groups according to their objName to a methodEntity.
* 2. Add one obj(something like air_conditioner, or light_switch) to rpcEntity[]
* 3. Implement these Rpc method.
- Install the SDK toolchain;
- Download this repo and put all files into a directory A (example);
- Move directory A to $TOOLCHAIN_INSTALL_DIR/Application;
- Open eclipse of the toolchain, "File" -> "Import".
- Or you can build this repo by command line: Open "Jennic Bash Shell" -> change directory to "A/build", then execute "./build.sh" to build all targets.
The details are descripted at this wiki page, please launch there and find your need.
Contributing to this software is warmly welcomed. You can do this basically by forking, committing modifications and then pulling requests (follow the links above for operating guide). Adding change log and your contact into file header is encouraged.
Thanks for your contribution.
Want to know more about our firmware development process? Please check out this link: https://github.com/Seeed-Studio/Mesh_Bee/tree/v1.0.4_preview.
Besides, you can post on our discussion group at here and share your ideas or find some solutions for your problem.
This software is written by Jack Shao ([email protected]) & Oliver Wang ([email protected]) for seeed studio
and is licensed under The MIT License. Check License.txt for more information.
Seeed Studio is an open hardware facilitation company based in Shenzhen, China.
Benefiting from local manufacture power and convenient global logistic system,
we integrate resources to serve new era of innovation. Seeed also works with
global distributors and partners to push open hardware movement.


