- AGB-001
- AGS-101 screen (Reproduction screens are availible online)
- Ribbon adapter
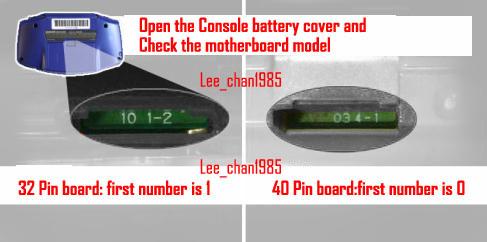
You can tell the model by taking off the battery cover and looking at the motherboard model
- 32 pin: 1st number is "1"
- 40 pin: 1st number is "0"
You can tell the type by the ribbon circuitry or connector color (source)
- A: uniform widths, white connector
- AB/B: differing widths, brown connector
- 32/40 pin: Must purchase one that matches your AGB-001 motherboard
- Solderless: Will not be as bright unless you add a wire
- Solder required: Must connect P1 to left leg of DA1
- Switch: Allows switching between high/low through the battery compartment. Requires slight shell modification. Physical switch so it keeps setting across device reboots.
- 5 level w/ key combo: Allows switching through 5 brightness levels with Select + L, but boots with lowest setting every time.
- 32 pin + Type-A: Perfect (source)
- 32 pin + Type-AB: Washed out and dim (source)
- 40 pin + Type-A: Washed out and bright (tested). Possibly connect 103 to GND to fix (source) (Newer ribbon adapters do not have this issue)
- 40 pin + Type-AB: Perfect (tested)
- Remove rubber grommet and backing from front and back of AGS-101 screen or else it won't fit
- Must modify shell to fit new screen
- Can adjust screen using potentiometer through hole behind sticker on the back
- If buying a new shell with hardware, use the hardware that came with the shell since the hardware might be different and the shell is designed for them
- Insulate the pins on the cartridge reader with kapton tape, to prevent them from shorting with your screen
