-
Notifications
You must be signed in to change notification settings - Fork 40
Setting up developer environment
This is the version that you should be using.
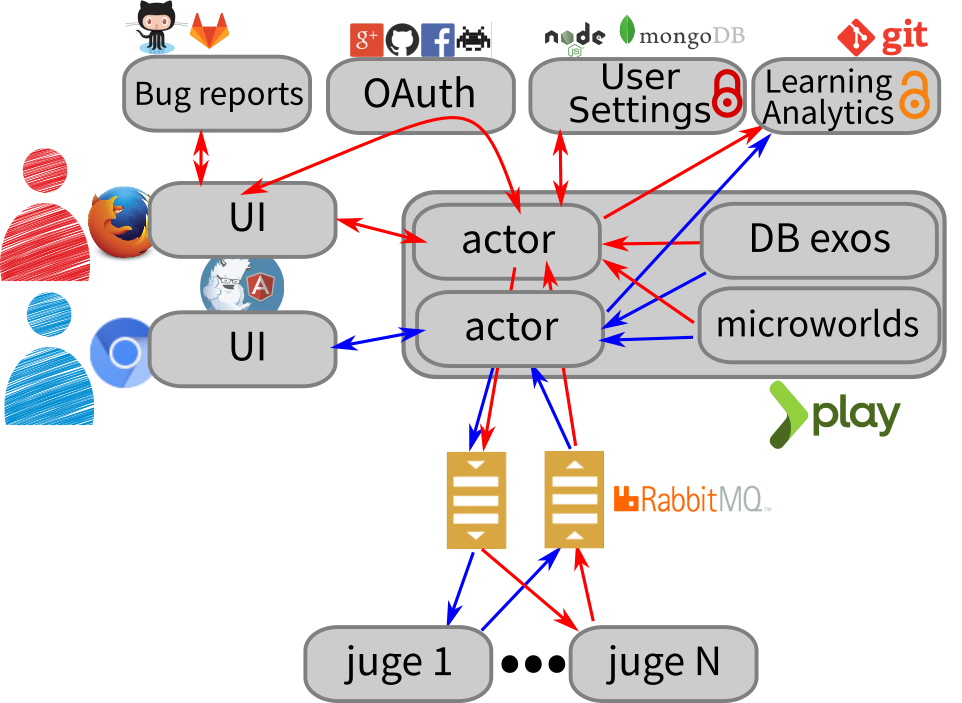
When the learner types the code in the web browser, the javascript of the page sends the code to the server using a websocket and waits for the answer.
In production, we need to sandbox the student code execution, to
protect the application server from the code submitted by the
students. Otherwise, a simple System.exit(0) is enough to shut
the application server down. But these execution sandboxes (called the
PLM Judges) are optional: if
you run you own local server, it directly executes the source code
that you provide. When executing locally, we assume that you trust
yourself. When using this separated execution mode, the server will
forward the learner code to the judge through a RabbitMQ messaging
queue, so that you can easily plug several judges to deal with your
workload.

But if you only want to run the PLM for yourself, you can save this extra complexity, and have the Play server execute the student code internally. PLM will still act as web server, but with almost no dependency and absolutely no extra complexity.
Once the code gets executed (either on the server directly or sandboxed by a judge), it produces the animation steps. They are snapshots of the world state that should be presented graphically to the learner. The server then returns these json strings back to the javascript that does all the animation magic.
TODO: for now, the animation steps are not snapshots, but operations that must be applied on a world to get the next one. We plan to change the code according to the description on this page.
TODO: despite what is depicted, it is currently impossible to send bug reports using GitLab. This is something we plan to add at some point.
Install the Play Framework. That's the application framework that we use. It bases the whole thing. Play! requires Java version 8.
If you want to use or modify the account features (logging to the infrastructure), you need to install MongoDB. But you don't need these if you want to develop or adapt the pedagogical content or the core features.
You may want to install a separate Judge, to use the PLM in production or to improve on the Judge itself. The instructions are rather cumbersome for now, and we will extend the instructions here once it clarifies.
git clone [email protected]:BuggleInc/webPLM.git
This will give you a ready to use installation.
Once you cloned the webPLM repository, you can run the application in
production mode by running activator start (from its root
directory).
If you prefer to run it in debug mode (where it reloads everything
automatically when files change), use activator ~run instead.
Remove the ~ so that it only reloads when you reload the page in the
browser.
To access to your application, browse to http://localhost:9000 If
you want to start it on port 8080 instead, use activator "~run 8080"
The project is composed of several sub-projects that are not really nicely combined right now. The instructions are a bit different depending on what you want to do.
If you want to modify the server itself or the client part (the javascript), just hack the code in the webPLM repository.
If you want to change the pedagogical content (missions and challenges, ie exercises and lessons), the universes or the core of the library, it gets a bit tricky because theses bits don't live in the webPLM repository, but in the main PLM one instead. So you need to checkout the PLM, do your changes, recompile a jarfile, and copy it back in the webPLM source tree:
git clone [email protected]:BuggleInc/PLM.git
cd PLM
(edit the files you want)
ant dist
cp dist/plm-2.6*jar path_to_webPLM/lib
(restart webPLM if not run in debug mode)
While you are at it, please consider starring the PLM ;)
Please note that you should not work on that code base anymore, but try to improve the web version instead.
If you have a Github account, consider forking the repo in case you want to send us your work via pull requests. If not, simply clone our git repository, for example by typing
git clone [email protected]:BuggleInc/PLM.git --branch javaUI
on the command line. But this is somehow cumbersome as you will have to deal with the git interface by yourself. In particular, when you change something, you have to extract the diff by yourself and send it per email.
The PLM is written in several programming language, so you need to install all the java, python and scala nature in eclipse to get it working. The scala nature (that you can get from the Scala plugin for eclipse) is very important as it is used to compile most of the project. There is no need to install the C nature as eclipse never gets to compile these files (the PLM does it itself on need).
One trick is that we insist on using the libraries that are located in lib/ instead of the ones on disk. This is because the lib/ ones are distributed in the generated archives, so we want to check that the code actually works with these versions. Eclipse sometimes tries to be clever here and use "better" versions of the libraries, so please inspect any change that you commit to the .classpath and .project files very carefully.
To test your code from eclipse, simply launch the classes containing a main as Java application.
The distributed archives are generated from the ant file (build.xml). It used to work from eclipse too, but not anymore. If you know how to fix it, we'd love to hear from you.